


Example 01
Let’s begin with the C coding of pointers in the Ubuntu 20.04 Linux system. Login from your Ubuntu system and open the command shell. You may use the “Ctrl+Alt+T” to open it in 10 seconds. After opening it, create a C language file using the “touch” keyword in the shell with the name of a file to be created. So, we have tried the below instruction and got successful.
![]()
Now open this file in an editor to start writing code. Use the below-stated command to open it.
![]()
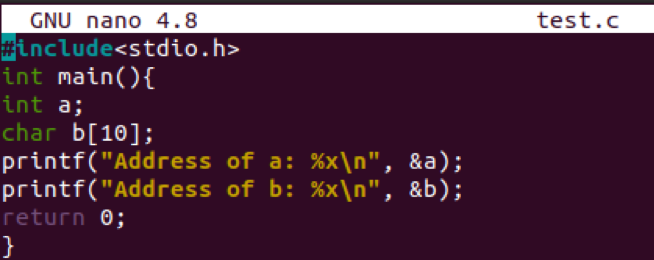
In our first example, we have declared one integer type variable “a” and a character type array variable “b” in the main method of C code. We have used the “&” sign with both variables in the print statement to check the memory addresses. Save the code to proceed further via “Ctrl+S”. Quit the editor using the “Ctrl+X” key.
Compilation of the code is necessary to execute it. So, make sure to have any C compiler configured on Ubuntu 20.04 Linux system. We have been using the “gcc” compiler to compile our code as below.
![]()
Upon executing the C code, we have got the memory addresses of both the variables, as shown in the output screenshot below.

Example 02
Now our second example will be used to see that how pointers work. As you’ll be aware, each variable seems to be a volatile memory with its location that can be reached using the ampersand (&) symbol, representing a memory address. Consider the following example, outputs the variables’ addresses.
![]()
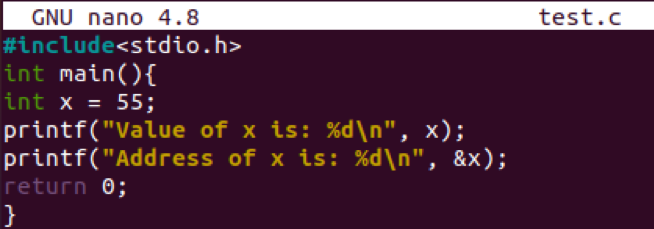
We have declared a variable “x” and assign it a value “55” in the main method. In the next consecutive line, we have printed the value of a variable “x”. After that, we have been printing the memory location of our variable “x”. In the end, the main method closes after return 0 expressions.
Compilation of the code is needed before the execution. Without it, code will never work. Hence, the below command works perfectly in this case.
![]()
Now the execution of the file is shown below. The first line shows the value of a variable “x,” and the second line shows its memory location.

Example 03
If you don’t have a precise location to give to one of the pointer variables, it is usually a good idea to allocate a NULL value. This would be done when the variable is declared. A null reference is a pointer that has been allocated the value NULL. The NULL pointer is indeed a zero-valued variable found in various standard libraries. Take a look at the succeeding program. Open the file once more.
![]()
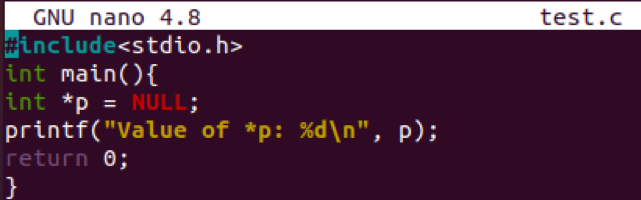
Write out the code shown below in your opened file. After initializing the main function, we have declared a variable pointer “p” with a NULL value. We have printed the pointer p then, or you can say you printed its address in the print expression. After the return 0 statement, the main method closes. Since the computer system has protected memory at location 0, many OSs do not allow applications to access storage at a certain location. The memory location 0 contains a particular meaning; it indicates that now the pointer is not meant to point to something like a reachable memory address. However, a pointer containing the null (zero) assessment should not point to not anything after default.
Compile the C code of this example once.
![]()
After the compilation, it needs to be executed via the below command. The output shows the value of a NULL pointer as 0.

Example 04
There seem to be a couple of key operations that we could use pointers to perform regularly. (a) We create a pointer variable, (b) then allocate a variable’s location to a pointer, and (c) then ultimately retrieve the worth at the pointer mutable’s location. These are accomplished by using the unary symbol *, which provides the variable’s value only at the location provided by its argument. Those operations are used in the below scenario. Open the same file to update our C code for pointers.
![]()
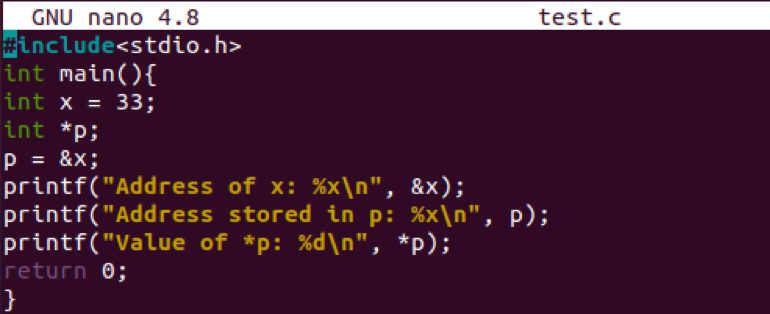
Add the below same script in your C code file. We have used an integer “x” with value 33 in this code and an integer type pointer “p”. After that, we have stored the address of variable “x” in the pointer “p” via the “&” binding operator. Now the first print statement has been printing the address of variable “x”. The other print statement has been printing the address of a pointer, and the last print statement shows the value of a pointer stored in it. Return 0 statement has been used before the closing of the main method. Save your code data and quit the file using the shortcuts “Ctrl+S” and “Ctrl+X” consecutively.
Now the code has been saved, compile it using a C code compiler, e.g., gcc.
![]()
The execution of this C code shows us the memory address of variable x, the memory address of pointer p, and the value of pointer “p” that has been referenced in it using variable “x”.

Example 05
Similar to the prior example, let’s see another example of the pointer in C. Open your code file yet again to add a new code to it.
![]()
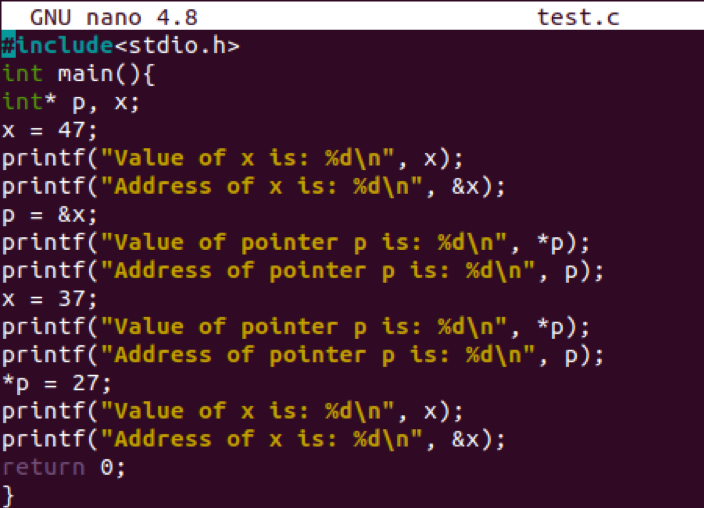
We have declared two integer type pointer variables, “p” and “x,” in the main method. Then we have assigned the value “47” to variable “x” and printed that value of “x” and its address using the printf expression right after declaration. After this, we have assigned the address of variable”x” to pointer “p”. The print statements have been used to show the value of pointer “p” and its address. Then we have assigned a new value to variable “x” and printed the value and address of pointer “p”. After that, we have assigned a new value to pointer “p” and displayed its value and address.
Compile code again.
![]()
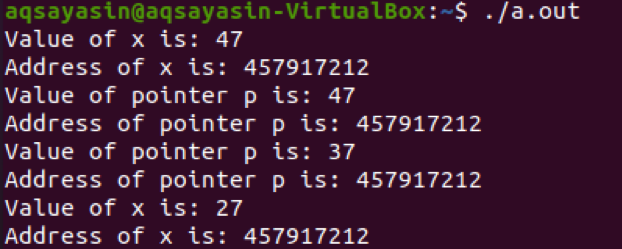
Execution of this code gives us the updated values of both variables “x” and “p” after the alteration. Meanwhile, the memory address for both variables remained the same.
Conclusion
This article covered how to declare and initialize a pointer and reference or bind it with another variable. Hope this tutorial would be easy for you to understand and implement.
from Linux Hint https://ift.tt/3zFSpfd


0 Comments