In C#, LinkedList is one in which elements are stored in non-contiguous locations. It is a linear data structure. A linked list’s elements communicate with one another via pointers. In simple words, it consists of nodes, each node comprises a data field and a link to the next node in the list. In doubly_linked list, every node in the list points forward to the following node and backward to the preceding node. It also allows for quick insertion and removal of items. It is defined in System.Collections.Generic namespace.
How to Create a LinkedList in C#
For creating LinkedList in C#, we have three constructors.
LinkedList (): For creating an empty instance of LinkedList class, we use the “LinkedList()” constructor.
LinkedList(IEnumerable): For creating an instance of the LinkedList class containing elements that are copied from the IEnumerable, we use the “LinkedList(IEnumerable)” constructor. It has enough space to hold the number of objects being copied.
LinkedList(SerializationInfo, StreamingContext): It is used to create an instance that is serialized using the SerialiationInfo and the StreamingContext parameter.
Example 1
We write the code which is given in this example and save this file with any name. We will use the extension “.cs” for saving this file.
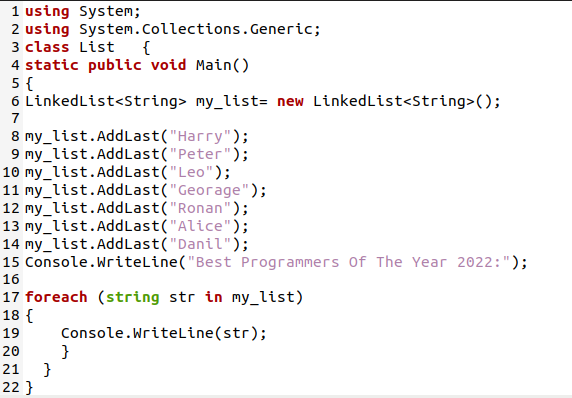
In the above code, we use the keyword “using” in the first line for including namespaces. Now, we have the “using System.Collections.Generic” namespace. After that, we have a class; “List” is the class name. After that, there is a “Main()” method. The Main method describes what the class does when it is run and creates additional objects and variables. It is the program’s starting point, and it runs without even creating a class object. In curly braces, we have “LinkedList<String>” which is used to create a LinkedList of datatype string.
After this, we use “my_list.AddLast()” to add nodes to LinkedList. The new node will add at the last of LinkList by using the “AddLast” method. The method “my_list.AddLast(“Harry”)” will add the name “Harry” to the LinkedList. By using this method, we add “Peter”, “Leo”, “George”, “Ronan”, “Alice” and “Danil” to the LinkedList. After this, we have the “Console.WriteLine” keyword which is used for output. Anything written in brackets will print on the screen.
Now, we use the “foreach” loop to access the elements of LinkedList. By using, “foreach(string str in my_list)”, we will access all the strings which are present in “my_list” LinkedList. After this, we use “Console.WriteLine(str)” which displays all the strings in this program. Now, we will close all the curly braces.
Compiling a C# Program in Ubuntu 20.04
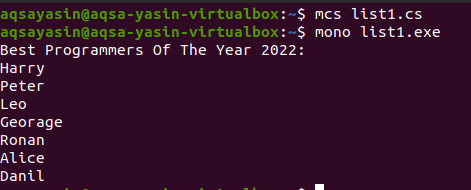
For compiling the above program, we will use the following command.
![]()
Here in this code, “list1.cs” is the name of the file which we want to compile and “mcs” is the Mono compiler of C#. Type this command and press ENTER. The “.exe” file will be generated for us.
Execution of C# Program in Ubuntu 20.04
Type the command given below for the execution of this C# program, which is compiled in the above step.
![]()
The “mono” command runs a Mono program that is compiled. The “mono list1.exe” can be used to execute the “list1.exe” program. After execution, the following list is displayed on the screen as shown below.
Example 2: For Checking the Value
Here in this code, we have searched whether the value that is given is in LinkedList or not. If the value or string is present in LinkedList, then it will return true which means the string or value is present in it. The following code is used for this.
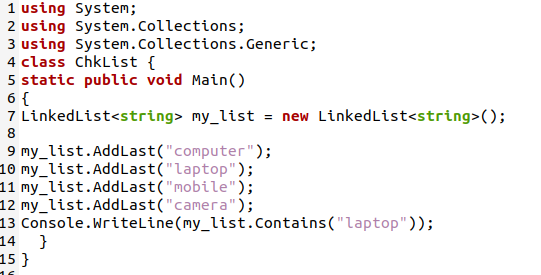
In this code, “using system” is used to add namespaces. After this, we have “using System.Collections” which means we use collection classes. These classes are used for many purposes. They will create object collections. Then, we have “using System.Collections.Generic” which is used for the namespace in the program. Then we have a class named “ChkList”. After class, we put curly braces, and inside the curly braces we define, the “Main()” function.
Inside the “Main()” to create a LinkedList we have a “LinkedList class” and string is used for a string data type which is used for string input. Now for adding nodes we use “my_list.AddLast()”. We can add “computer” in LinkedList when we use my_list.AddLast(“computer”). By using the same line, we add “laptop”, “mobile”, and “camera” to LinkedList. We discussed all these elements in the above example in detail.
After this, we write “Console.WriteLine(my_list.Contains(“laptop”))” when this line is executed it will check whether this LinkedList contains “laptop” or not. It will return “true” if the LinkedList contains “laptop”.
For compilation and execution of this above program, we write the commands given below on the terminal.

Here in this output, we see that it returns the true result which means the LinkedList contains “laptop”.
Example 3: For Removing the Node
Here, we will explain another example in which we delete or remove the first value from the LinkedList and will get the count of the values.
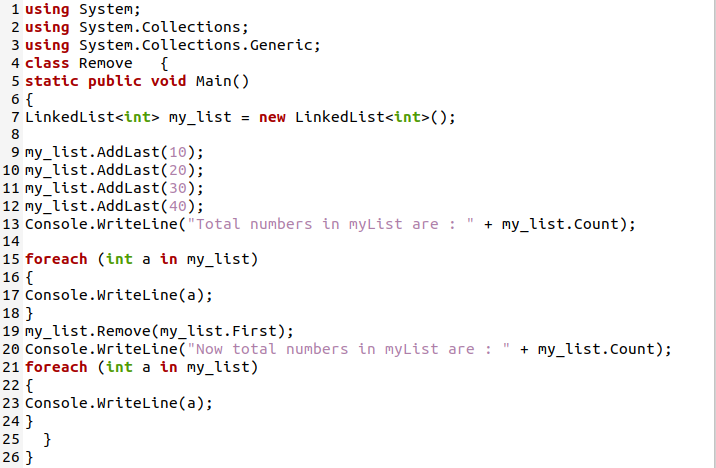
In this code, we use the keyword “using” which we explained in the first example. Then, we are using the “using System.Collections.Generic” namespace which we have discussed in detail in our previous example. After that, we have a class named “Remove”. Then, the “Main()” function is formed. The “string[ ] args ” signifies the arguments of this function. After “Main()”, we generate a LinkedList of an integer by using “LinkedList<int>”. Then, we add different nodes with the help of “my_list.AddLast()”.
When we write “my_list.AddLast(20)”, it will add a node 20 in LinkedList. Now, we add “10,20,30,40” by using the same method. To get the output of the count of nodes, we use “Console.WriteLine” and count the nodes by using “my_list.Count” and will print the count of nodes before removing any node. Then we use the “foreach” loop which will display the nodes on LinkedList.
In “foreach (int I in my_list)”, “int” represents the integer values in “my_list”. In curly braces, we will print the values of “i” by using “Console.WriteLine(i)”. Now, we remove the first node by using “my_list.Remove(my_list.First)” and then use “my_list.Count” to get the count of nodes in our program and display it with the help of “Console.WriteLine”. After this, we use the “foreach” loop as discussed above for printing all the nodes after removing the first node. After completing the above code, save this file.
Now, we will get the output by writing the command given below in the image. First, we compile the program and then execute it.
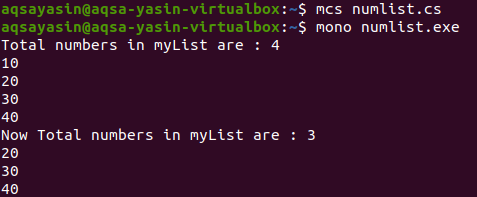
In this output, we see that it prints the count of the nodes and then displays all the nodes in a list. After that, it removes the first node and prints the count of the remaining nodes, and then displays the remaining nodes.
Conclusion
In this article, we have learned that a linked list is a group of nodes and each node contains a data element and a pointer ahead which points to the address of memory of the upcoming node. Because we cannot get the elements casually as we get in arrays so passing through it is refined. By comparison with arrays, insertion-deletion actions are cheap. Also, we studied a lot about LinkedList by using different examples which are very helpful for users in the future.
from https://ift.tt/KbXHmiZ


0 Comments