In programming, testing a condition is unavoidable. We will frequently encounter circumstances in which we must test conditions (whether true or untrue) to manage the execution of a program. As we know “else if” is a decision-making or conditional statement. For controlling the flow of the C# program, we have many decision-making or conditional statements.
In this tutorial, we will study different else if statements like if, else if, nested if, etc.
1. C# If Statement
In the if statement, we have a condition and a block of code. In the case of a true condition, the following code will execute. If the condition is false then the code below will not be executed.
{
//execute the code for the true condition.
}
If Statement in C# in Ubuntu 20.04 Using a Text Editor
For writing the C# program, you have to use the text editor present on your system. Now write the code which is given below in the text editor and save it by the name of your own choice with the extension of “.cs”.

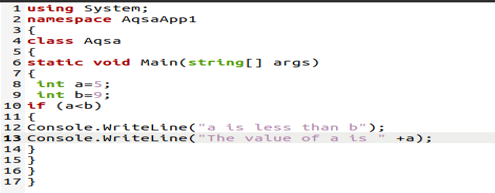
The “using System” is the first statement in the C# program. For including the namespaces, we use the keyword “using”. The keyword “namespace” is used to organize our code. It is also a container of classes. Here, namespace “AqsaApp1” is the project name that contains different classes.
Now for declaring class, we have the keyword “class”. Here in this code “Aqsa” is the class name. Then, the “main()” function is created for the C# program. The “string[ ] args ” represents the arguments of this function. The “main()” function is used to execute all the code which is written in curly braces. After the” main()” function, we initialize two integers named “int a, int b” and assign the value “5” to “a” and “9” to “b”. Now we use the “if statement”.
In the if statement, we put the Boolean condition “a<b” if this condition is true and “a is less than b” then it will execute the code given below otherwise not. In curly braces, we have “Console.WriteLine”. The “Console” is the class of system. The keyword “Console.WriteLine” is used for output. After this code, we saved the file with the extension .cs.
How to Compile a C# Program in Ubuntu 20.04
For the compilation of the C# program, we will use different commands.
![]()
Here “aqsa1.cs” is the name of the file which we want to compile and “mcs” is the Mono compiler of C#. After writing this command, press ENTER. It will generate “.exe” file for us.
How to Execute a C# Program in Ubuntu 20.04
Now we have another command for the execution of our C# program.
![]()
The “mono” command runs a compiled Mono program. To execute the compiled CIL bytecode, mono uses a just-in-time compiler (JIT). The mono aqsa1.exe can be used to execute the aqsa.exe program. Upon execution, the following message is displayed on the terminal as shown below.

2. C# Else If Statement
In C#, we use an optional else statement. After an if statement, we use multiple other if statements with the if statement. When the condition of “if” is false, it will be executed. As a result, only one of the if or else if statements can be performed at the same time.
{
// performed these statements if condition1 is true
}
else if (cond 2)
{
// performed these statements if condition 2 is true
}
else if (cond 3)
{
// performed these statements if condition 3 is true
}
.
.
.
else
{
// performed these statements if all above conditions are false
}
Else If Statement in C# in Ubuntu 20.04 Using a Text Editor
Here we have an illustration of the else if statement. Write the given code on the text editor.

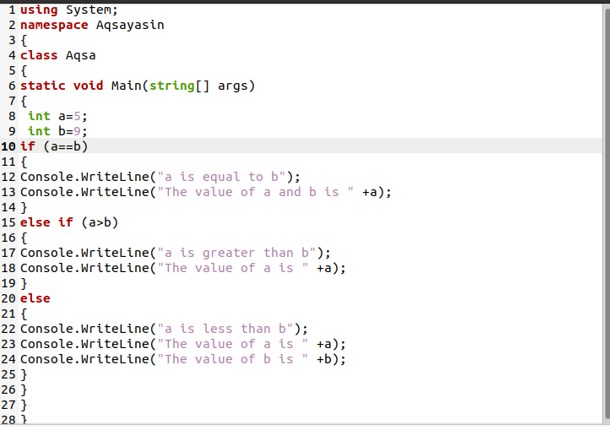
The keyword “using” is used to include the namespaces as we discussed above. Our code is the same as we discussed in the above example. Here, the project name is “Aqsa”, and the namespace is “Aqsayasin”. Now for declaring a class, we have a keyword called “class”. In the above code class name is “Aqsa”. Then, for the C# program, we constructed the “main()” method. The arguments of this function are denoted by the notation “string[] args.” Essentially, the “main()” function executes all of the code enclosed in curly brackets.
Now in this example, we initialize two numbers named “int a, int b” and assign values to them. We assign “5” to “a” and “9” to “b” after the “main()” method. Then we have different “else if” conditions. In this, if the first “if” condition is true, the code written below will be executed. If the condition is false, then it will ignore the code given below and move to the next condition which is the “else if” condition. If the given “else if” condition is true, then the code below will execute otherwise it will ignore this and move to the “else” condition. If the “else” condition is true, it will execute the last code otherwise it will terminate the program.
To compile the program, we used the following command:
![]()
Also, this program can be executed with the same command as in the first example but the file name is changed. The command for execution is given below:
![]()
After the compilation and execution, we will get the output which is shown below in the image.

Else If Statement (by getting input from the user using string)
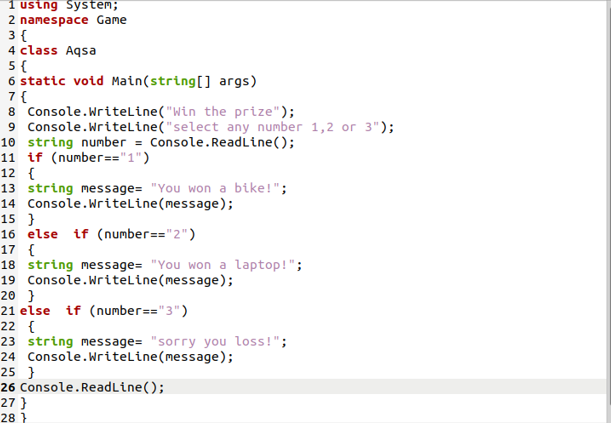
We have another example of an “else if statement” in which we prompted the user to give input. Also, we used a string in this code.

This code is the same as we discussed in the above example. The new elements we used in this code are “string” and “ConsoleReadLine()”. The keyword string is used to make a string variable. The “ConsoleReadLine()” is used for getting the input from the user.
The output is as shown below.

Else If Statement Using ‘AND’ Operator
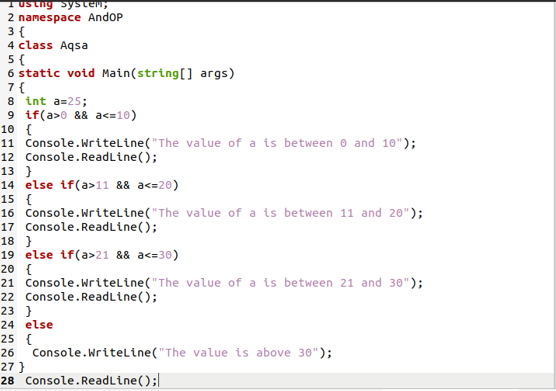
In this illustration, the “AND” operator is used. The code is given below:

In this code, we used different keywords such as “using”, “namespace”, “class”, and “int”. We discussed all these keywords in the first example. The “AND” operator is new in this code. Combining two exp “AND” operators are used — Exp 1 and Exp 2.
In this code, “AND” operator checks the value of “a”. If the value is greater than 0 and less than equal to 10, then it will execute the code written below in curly braces, otherwise it will ignore these lines and move to the next condition. Then it will repeat the same steps till the last condition. When all conditions are false, then the else part is executed.
For output, we will use the same commands which are discussed in the above examples.

Conclusion
In this article, we learned to use if, else if, else statements. It is used to add a conditional expression to our program. We have seen how these statements might be useful for running specific code blocks based on a condition. As we create more sophisticated C# programs, this will be very helpful for users.
from https://ift.tt/AGRjb4t


0 Comments