


Change Password:
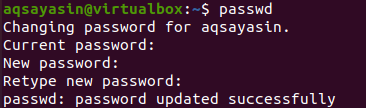
Firstly, the “passwd” command will be utilized in the main terminal shell without using the “sudo” command. It will change the current account we have been working on, i.e., “aqsayasin”. So, after using the “passwd” command, we can change the password of this account. Firstly, you need to enter your current password, and then you will be asked to add a new password. You have to re-enter the new password and press Enter. The password update successful message is being displayed on the screen as per the attached image.
If we use the same passwd command for another user, i.e., “Linux”, we will not be able to change the password of that particular user without loging in as sudo as per the below output.
![]()
To change the password for another user through the current user terminal, we need to log in as a sudo using the “sudo” command with the “su” keyword as shown below. It will ask for the sudo user password to continue the login. We have added the password as below.

Now, we can change the password of any user in the sudo terminal. So, we have tried the passwd command to change the password for the user “Linux” as shown below. It will not ask for your current user password. So, we have added the new password two times, and the password is being updated for the “Linux” user as per the below output.

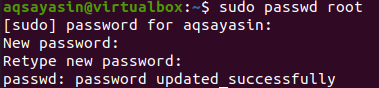
You can not even change the password for the root account of the Ubuntu 20.04 system. You can try the passwd command with “root” user as shown below.
![]()
To add or change the password for the root user via the passwd command, you have to use the “sudo” keyword within this command, as shown in the image. Now, you have to add the password for the “aqsayasin” user then you will be able to change the root password. You have to type the new password and retype it again. The password will be updated then.
Check Status:
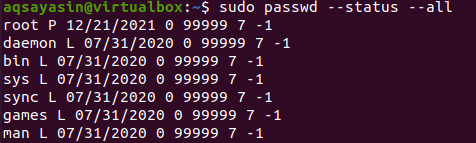
Let’s check the status of a current user “aqsayasin” using the status command. The “—status” and “-s” keywords will be used for that. You will see the user’s password details about them. The “P” option shows the account “aqsayasin” is unlocked right now. The “date” shows the day when a password has been last updated. The 0 shows the minimum days amongst password updates, the 99999 is the number of days for password validity, the 7 is the warning days for password expiration, and the -1 shows the number of days for account inactivity after password expiration.

Let’s check the status for the status of a Linux user password. You will see the same details.

Your system may have one or more system accounts that are not even seen in the login panel. You can also see the information regarding those user accounts via the same passwd command with the “status” keyword while using the “—all” flag in it. Now, you have data about all users.
Delete Password:
If you want to delete the current login user’s password, you need to use the passwd command with the “—delete” flag and the user account name while utilizing the sudo rights. You will see that the output screen will show us that the password expiry information has been changed now.
![]()
Also, you can utilize the “—d” option as well to delete the current password for any user. For example, we have done it for the “Linux” account.
![]()
Expire Password:
Let’s make our system password expire before its expiring date. For that, we need to utilize the passwd command with the “—expire” flag using the username, i.e., “Linux”. After using this command, the password for a particular user will be expired as shown.
![]()
After checking the information, you will find the date from the 1970 year, i.e., expired and old.
![]()
To make the current account password expire, you need to use the same command with a current username. We can also utilize the “—e” flag.
![]()
After checking the information regarding the current user, we will see the warning and password change panel as shown. Now, you have to add the current password and add a new password to reset it. Then, it will automatically show you the current status of an account.

Deactivate Account:
The passwd command can be utilized with the “—inactive” flag while using the number of days to deactivate the particular account if a password is expired for mentioned days. For example, we have used 10 days in our command. It illustrates that the account will be deactivated after 10 days of password expiration. You can see the data has been updated in the status query.

Update Minimum Days For Password Update:
In the above example, you can see the 0 digits shows the minimum number of days required to change your password again, i.e., no restriction. We changed it to 100. You cannot change your password for the next 100 days minimum. The update has been displayed.

Update Maximum Days For Password Validation:
The “—maxdays” flag will be used within the “passwd” command to specify the maximum number of days for your password to be valid. After that, it will be automatically expired, and you have to change it. We have updated it with 100.

Update Warning Days For Password Expiration Warning:
You can also set the warning days to display waning after the password expiration. It will be displayed before a certain number of days. So, we have set it to 10.
![]()
The updated data has been displayed below.
![]()
Lock/Unlock Account:
You can also lock or unlock a particular account. Let’s lock the account first using the passwd command via the “—lock” flag. Now, no one will be able to log in from the particular user account via the password.
![]()
The “L” shows that the “Linux” account is currently locked.
![]()
To unlock the current account, you need to use the “—unlock” flag for the “Linux” account using the “passwd” command. Now, you can log in via the password.
![]()
After the unlock, you will see the “P” in the information of a particular user.
![]()
Conclusion:
Finally, we have covered all the possible ways to use the “passwd” command in the terminal of the Ubuntu 20.04 system. We have looked at each example, starting from the password change to lock and unlock the user account. We have seen how to change the different password settings for the specified users via the passwd command. We extremely hope that this article will prove itself a bonus to Linux users.
from https://ift.tt/3nAu07t


0 Comments