In Linux, groups are the entities used for the organization and management of numerous user accounts simultaneously. Groups offer easy and quick administration of user accounts. Various Linux users have many different task assignments and roles. The key point of groups is the identification of a set of rights like write, read or execute access for a specified resource that can be mutually shared among the group users.
In this guide, we will discuss how many types of groups exist in the Ubuntu Linux system. Moreover, we will also elaborate on how to add a Ubuntu user into the groups.
Groups in Ubuntu Linux
Ubuntu and many other Linux distributions have two different types of groups:
- Primary group
- Secondary group
Primary Group
As soon as the user creates the file, it is automatically added to the primary group. The primary group is similar to the user name. All primary group details about the users are saved in a file that is located at ‘/etc/passwd’.
Secondary Group
Secondary groups are significant for granting particular file access to the group members. They are made to administer individual files along with software applications. Group members inherit write, read and execute rights for that group.
Every user on a Linux system is a member of one primary group and in addition, this user can be included in none or more secondary groups. Users can be added as members of the group by merely root or users with sudo privilege.
Create a Group in Ubuntu
You can create a new group on the Ubuntu system by running the following command:
In the above command, the ‘test_group’ is the name of the new group.

Adding an Existing User to a Group in Ubuntu
To add a user that is already created on your Ubuntu machine and you want to assign a group to this existing user, run the following command to do this:
For example, the ‘sam-pc’ is existing on our system and we want to add this user to a group ‘test_group’. To do so, change the above command into the following form:
![]()
When you execute the above ‘usermod’ command, it does not show you any output on the terminal screen on successful command execution. That means the user is added to a group successfully. When you add a user into the group, you need to append the ‘-a’ option. If you do not add the ‘-a’ option, the user will be removed or eliminated from any groups not listed after the option ‘-G’.
Create a New User and Add in Multiple Groups in Ubuntu
If you want to create a new user and add into a group by using just single command, use the ‘useradd’ command to add a new user and then add this user into the primary and secondary group by using the following syntax:
In the following example, we have created a new user with the name ‘Samrina’ and assigned multiple groups. The primary group is ‘users’ and the secondary groups are ‘sudo, sam-pc’.
Add an Existing Ubuntu User into Multiple Groups
To add an existing user into the multiple groups in the Ubuntu system, you can use the ‘usermod’ command followed by option ‘-G’, enter the name o the groups which will be separated by commas as follows:
Let’s take an example, to add an existing user ‘Samrina’ into multiple groups such as ‘sam-pc, sudo, sambashare’, run the below-mentioned command:
Change User’s Primary Group in Ubuntu
By using the `usermode` command followed by the option `-g`, you can change the user’s primary group.
In the following example, we changed the primary group of a user ‘Samrina’ to ‘test_group’ by running the below-mentioned command:
Display User’s Groups Details in Ubuntu
You can display a complete user’s group information, such as a user belonging to which group. To perform this task, the following id command is used followed by the username:
For example, we want to display all group information of a user ‘sam-pc’.

As you can observe in the above output, the user belongs to different groups. Here, the user’s primary group is ‘users’ and it is also a member of other supplementary groups that are ‘sudo, sam-pc, and sambashare’ which are shown in the above screenshot.
When you use the ‘group’ command followed by the username, it displays the user’s supplementary groups.

If you will not pass a username to the ‘group’ command, in this case, it will display the current logged in user’s group information as follows:
Display All Ubuntu System Groups
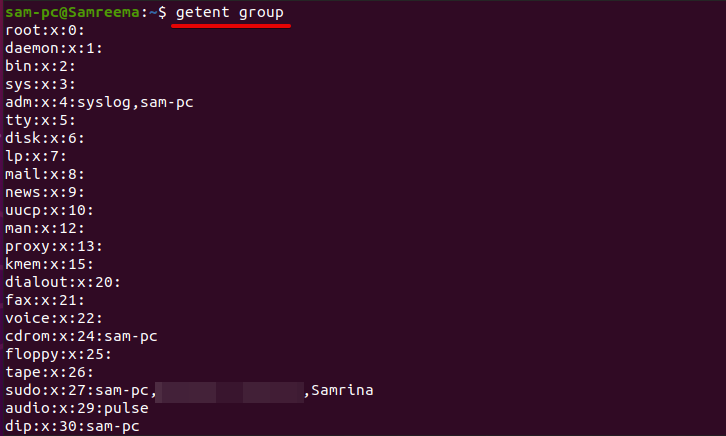
To view all system groups that are running on your Ubuntu system, use the following ‘getent’ command:

The above command displays all system groups on the terminal screen and also shows you the user’s account belongs to which group.
Remove an Existing User from a Group in Ubuntu
To remove or eliminate a user from a group, execute the command ‘gpasswd’ followed by the option ‘-d’ on the terminal.
For example, we want to remove a user ‘Samrina’ from the ‘sambashare’ group, change the above command into the following form to do this task:
Delete a Group in Ubuntu
Use the following command ‘groupdel’ along with ‘groupname’, to delete an existing user’s group.
Conclusion
We demonstrated in this guide how to add a user to a group in Ubuntu 20.04 system. We have seen how groups facilitate us to manage all system accounts and users. We implemented various commands for a better understanding of the users and groups. The above command can also execute on other Linux distributions. Let us know in case of any confusion related to this article. Thanks!
from https://ift.tt/30NeKvp


0 Comments