


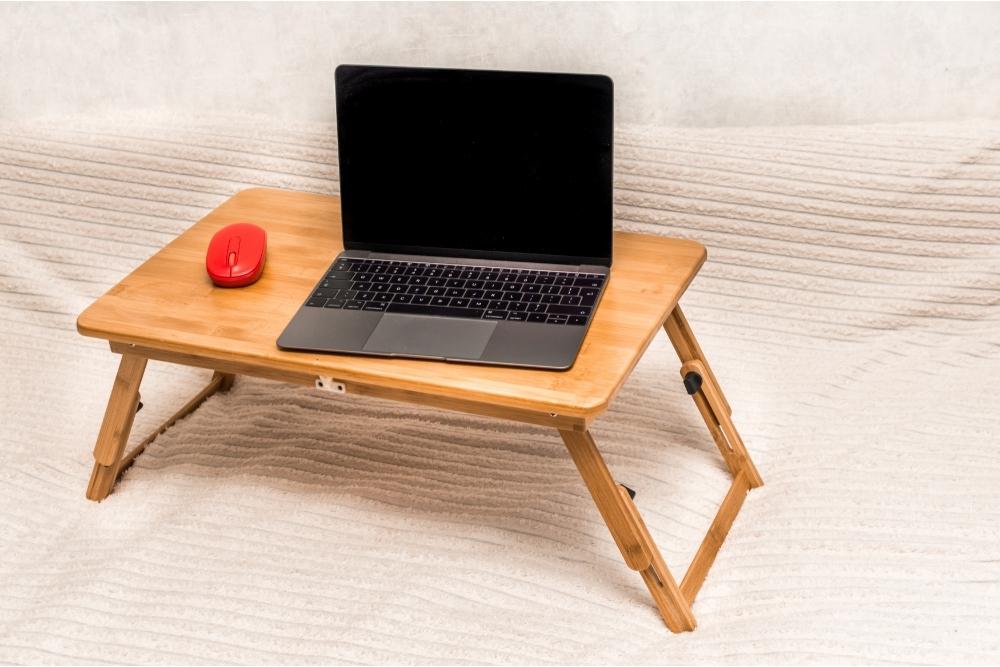
There’s nothing better than sitting in bed and using your laptop, especially when you are surfing the internet or relaxing with your favourite film. However, this does not mean that using your laptop in bed is a simple task, as it can be difficult to look at your screen and keep your neck in a comfortable position.
So how can you combat this problem? By using a laptop bed stand.
Not only are laptop bed stands handy for using your laptop in bed, but they also help to make the process more comfortable and accessible. The only setback is that some laptop stands can be expensive and it can be difficult to find the perfect stand for your computer.
So if you want to know how you can save money by making your own laptop bed stand, then you have come to the right place.
In the following article, we are going to teach you how to make your own laptop bed stand, while also explaining the various tools and materials you will need to finish the job.
So if you are ready to make bad necks and uncomfortable binge-watching a thing of the past, then we have everything you need to get started…
Why Make A Laptop Bed Stand?
Using your laptop in bed can be an uncomfortable experience, especially when it comes to watching videos or doing work. This is why many experts recommend using a laptop bed stand, as this can make the process more comfortable and reduce the risk of lasting damage to your neck and back.
However, some laptop stands can be very expensive, while others may not be suitable for the model of laptop that you own. For this reason, some people prefer to make their own laptop stands from scratch, which can be done using cheap materials and tools found in your garage.
So if you are interested in making your own laptop bed stand, everything you need to know has been outlined in the following sections:
What You Will Need
Before we can teach you how to make your own laptop bed stand, you must first understand the tools and materials needed to get the job done.
Although this build does not require any unique or professional tools, you will still need to purchase the materials from your local hardware store. However, this does not mean that you have to spend a fortune on the best supplies available.
So if you want to make your own laptop bed stand, here’s everything you need to get started:
Materials
- Wood strip (0.75 in x 1.75 in x 6 ft)
- Hardboard or MDF board
- Knobs attached to screw bolts (x2)
- Large washers (x2)
- Socket anchors (x2)
- Small wood screws (x2)
- Medium wood screws (x4)
- Small nails (x4)
- Plastic checker piece (x4 – optional)
Tools
- Circular buzzsaw (or hand saw
- Power drill
- Dremel with a sander (optional)
Special NoteThis laptop bed stand can be made in 30 minutes when made correctly. You also will not need many measurements, especially if the pieces line up. However, we do recommend following basic safety precautions to reduce the risk of harm.
Now that you understand what you will need, let’s take a look at how you can make your own laptop bed stand from scratch…
Step One: Make The Legs
When it comes to constructing your laptop bed stand, you will need to begin the process by making the legs. Just follow these instructions to get started:
- To begin, take your wood strip (0.75 in x 1.75 in x 6 ft) and cut it into quarters using a circular buzzsaw or hand saw. If your measurements are correct, this should produce 4 sticks, each measuring 1.5 ft in height.
- When you have completed the first step, take your circular saw and cut off the edges on one side of each stick. This will help to round off the corners so that they don’t stick out. Alternatively, it is also possible to use your dremel to smooth the edges once the sticks have been cut.
- Place two sticks on top of each other and drill a hole that is large enough for your screws and socket anchors. Repeat this process until all four sticks have been drilled, then make sure that the holes are aligned. For the best results, make sure to use the drill in a vertical position.
Special Note
When it comes to making the legs, you can determine their length by measuring your arms and stomach, as this will help to make your laptop stand comfortable and suitable for your needs.
Step Two: Make The Joints
For the next step, you will need to make the joints for the legs using the previously mentioned hardware. Just follow these instructions and you will have everything you need to finish the job:
- Take your socket anchors and place them into the drilled holes, then insert a small nail into the socket anchor’s hole to secure it in place.
- Once you have done this, take a knob and place it on a washer before feeding it through the opposite side of the anchor.
- Repeat this process until you have created two working leg joints for your laptop stand.
Step Three: Make The Tray
After you have finished building the legs, you will need to make the central tray for the stand, which can be accomplished using the following steps:
- Take your hardboard and cut off an 11-inch strip using your circular buzzsaw.
- When you have done this, take the remaining board and cut down the width until it measures around 20 inches.
- Cut two more pieces of hardboard and line them up on one side of the tray, then nail them down to produce the lip.
- Take your small screws and use them to secure the lip in place.
Special Note
When completing this step, you do not need to use precise measurements, as you can use your laptop to determine the length and width of the tray.
However, you will need to make sure that you leave room for the lip and that the width is not too small – after all, the tray will need to fit over your legs in bed.
Step Four: Attach The Legs
When you have completed the previous step, you should be left with two working leg joints and a tray. So the next step is to attach the legs to the stand:
- Take your leg joints and line them up with the sides of the tray, making sure to mark the spot where you will drill the hole.
- Using your power drill, drill a hole on top of the tray for the leg and then insert a screw before repeating the process on the bottom.
- Repeat this process on the other side until both legs have been successfully attached to the tray.
- Tighten any loose screws and your laptop bed stand will be ready for use!
from https://ift.tt/3ci5uBV


0 Comments