


When network administrators manage the network of systems and watch the packets flow to manage the network, it becomes difficult to understand and know where the packets are coming and going. To identify a system, we can use Universal Identifiers, IP address tracking, or Hostname.
The hostname is the most convenient and most easy-to-remember way for identifying a system. Let’s dig more into the Hostnames. What is a Hostname, what are the types of Hostname, how can we change a hostname, and what are the rules to keep in mind while changing a hostname?
What is a Hostname?
A hostname, in simple words, is the name of the machine or server on the network. It is also used as a computer identifier, so it is better to have a unique hostname, and it can easily be distinguished from other systems on the network.
Simultaneously, instead of naming a machine for identification in the network, the hostname is set to ease the user or network administrator. By looking at the IP address of a system, it becomes harsh to identify the right machine while hostname makes this hassle easy.
We can set the hostname in a private network as well as in the public networks. However, in public networks, the hostnames should be combined with the domain name. For example,
The host name is often got confused with the domain name, but they are different. In the above-provided example, the server name is the hostname, while the example is the domain name, and lastly, com is the TLD(Top Level Domain).
The combination of hostname and domain name is known as the FQDN(Fully Qualified Domain Names). In the public networks, setting a Fully Qualified Domain Name is a must. Otherwise, in private networks, setting a simple hostname is fine.
After understanding the core concepts of hostname, let’s learn and understand the types of Hostname.
Types of Hostname
There are basically three types of hostnames.
- Static hostname
- Pretty hostname
- Transient hostname
Static Hostname
The most basic and traditional hostname can be set by the user and used to identify itself among other server machines in the network. This static hostname is stored in the /etc/hostname file.
Pretty Hostname
As it is in its name, this hostname is used for presenting a more user-friendly hostname to the user because it is free from UTF-8 hostname and allows non-standard characters.
Transient Hostname
The Linux kernel maintains this transient hostname, and it can be changed after a reboot by the DNS server or DHCP.
Rules to name a Hostname
While setting up and naming a hostname, there are some rules that we have to keep in mind:
- The hostname can only contain letters(a-z) and digits(0-9).
- The only hyphen(-) and dot(.) can be used as special characters in the name of the hostname.
- The hostname must be 2-63 characters long.
- The hostname’s starting and ending letter must be a letter or digit.
- The hostname is case insensitive.
Alright, after understanding hostname, its types, and rules to name a hostname, let’s get into some practical stuff and learn to show and change the hostname using several methods in CentOS 8.
Show Current Hostname
The current hostname of the system in any Linux-based Operating system can be seen using the hostname, or hostnamectl commands can be used.
To show the hostname using the hostname command, executed the command typed below:

Alternatively, you can also use the hostnamectl command for getting the details about the hostname:
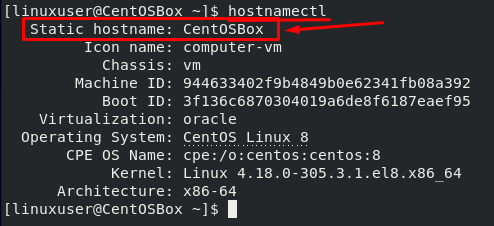
Since the hostnamectl command gets all the information from the /etc/hostname file and shows it as an output, we can directly get the hostname information from the /etc/hostname file.

Method 1: Change Hostname using hostnamectl command
We can easily change the Hostname using the hostnamectl command. The syntax for changing the hostname in CentOS using the hostnamectl command is as follows:
![]()
Just provide the hostname that you want to set after the set-hostname in the above command, and the hostname will be changed after a reboot.

Since we discussed three types of hostname, let’s learn how to change static, pretty, and transient hostname in CentOS 8 Operating system.
Change Static Hostname
To set a static hostname in CentOS 8 OS, you can use the hostnamectl command, and you just need to add –static flag followed the new hostname as shown below:

In the above command, provide the hostname of your desire at the place of new-hostname, and do not forget to mention the –static flag to set the static hostname on the CentOS 8 Operating system.
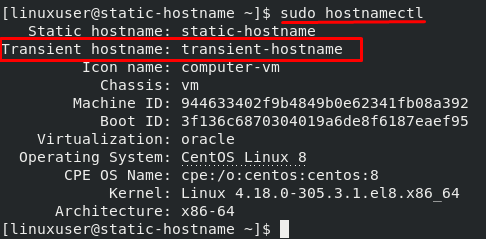
Change Transient Hostname
For setting up or changing the transient hostname of the CentOS 8 Operating system, use the –transient flag after writing the hostname in the hostname ctl command as shown below:

To view the transient hostname, type the command:
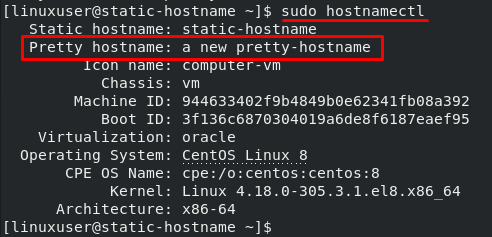
Change Pretty Hostname
The pretty hostname can be changed by using the –transient flag in the hostname ctl command, and the demonstration of using the –transient flag is shown in the below command:

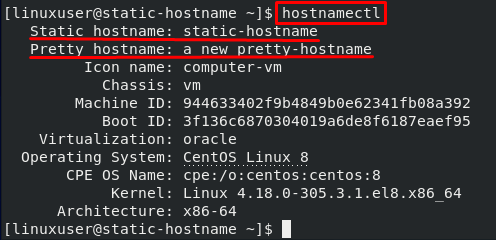
Verify and apply the new Hostname
To verify the changed hostname, execute the hostnamectl command:
To apply the hostname changes, rebooting a system is required. To reboot:
Method 2: Change Hostname by Editing /etc/hostname File
There is another way to change the Hostname. We can do this by editing the file /etc/hostname with a text editor such as vi or nano.
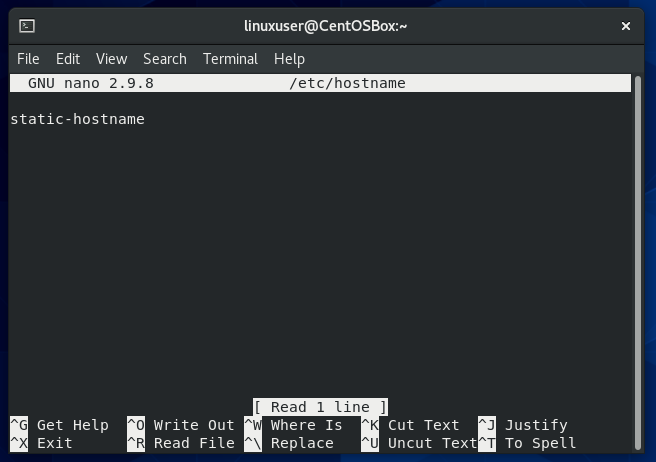
As you can see in the above-attached screenshot, we have just one line in this file, and that line contains the machine’s hostname only.
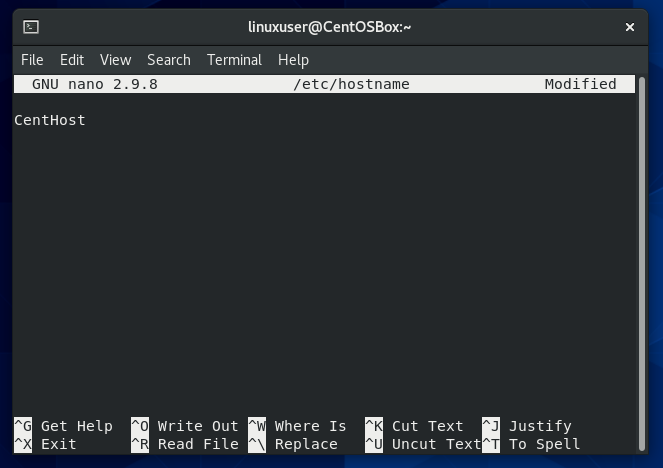
So, just change this hostname that you want to set and save the file using keyboard shortcut CTRL+S and exit from the nano editor by pressing CTRL+X.
After changing the hostname, for quickly verifying the hostname, execute the hostnamectl command:
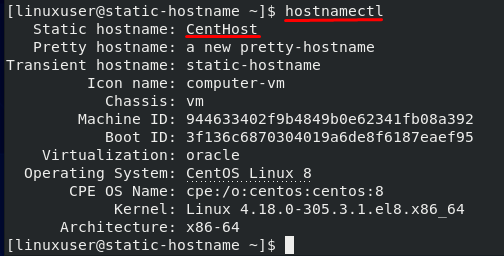
The changed hostname is displayed in the output information of the above command.
Method 3: Change Hostname Using the NMTUI command
NMTUI abbreviation of Network Manager text User Interface is a command-line tool used for performing network management-related tasks. It can be used for interacting with NetworkManager and changing the hostname from the terminal. It comes pre-installed in the CentOS 8 operating system and can be used by directly executing the NMTUI command in the terminal.
To launch the NMTUI tool, execute the simple command given below:
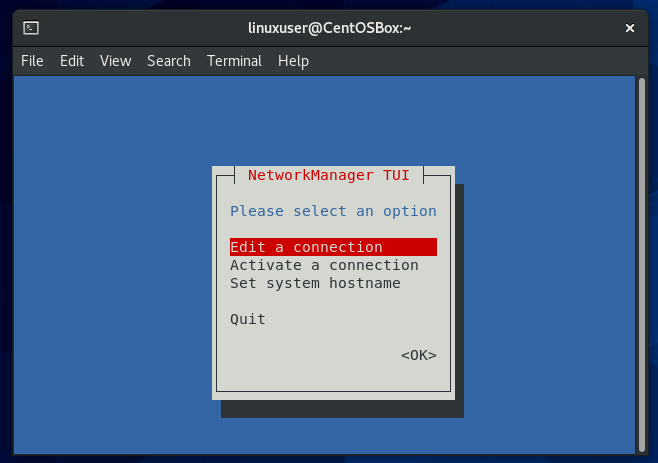
In the NMTUI tool, you can use arrow keys to navigate between the options shown:

Go to the set system hostname option and hit Enter:
In the Input field appeared, type the hostname that you want to set and hit Enter:
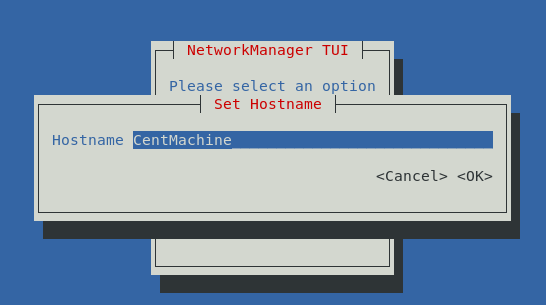
Hit Enter once again to confirm the hostname change:
In the Main menu of NMTUI, press the Esc key to get back to the terminal:
For the modifications to take impact, restarting of the systemd-hostname service is needed, and you can do so by executing the command:
After restarting the systemd-hostnamed service, the hostname will get changed, and it can be verified by executing the hostnamectl command:

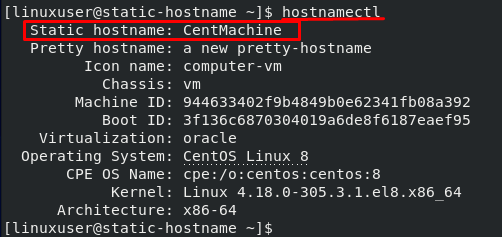
You can witness the changed, new hostname using the NMTUI command-line tool in CentOS 8.
Conclusion
We learned the top 3 and most useful ways to change the hostname in CentOS 8 Operating system from several ways to change the hostname.
Changing the machine’s hostname helps differentiate and identify a machine from other machines in a network.
from Linux Hint https://ift.tt/36eZkzd


0 Comments