


Users, as well as groups, are usually classified by numbers rather than titles within the kernel level of the Linux OS. The kernel must be fast and reliable. In addition, the data structures must be minimal, otherwise passing strings around would be ineffective. As a result, each user, as well as group title, is translated to a specific unsigned integer value which is referred to as UserID and group ID, or “UID” and “GID” for easy reference. For an operation, there are three kinds of UIDs that can be uniquely modified depending on the process authority in the Linux operating system:
- Real UserID
- Effective UserID
- Saved UserID
Real UserID:
The Real UserId is the UserID of its user who initiated the operation. It specifies which documents are accessible to this operation. It is the person who owns the operation.
Effective UserID:
The Effective UserID is identical to the Real UserID, but it could be modified to permit a non-privileged person to use the documents that are typically accessible only to privileged users such as the root. It is used by the computing system to determine if you are allowed to do a particular task or not.
Saved UserID:
The Saved UserID is a cast-off while a main task being performed contains high confidentiality. Most of the time, its root has to do work that requires less privilege. This can be accomplished by briefly transitioning to a non-privileged profile.
Working:
Users, e.g. root that have signed in through the system, produce operations in Linux, apart from a certain unique process involved. During the authentication operation, the machine searches two identifiers (ID) numbers inside the password file. The numbers obtained by the machine tend to be in the third and fourth sections of the person’s password entry. These would be the system’s actual user ID ( UID ) and real group ID ( GID ), respectively. The effective UID is situated and modified to a lesser privileged value, while doing less-privileged tasks and the euid is preserved to the saved userID(suid). As a result, it would transfer back to a privileged profile after the job is completed. It is not so much that the user gets to root for a short time; it’s focused more on the trustworthy application which operates with root privileges. Setuid must be securely applied to systems that are specifically programmed to restrict users to precisely accomplish what they are allowed to do.
Example:
To understand the process properly, log in from any account of your Linux system other than from a root user. For instance, we have logged in from “saeedraza”. Launch the command terminal for work using the “Ctrl+Alt+T” key. First, we want to check the permissions in the “passwd” file. For that, utilize the following instruction in the console. The output provides the rights for the “root” user as shown in the image. This means only the root user can change the passwords of all the other users, including “saeedraza”.
![]()
The user “saeedraza” can also change his/her password using the “passwd” command.
Next, try to change the other user’s “aqsayasin” password while using the user “saeedraza”, which is also not a root user. We have tried the instruction below. The output provides the rights for the “root” user as shown in the image. This means only the root user can change the passwords of all the other users, including “saeedraza”.
![]()
Now, log in as the user “aqsayasin”. Open the console terminal utilizing the “Ctrl+Alt+T” key command. Let’s try to change the password of user “saeedraza” from the panel of user “aqsayasin” using the “passwd” query. However, the system is unable to do so since the user “aqsayasin” also doesn’t have root privileges to accomplish this command.
![]()
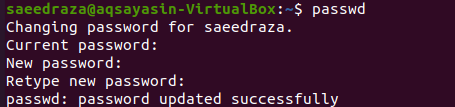
To change the password of user “saeedraza”, we have to log in as a “root” user first. Now, try out the instruction stated below in the console shell. Type out the “root” user password, and hit the “Enter” key. It will quickly convert your terminal to the root user terminal, and the change will be the same as presented in the attached image.

Now, we have logged in as a root. We will attempt to change the password for the user “saeedraza” using the same “passwd” query, as stated. It will ask you two times to add a new password. Click the “Enter” key each time. If the password matches both entries, it will display a success message saying “password updated successfully”.

Check User ID:
Next, check the user IDs for the user “saeedraza” using the “id” command. The output screen is showing the user ID as “1001”, group ID as “1002”, and groups as “1002″ for the user “saeedraza”.
![]()
When you use the same command for the “root” user, it shows “0” for all the values of ID.
![]()
Check Group ID:
Now, check the group IDs for the user “saeedraza”. First, try the “id” instruction indicated below in the console with the “-G” flag. It shows the group ID as “1002”
![]()
Or you can use:
![]()
Using the same command for root user showing “0” as its ID.
![]()
Check Group Name:
We can check the group name as well, using the following query with the “-Gn” flag.
![]()
The same query can be used for the root user.
![]()
Conclusion:
Some credentials cannot be revised, since the Linux system may not grant permission. Since it is operating as a root, the software has the device privileges to modify whatever password it prefers. This has been deliberately programmed to limit the user’s means to acquire one and use such privileges. With a bit of luck, you currently understand the main difference between a Real UserID and an Effective UserID by using this article as your reference.
from Linux Hint https://ift.tt/3eSLk3t


0 Comments