Advantages of Using Laravel Passport:
OAUTH2 protocol can be integrated with the Laravel application by using the Laravel password. When the user wants to retrieve or insert data from the application then the access request will be sent by this protocol. The permission will be given to the user by authorizing the user for access. Some major benefits of passport authentication are mentioned below.
A. passport authentication is better than the Laravel default authentication because it can be used for the external site also.
B. Normal API authentication can be used to access the content of the Laravel site only where it is implemented. But the external site can access the content of the Laravel site with the permission of the authenticated user and token.
Prerequisites:
You have to do the following task before installing and using Laravel Passport for user authentication.
A. Install a new Laravel project
B. Setup database connection
Install Laravel Passport:
Run the following command from the terminal to install the Laravel Passport package using the composer.
You will require to create the users table in the database before installing the passport package. Three migration files and a User model have been generated automatically when a new Laravel project creates. One of them is used to create a users table. Go to the Laravel project folder and run the following migrate command to create the users table.
Run the following command to install the passport package for the project.
You will get the following information after installing Laravel passport successfully in your project. Here, two secret keys are generated. One for personal access client and another for password grant client.

Laravel Passport Configuration:
Open the User model which is located in the location, App\model.php from an editor, and modify the model like below. Add Laravel\Passport\HasApiTokens at the beginning of the class and use HasApiTokens and Notifiable inside the class.
namespace App;
use Illuminate\Contracts\Auth\MustVerifyEmail;
use Illuminate\Foundation\Auth\User as Authenticatable;
use Illuminate\Notifications\Notifiable;
//Added here
use Laravel\Passport\HasApiTokens;
class User extends Authenticatable
{
//Modified here
use HasApiTokens, Notifiable;
/**
* The attributes that are mass assignable.
*
* @var array
*/
protected $fillable = [
'name', 'email', 'password',
];
/**
* The attributes that should be hidden for arrays.
*
* @var array
*/
protected $hidden = [
'password', 'remember_token',
];
/**
* The attributes that should be cast to native types.
*
* @var array
*/
protected $casts = [
'email_verified_at' => 'datetime',
];
}
Next, open app/Providers/AuthServiceProvider.php to register the routes that are necessary to issue and revoke access tokens. Passport::routes method is called within the boot method of AuthServiceProvider. Modify the content of the file shown below.
namespace App\Providers;
use Illuminate\Foundation\Support\Providers\AuthServiceProvider as ServiceProvider;
use Illuminate\Support\Facades\Gate;
//passport is added here
use Laravel\Passport\Passport;
class AuthServiceProvider extends ServiceProvider
{
/** The policy mappings for the application.
*
* @var array
*/
protected $policies = [
'App\Model' => 'App\Policies\ModelPolicy',
];
/**
* Register any authentication / authorization services.
*
* @return void
*/
public function boot()
{
$this->registerPolicies();
Passport::routes();
Passport::tokensExpireIn(now()->addDays(15));
Passport::refreshTokensExpireIn(now()->addDays(30));
}
}
Next, open config\app.php and insert the following line in the providers array to include the necessary class for using Laravel passport.
Next, open config\auth.php and set the driver of API to passport in the guards array shown below.
'web' => [
'driver' => 'session',
'provider' => 'users',
],
'api' => [
'driver' => 'passport',
'provider' => 'users',
'hash' => false,
],
],
Implement Controller for Registration and Authentication:
You have to create a controller for implementing the authentication system using the passport package. Run the following command from the project root folder to create ApiController.
In the next part of this tutorial, three methods are added inside the ApiController to create a new user, authenticate a user, and get the detailed information of an authenticated user.
A. Register
A new user can be created into the users table by implementing a register() method. Add the following code inside the ApiController to implement register API. The necessary field values for creating new user are retrieved by the argument, $request of the method register(). Validator class is used to check the field values are valid or not based on the defined validation rules. If the fails() method returns true then it will return an error message in JSON format. If the fails() method returns false then a hash password will generate and new user information will be inserted into the users table. A token will be generated after creating the new user and a success message with token value will be returned.
{
/**Validate the data using validation rules
*/
$validator = Validator::make($request->all(), [
'name' => 'required',
'email' => 'required|email',
'password' => 'required',
]);
/**Check the validation becomes fails or not
*/
if ($validator->fails()) {
/**Return error message
*/
return response()->json([ 'error'=> $validator->errors() ]);
}
/**Store all values of the fields
*/
$newuser = $request->all();
/**Create an encrypted password using the hash
*/
$newuser['password'] = Hash::make($newuser['password']);
/**Insert a new user in the table
*/
$user = User::create($newuser);
/**Create an access token for the user
*/
$success['token'] = $user->createToken('AppName')->accessToken;
/**Return success message with token value
*/
return response()->json(['success'=>$success], 200);
}
B. Login:
Any user can be authenticated by implementing the login() method. Add the following code inside ApiController to implement a login API. The required fields to authenticate a user are retrieved from the $request of the login() method. attempt() method will check the values of email and password for the authentication. If the values match the values of the users table then the record of that particular user will be retrieved and a token value will be returned. If the authentication fails then an Unauthorized message will be returned.
{
/**Read the credentials passed by the user
*/
$credentials = [
'email' => $request->email,
'password' => $request->password
];
/**Check the credentials are valid or not
*/
if( auth()->attempt($credentials) ){
/**Store the information of authenticated user
*/
$user = Auth::user();
/**Create token for the authenticated user
*/
$success['token'] = $user->createToken('AppName')->accessToken;
return response()->json(['success' => $success], 200);
} else {
/**Return error message
*/
return response()->json(['error'=>'Unauthorised'], 401);
}
}
C. User Detail
You can get the detailed information of any user after authentication by implementing User API. Add the following code into the ApiController to retrieve the detailed information of any authenticated user.
{
/**Retrieve the information of the authenticated user
*/
$user = Auth::user();
/** Return user's details
*/
return response()->json(['success' => $user], 200);
}
API Route for the Controller:
Open the routes\app.php file and modify the content with the following codes to define the login route, register route, and details route for API services.
Route::post('login', 'ApiController@login');
/**Route for register API */
Route::post('register', 'ApiController@register');
/**Route for details user API */
Route::middleware('auth:api')->group(function(){
Route::post('details', 'ApiController@user_info');
});
Run the following command to start the Laravel development server.
Test API authentication using postman:
Postman is a very useful tool to test RESTful APIs. The HTTP request can be generated very easily to test API functionalities by using the user interface of this application without writing a large amount of code to send requests. Postman can handle various HTTP requests and utilities to develop APIs. It has both paid and free versions for Linux.
Install Postman Agent:
Run the following command from the terminal to install a postman agent on Ubuntu.
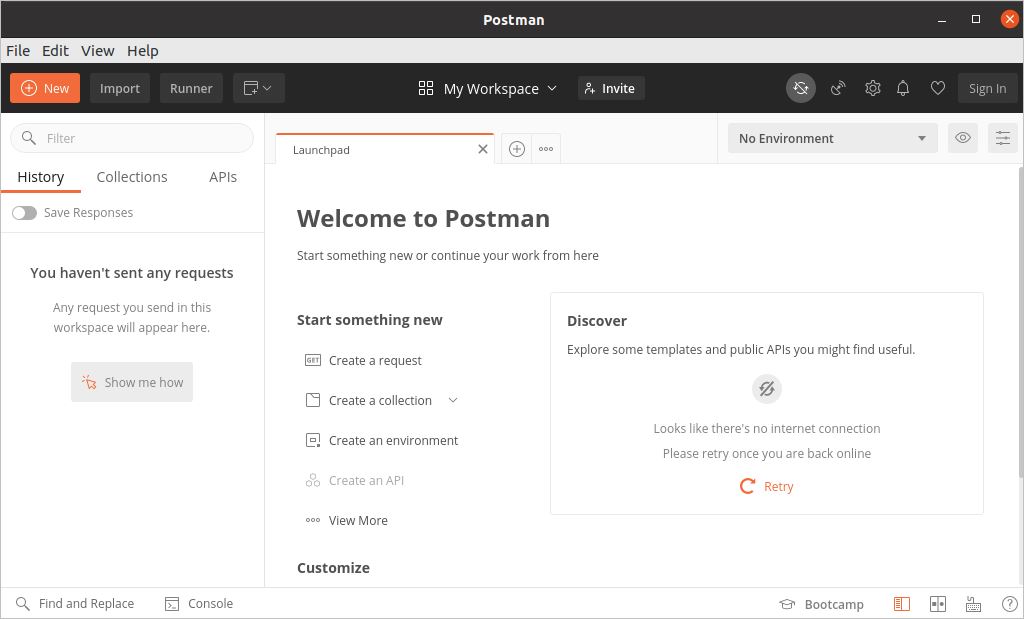
Open the application after the installation. The following interface will appear after opening the new window of the postman.
Test Register API:
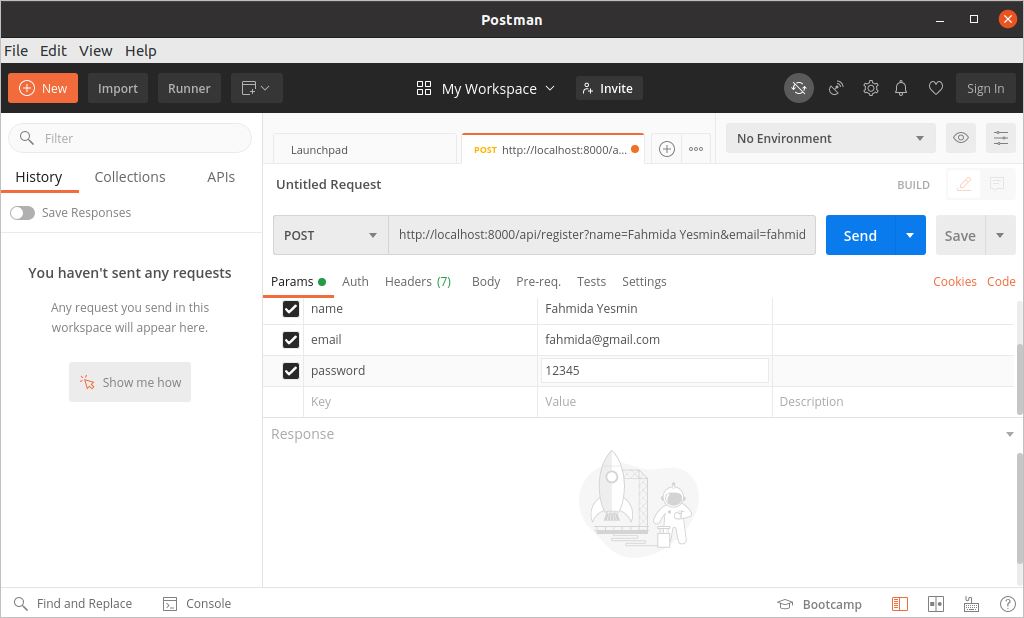
Click on the create a request link to open the request window. Laravel development server runs at port 8000 by default that is used here. If you are using a different port then you have to modify the port number in your URL. POST method is selected from the drop-down and the following URL is used to send an API request for register API.
http://localhost:8000/api/register
Three fields are defined as mandatory fields for the users table to create a new user. These are name, email, and password. Set three keys and values for these fields shown below and click on the send button. The register() method of ApiController will be called according to the route if the request is sent properly.
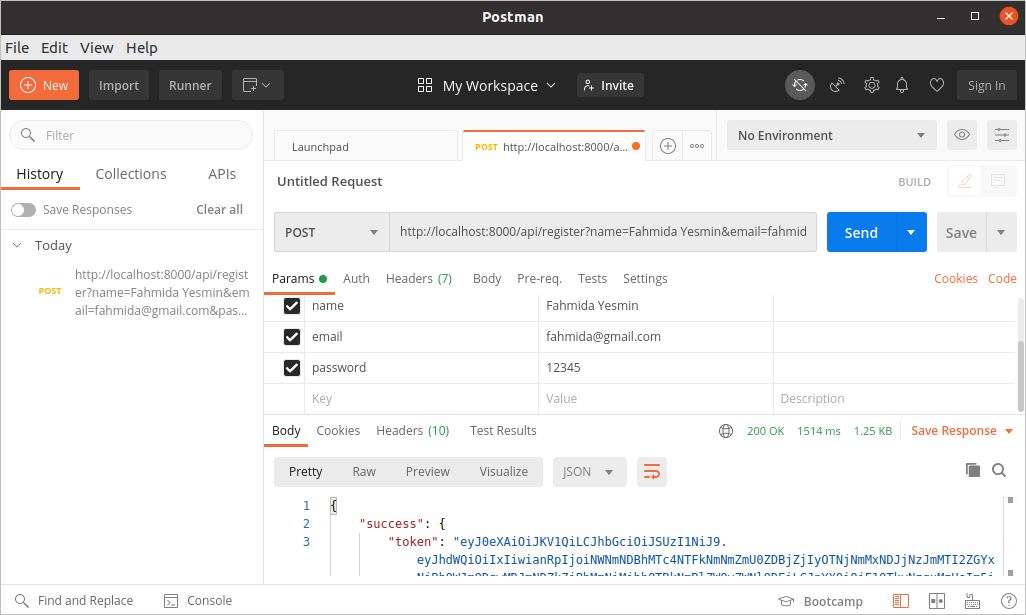
The following response will appear if the new user record is inserted successfully into the users table. The response code, 200 indicates that the HTTP request was successful and a token is generated after inserting the new user that is shown in the response body in JSON format.
Test Login API:
Select the POST method like the Register API that is shown before. Set the following URL in the address bar to send an API request for Login API.
http://localhost:8000/api/login
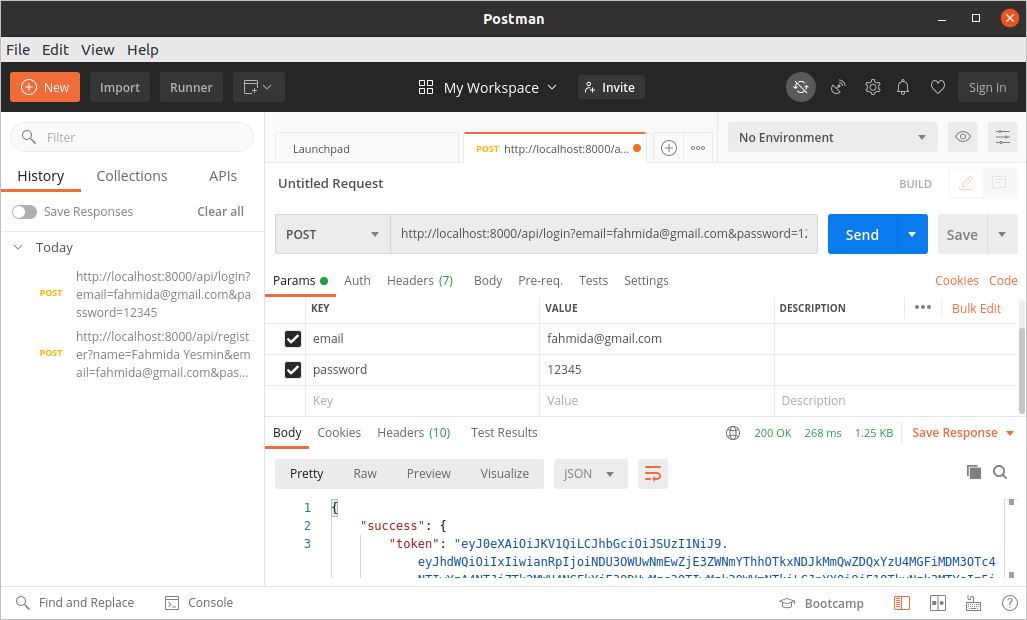
Two fields are mandatory to authenticate any user based on the records of the users table. These are email and password. Set two keys and values for these fields shown below and click on the send button. The login() method of ApiController will be called according to the route if the request is sent properly.
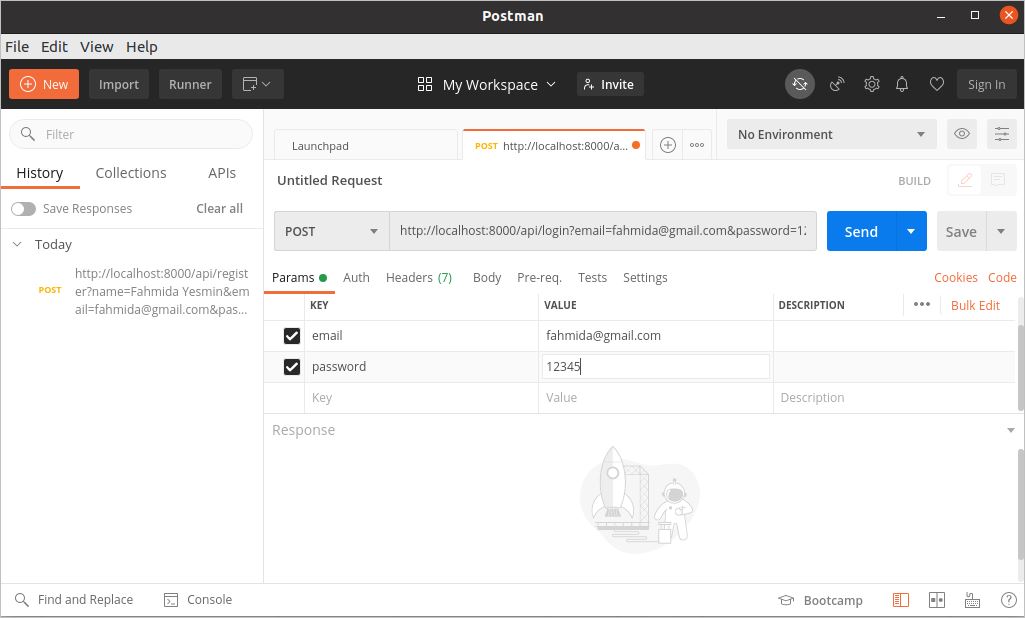
The following response will appear if the user is authenticated successfully based on the records of the users table. The response code, 200 indicates that the HTTP request was successful. The token value is generated after authenticating the user and returns the response body in JSON format.
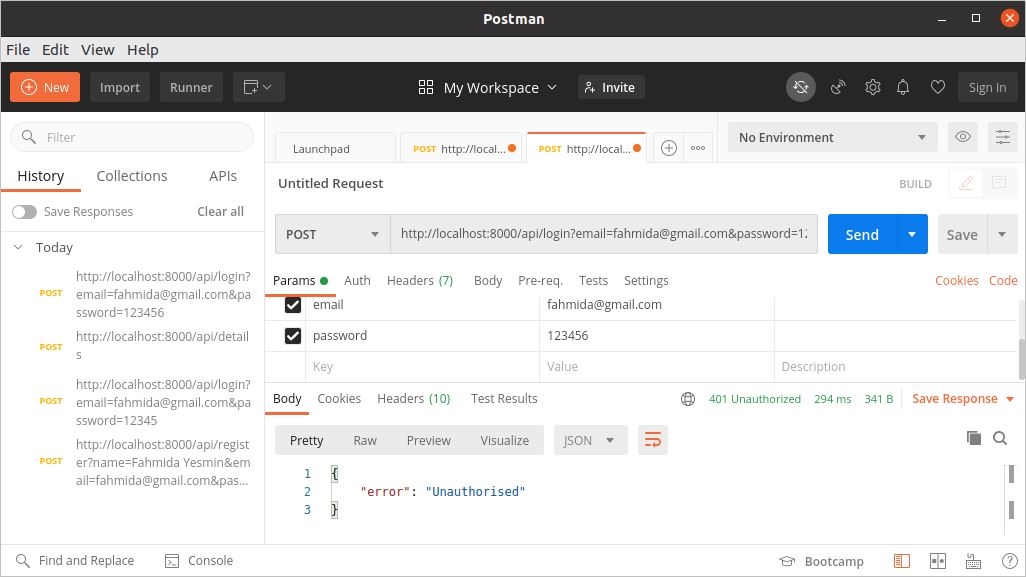
You will get the following response body when the wrong credentials are provided for authenticating the user. 401 error code is generated here to indicate unauthorized access.
Test User Details API:
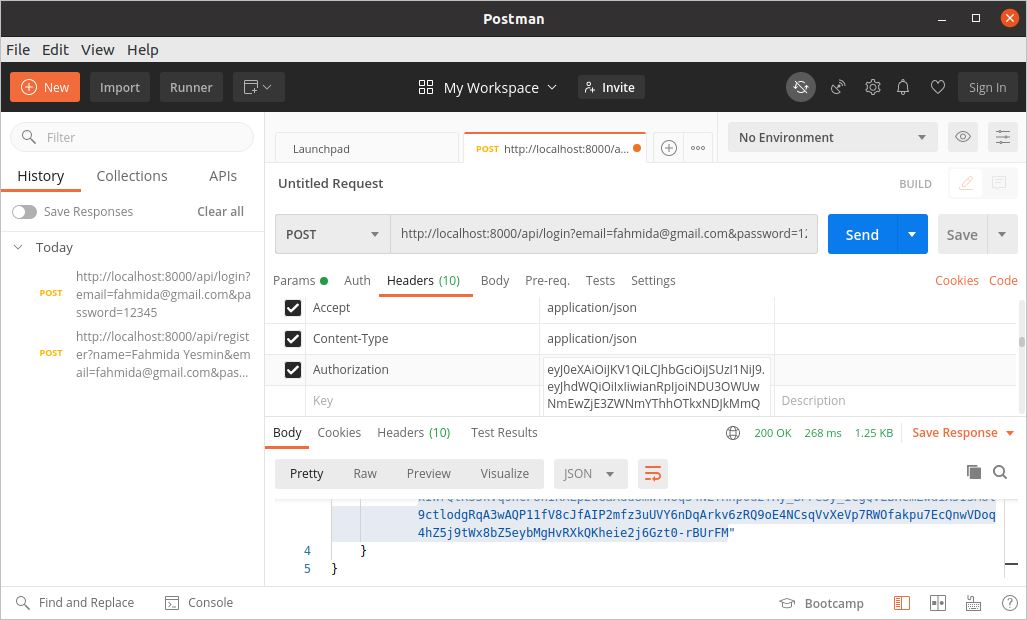
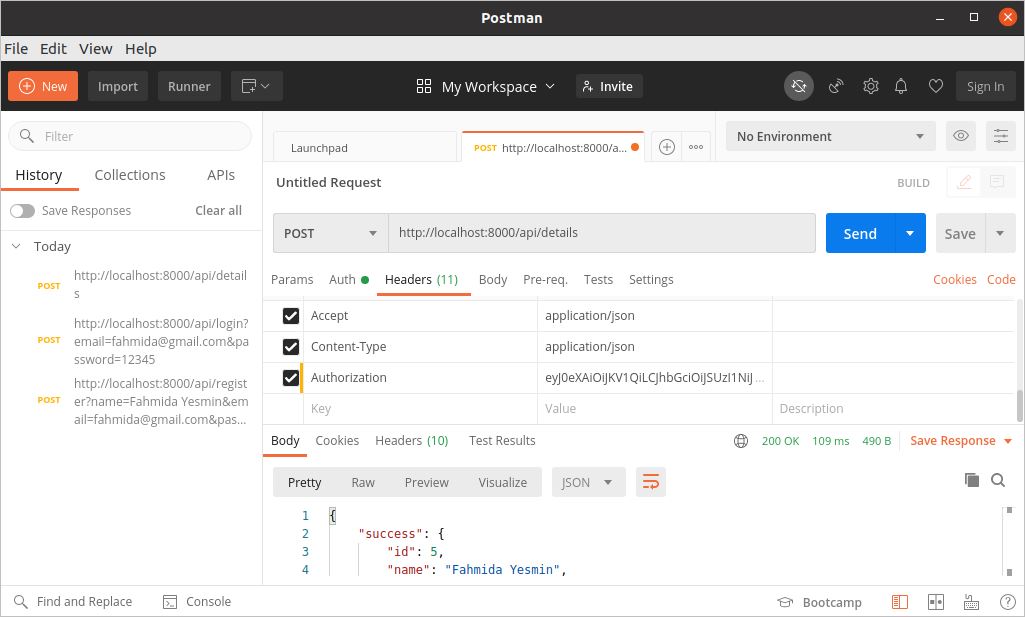
Some header parameters are required to set up before sending the request for Details API. Click on the headers tab of the request section and add three header values to identify the authenticated user. The token value is copied from the response body and set for the Authorization value.
Content-Type: application/json
Authorization:
eyJ0eXAiOiJKV1QiLCJhbGciOiJSUzI1NiJ9.eyJhdWQiOiIxIiwianRpIjoiNDU3OWUwNmEwZ
jE3ZWNmYThhOTkxNDJkMmQwZDQxYzU4MGFiMDM3OTc4NTIwYzA4NTJjZTk2MWU4NGFkYjE3ODU
wMzc3OTIwMzk3OWVmNTkiLCJpYXQiOjE1OTkyNzk3MTYsIm5iZiI6MTU5OTI3OTcxNiwiZXhwI
joxNjMwODE1NzE2LCJzdWIiOiI1Iiwic2NvcGVzIjpbXX0.fJYvzFsiD4WKcklpZ2-
w64UVOOk1DqMo_KbLCI7C00xQKhuQupVkgRULUx3e2mJIoJ8ET0MLngpUIFFS8Aet7W8KoQCcL
SzMKUjot4fhONQ5Dyzmb4csAIXFVoKK8YRm4gPCq-b1OW5e9K5gcrLKmqnt9a6nywoGHkXqq4GE
qHnHFgPnOkMfjbtGuKIj3aMtA2i7qHcbWdIt5O970LdM1ehW-AuMESZflJdjfN6zkHK4Kc93-
vLpZbgEKh1XD0p1fJEWyms590oIPERuWVS1hfCkpsnIFYRoB04TYTYPHdL25qwBW0m0VaTQG9fH
7xgiJFSkyS-FGmmUc7lglM8JUeVYmZfv-o5XVRlQ2EOCjLHSOFvKkuFzw-j3YfKaHBWY3Oo4gRD4
foWV2tGvDnF1zR_b11BDfDgv3rrl8mZNHx9DHjaFqUbWEdsnZbWouOR9wy
Vh0GI1fcIkWoWSM_BoNaTFittr9zqjkIWrQtKS3kVqsnCF8nIKXLp2dGaXdd8mWYWoq34NLYHhp
0u2TRy_BFFe3y_icgQVLBHcmEwdiXJISM8l9ctlodgRqA3wAQP11fV8cJfAIP2mfz3uUVY6nDqAr
kv6zRQ9oE4NCsqVvXeVp7RWOfakpu7EcQnwVDoq4hZ5j9tWx8bZ5eybMgHvRXkQKheie2j6Gzt0-rBUrFM
The headers section of the request part will be looked like the following image. You have to set your token value that is generated in the response body of your postman agent.
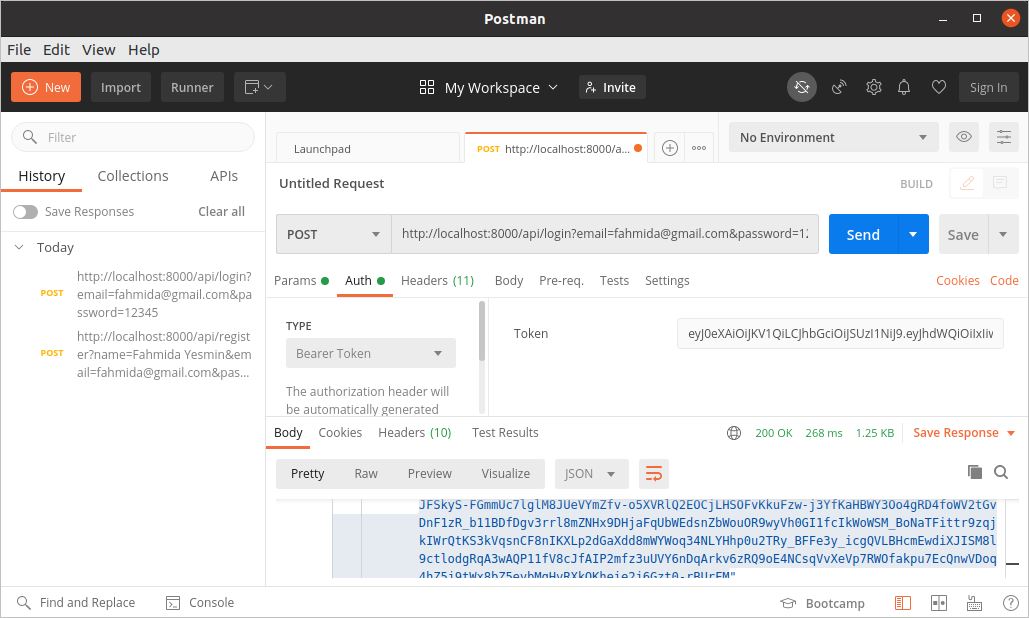
Next, click on the Authorization tab of the request section and select Bearer Token as authorization type from the Type drop-down.
Now, select the POST method, set the following URL in the address bar. It will call the user_info() method of ApiController that will retrieve the detailed information of the authenticated user.
If the token value and header information are provided properly then the details of that user will be returned as a response body in JSON format like the following image.
Conclusion:
Passport authentication is using in many Laravel websites now for its useful features. It makes the Laravel authentication system more secure than the default authentication and provides other services that are not available in default authentication. The basic uses of Laravel passport with the installation and configuration process are described in this tutorial properly. The use of the postman agent is also shown here to test the API. I hope the reader will understand the functionalities of the passport package after reading this tutorial.
from Linux Hint https://ift.tt/2EPAsnS


0 Comments