Locating and selecting elements from the web page is the key to web scraping with Selenium. For locating and selecting elements from the web page, you can use XPath selectors in Selenium.
In this article, I am going to show you how to locate and select elements from web pages using XPath selectors in Selenium with the Selenium python library. So, let’s get started.
Prerequisites:
To try out the commands and examples of this article, you must have,
- A Linux distribution (preferably Ubuntu) installed on your computer.
- Python 3 installed on your computer.
- PIP 3 installed on your computer.
- Python virtualenv package installed on your computer.
- Mozilla Firefox or Google Chrome web browsers installed on your computer.
- Must know how to install the Firefox Gecko Driver or Chrome Web Driver.
For fulfilling the requirements 4, 5, and 6, read my article Introduction to Selenium in Python 3. You can find many articles on the other topics on LinuxHint.com. Be sure to check them out if you need any assistance.
Setting Up a Project Directory:
To keep everything organized, create a new project directory selenium-xpath/ as follows:
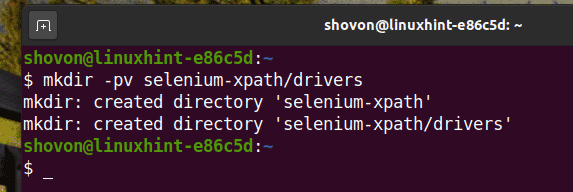
Navigate to the selenium-xpath/ project directory as follows:

Create a Python virtual environment in the project directory as follows:
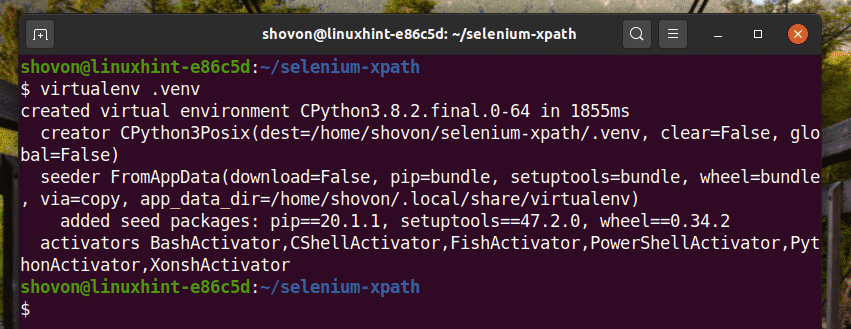
Activate the virtual environment as follows:

Install Selenium Python library using PIP3 as follows:
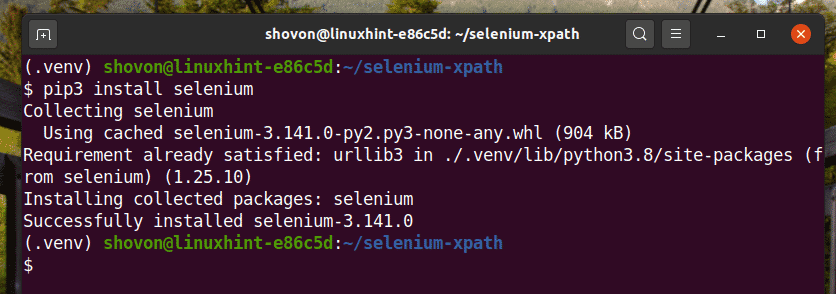
Download and install all the required web driver in the drivers/ directory of the project. I have explained the process of downloading and installing web drivers in my article Introduction to Selenium in Python 3.

Get the XPath Selector using Chrome Developer Tool:
In this section, I am going to show you how to find the XPath selector of the web page element you want to select with Selenium using the built-in Developer Tool of the Google Chrome web browser.
To get the XPath selector using the Google Chrome web browser, open Google Chrome, and visit the web site from which you want to extract data. Then, press the right mouse button (RMB) on an empty area of the page and click on Inspect to open the Chrome Developer Tool.
You can also press <Ctrl> + Shift + I to open the Chrome Developer Tool.
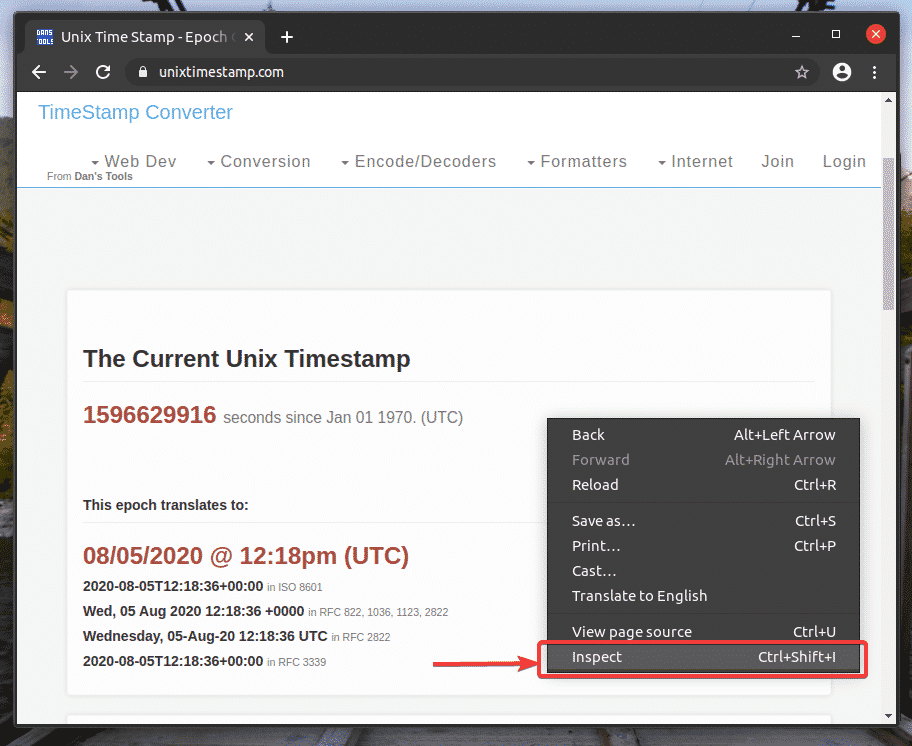
Chrome Developer Tool should be opened.
To find the HTML representation of your desired web page element, click on the Inspect(
![]()
) icon, as marked in the screenshot below.
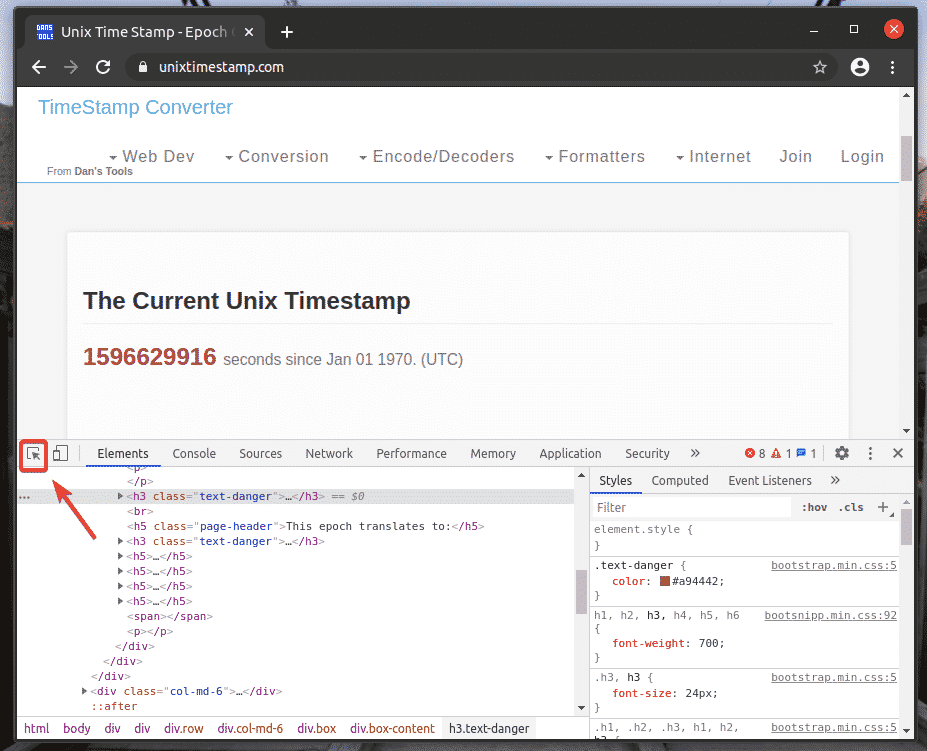
Then, hover over your desired web page element and press the left mouse button (LMB) to select it.
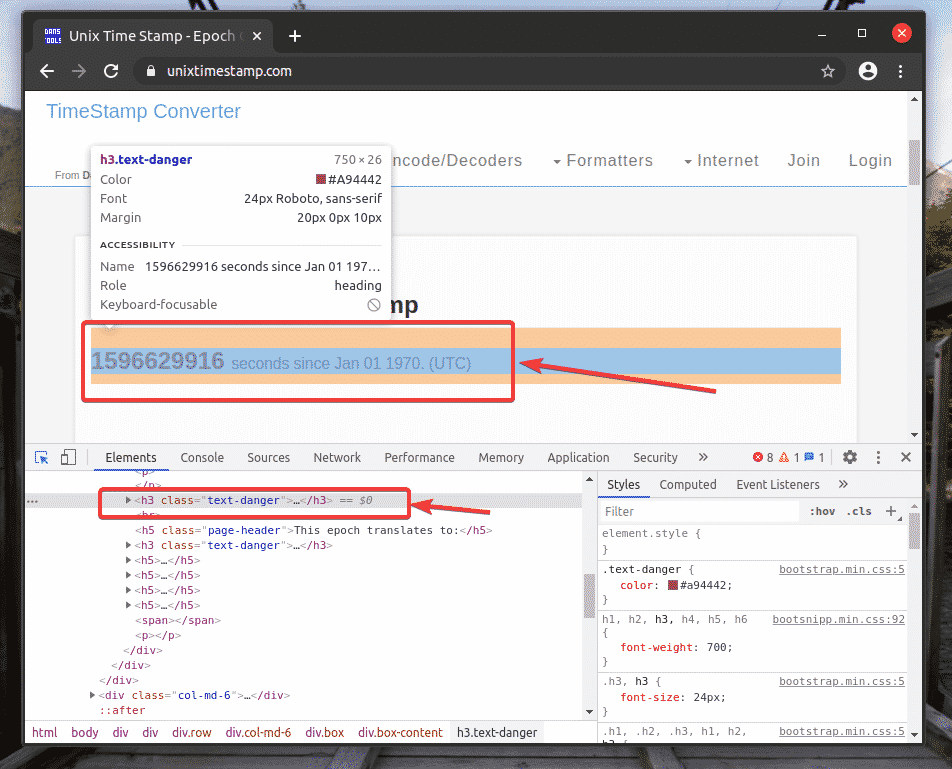
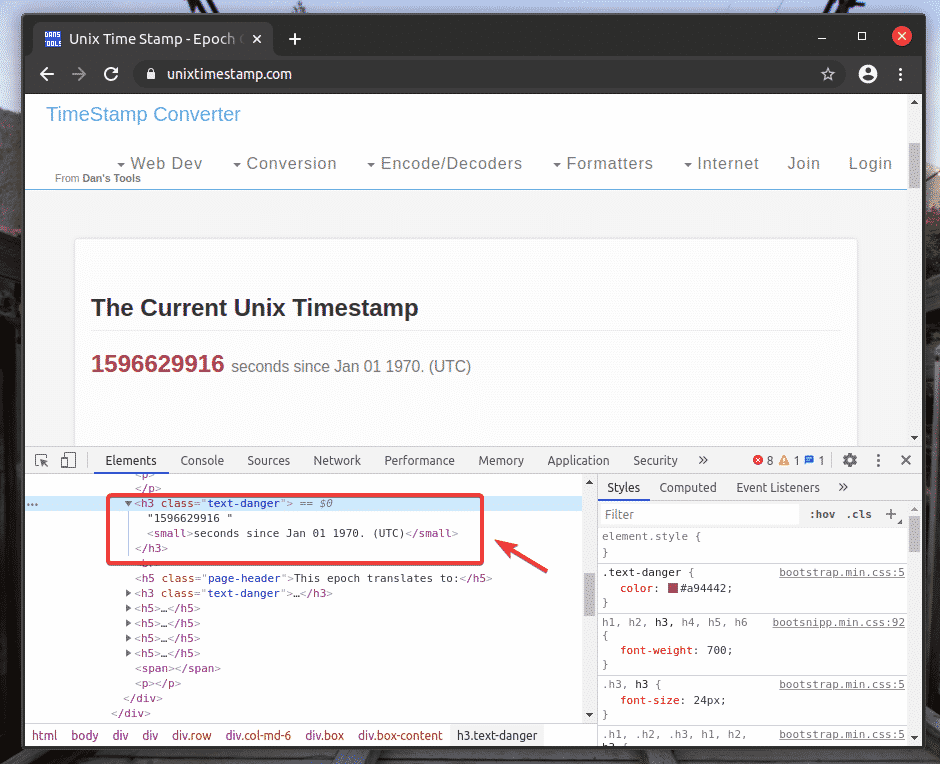
The HTML representation of the web element you have selected will be highlighted in the Elements tab of the Chrome Developer Tool, as you can see in the screenshot below.
To get the XPath selector of your desired element, select the element from the Elements tab of Chrome Developer Tool and right-click (RMB) on it. Then, select Copy > Copy XPath, as marked in the screenshot below.

I have pasted the XPath selector in a text editor. The XPath selector looks as shown in the screenshot below.

Get the XPath Selector using Firefox Developer Tool:
In this section, I am going to show you how to find the XPath selector of the web page element you want to select with Selenium using the built-in Developer Tool of the Mozilla Firefox web browser.
To get the XPath selector using the Firefox web browser, open Firefox and visit the web site from which you want to extract data. Then, press the right mouse button (RMB) on an empty area of the page and click on Inspect Element (Q) to open the Firefox Developer Tool.
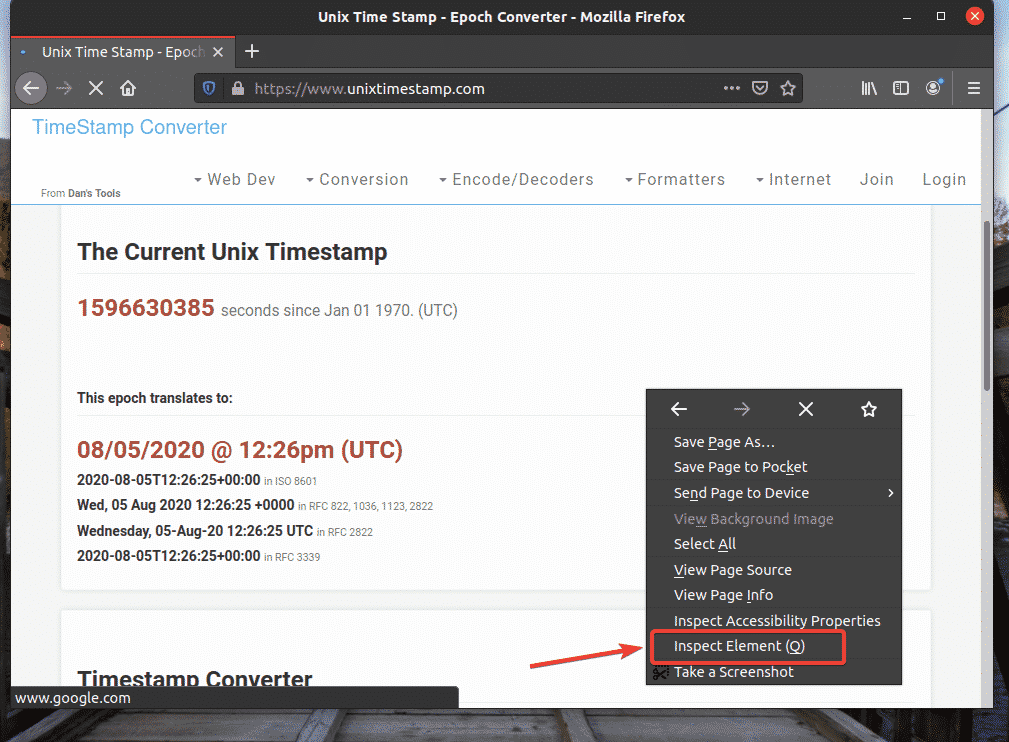
Firefox Developer Tool should be opened.
To find the HTML representation of your desired web page element, click on the Inspect(
![]()
) icon, as marked in the screenshot below.
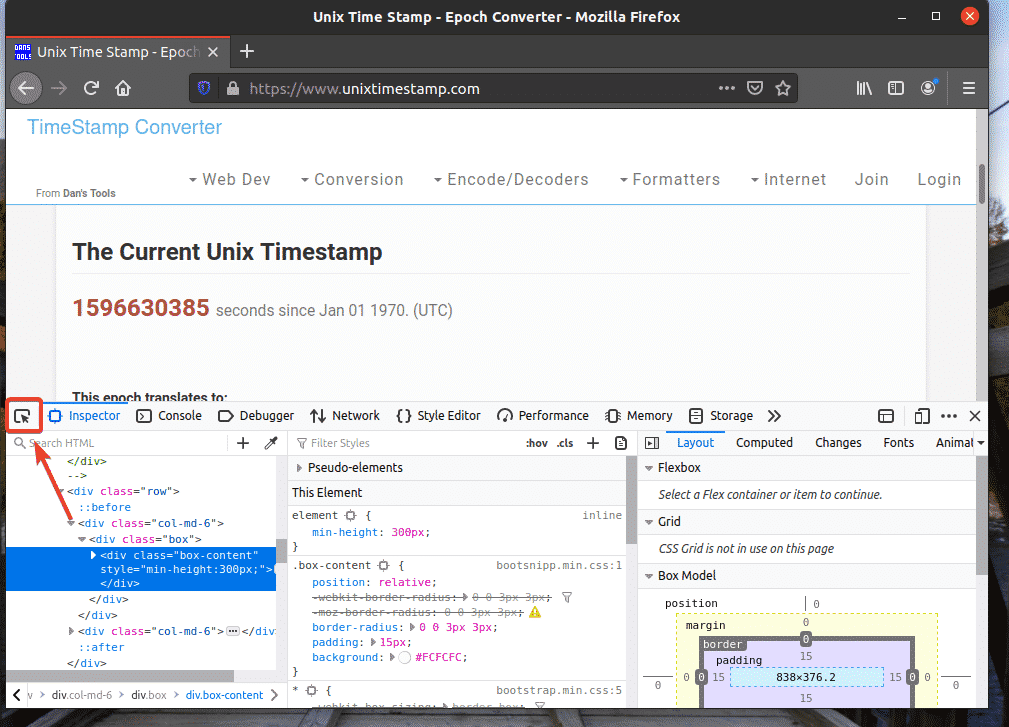
Then, hover over your desired web page element and press the left mouse button (LMB) to select it.
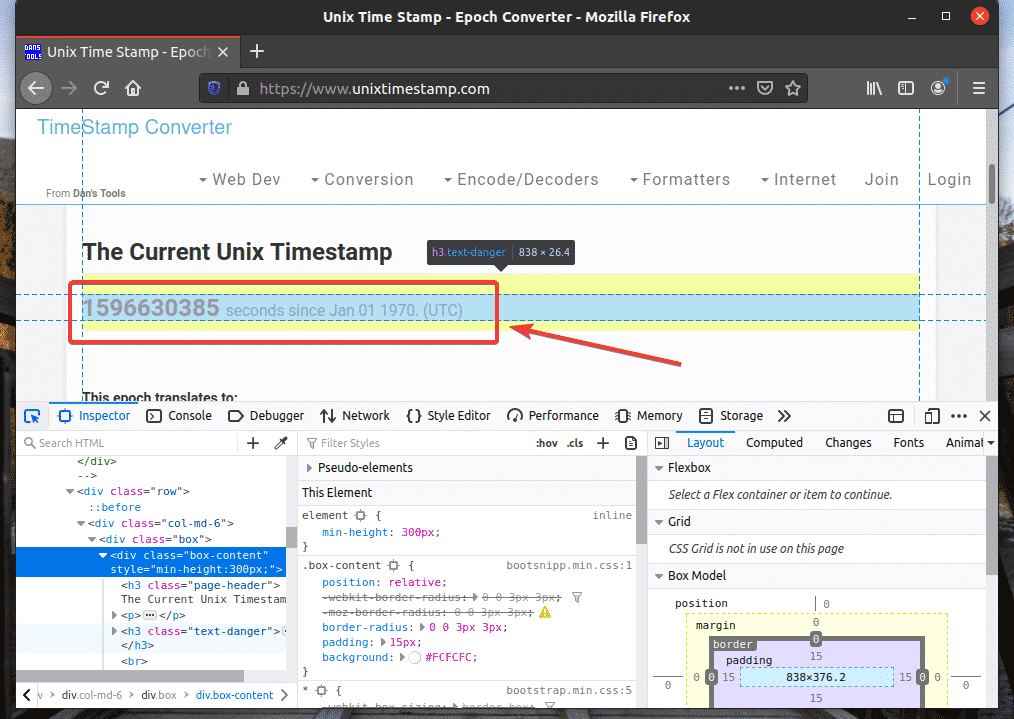
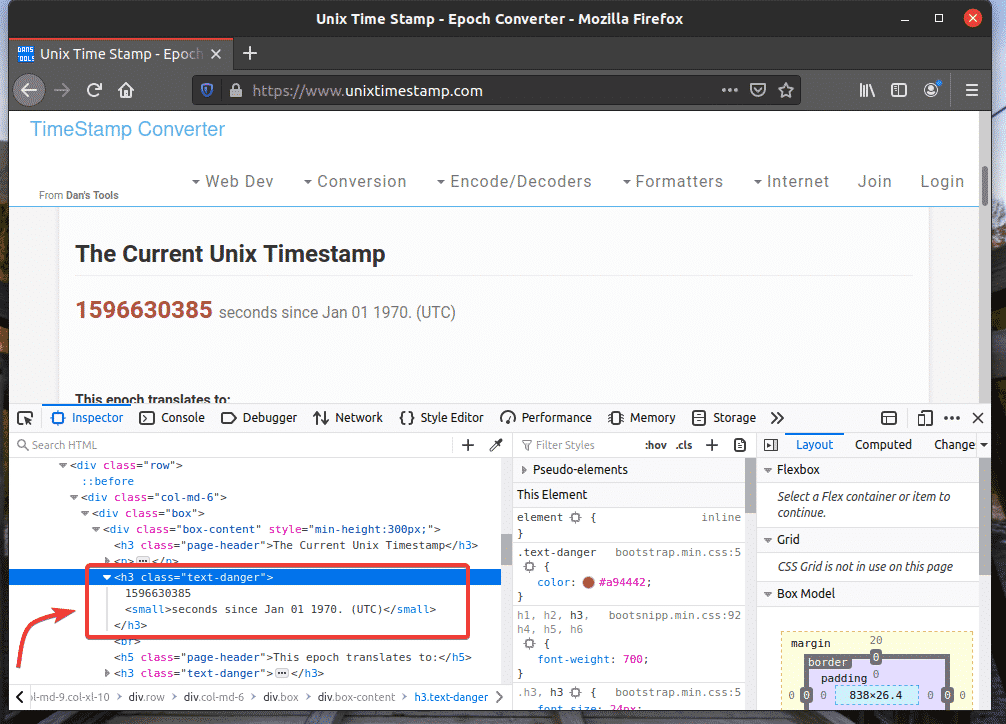
The HTML representation of the web element you have selected will be highlighted in the Inspector tab of Firefox Developer Tool, as you can see in the screenshot below.
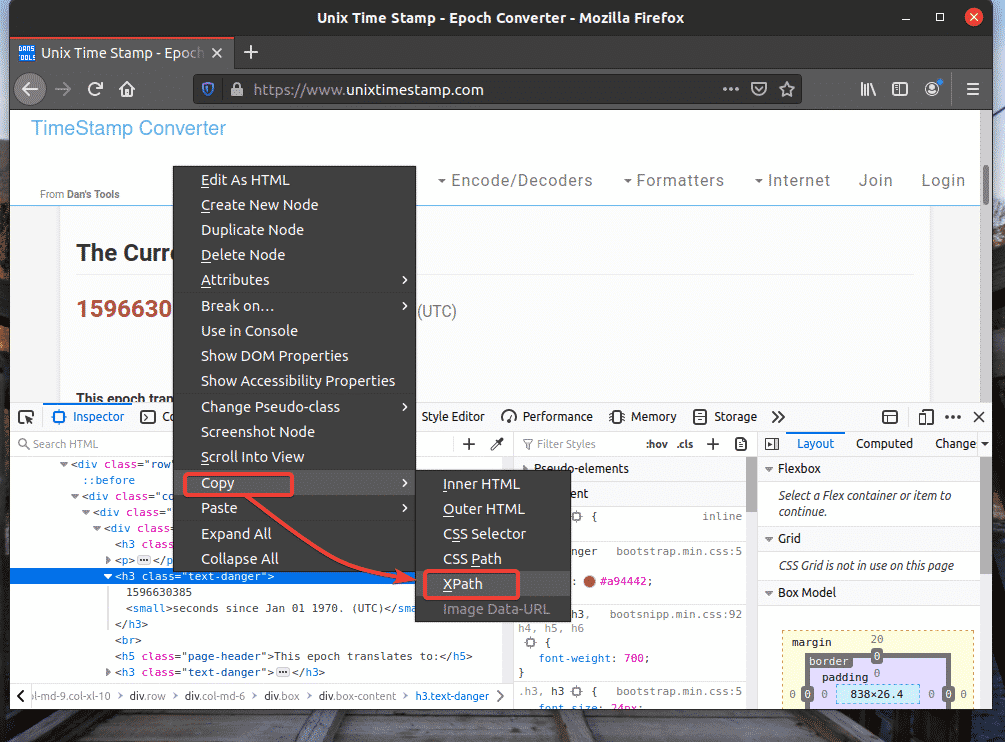
To get the XPath selector of your desired element, select the element from the Inspector tab of Firefox Developer Tool and right-click (RMB) on it. Then, select Copy > XPath as marked in the screenshot below.
The XPath selector of your desired element should look something like this.

Extracting Data from Web Pages using XPath Selector:
In this section, I am going to show you how to select web page elements and extract data from them using XPath selectors with the Selenium Python library.
First, create a new Python script ex01.py and type in the following lines of codes.
from selenium.webdriver.common.keys import Keys
from selenium.webdriver.common.by import By
options = webdriver.ChromeOptions()
options.headless = True
browser = webdriver.Chrome(executable_path="./drivers/chromedriver",
options=options)
browser.get("https://ift.tt/2Admg01")
timestamp = browser.find_element_by_xpath('/html/body/div[1]/div[1]
/div[2]/div[1]/div/div/h3[2]')
print('Current timestamp: %s' % (timestamp.text.split(' ')[0]))
browser.close()
Once you’re done, save the ex01.py Python script.

Line 1-3 imports all the required Selenium components.

Line 5 creates a Chrome Options object, and line 6 enables headless mode for the Chrome web browser.
![]()
Line 8 creates a Chrome browser object using the chromedriver binary from the drivers/ directory of the project.
![]()
Line 10 tells the browser to load the website unixtimestamp.com.
![]()
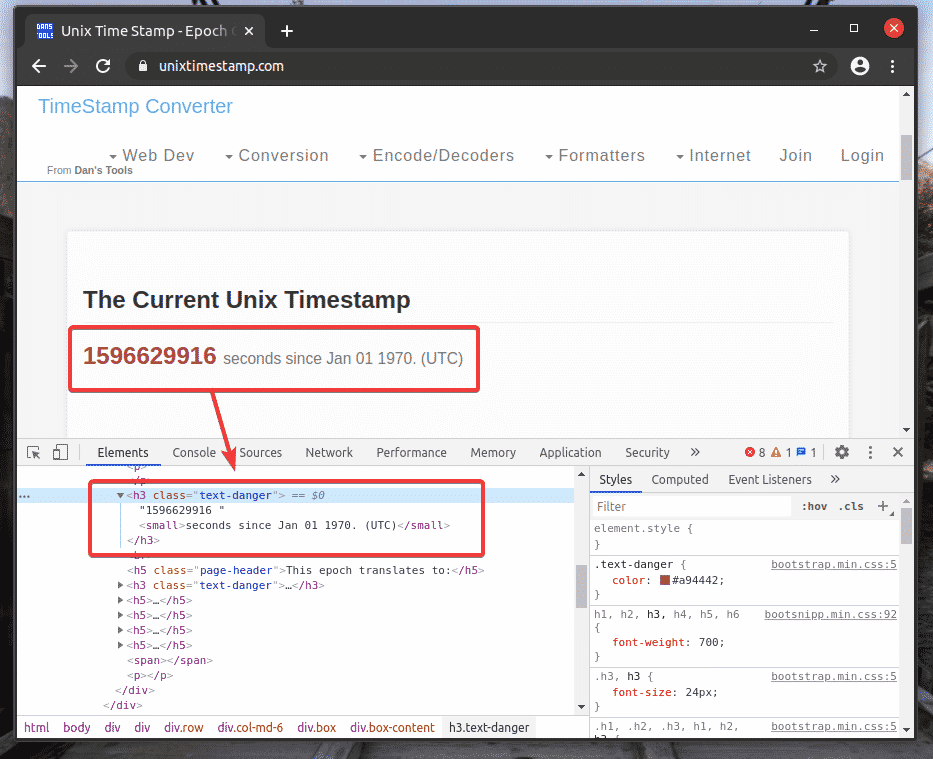
Line 12 finds the element that has the timestamp data from the page using the XPath selector and stores it in the timestamp variable.
Line 13 parses the timestamp data from the element and prints it on the console.
![]()
I have copied the XPath selector of the marked h2 element from unixtimestamp.com using the Chrome Developer Tool.
Line 14 closes the browser.
![]()
Run the Python script ex01.py as follows:

As you can see, the timestamp data is printed on the screen.

Here, I have used the browser.find_element_by_xpath(selector) method. The only parameter of this method is the selector, which is the XPath selector of the element.
Instead of browser.find_element_by_xpath() method, you can also use browser.find_element(By, selector) method. This method needs two parameters. The first parameter By will be By.XPATH as we will be using the XPath selector, and the second parameter selector will be the XPath selector itself. The result will be the same.
To see how browser.find_element() method works for XPath selector, create a new Python script ex02.py, copy and paste all the lines from ex01.py to ex02.py and change line 12 as marked in the screenshot below.
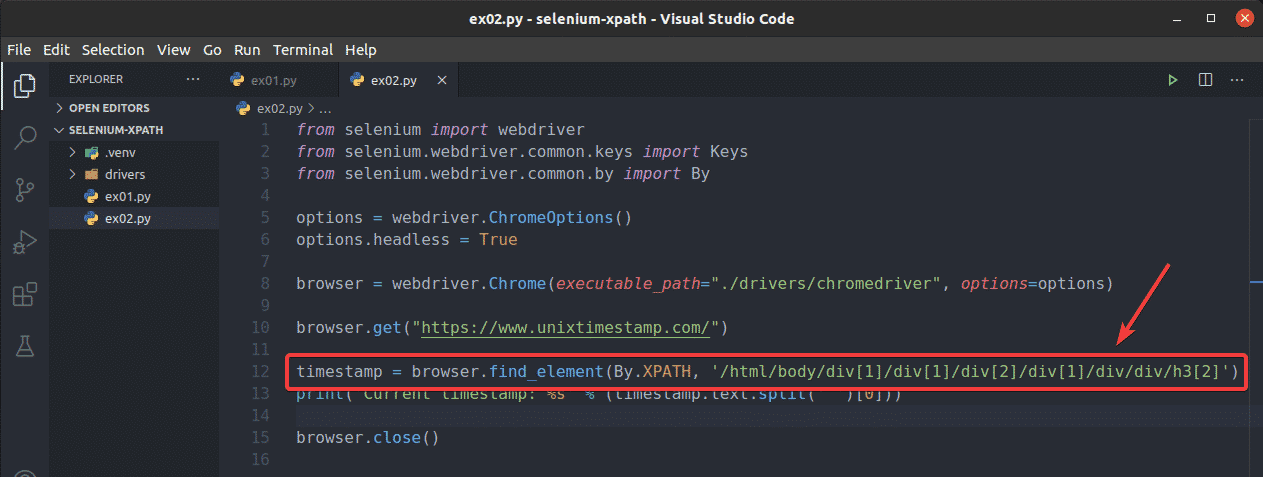
As you can see, the Python script ex02.py gives the same result as ex01.py.

The browser.find_element_by_xpath() and browser.find_element() methods are used to find and select a single element from web pages. If you want to find and select multiple elements using XPath selectors, then you have to use browser.find_elements_by_xpath() or browser.find_elements() methods.
The browser.find_elements_by_xpath() method takes the same argument as the browser.find_element_by_xpath() method.
The browser.find_elements() method takes the same arguments as the browser.find_element() method.
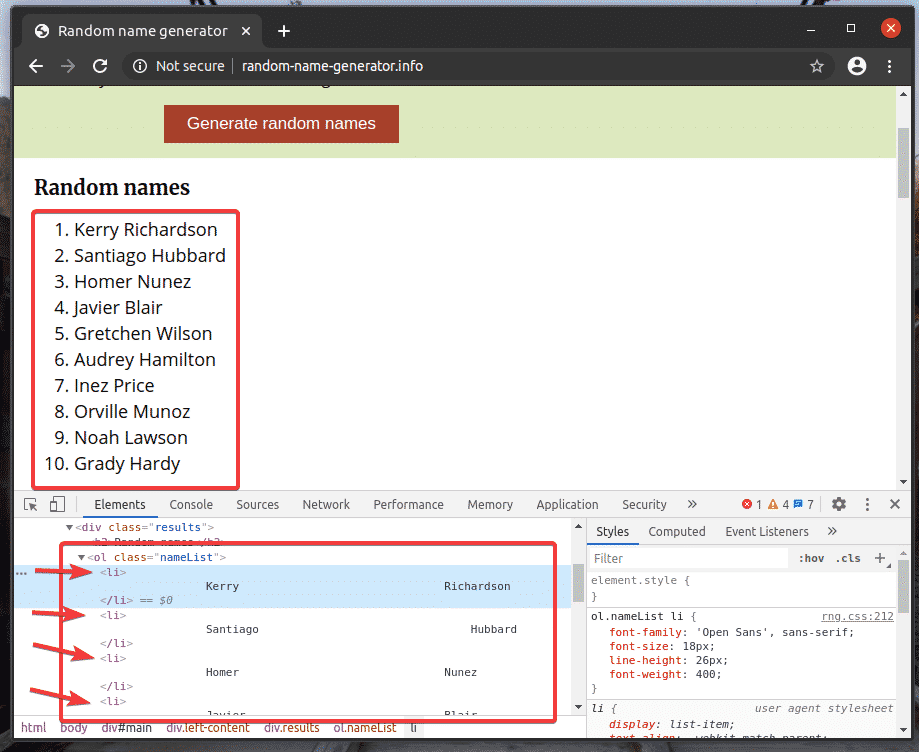
Let’s see an example of extracting a list of names using XPath selector from random-name-generator.info with the Selenium Python library.
The unordered list (ol tag) has a 10 li tags inside each containing a random name. The XPath to select all the li tags inside the ol tag in this case is //*[@id=”main”]/div[3]/div[2]/ol//li
Let’s go through an example of selecting multiple elements from the web page using XPath selectors.
Create a new Python script ex03.py and type in the following lines of codes in it.
from selenium.webdriver.common.keys import Keys
from selenium.webdriver.common.by import By
options = webdriver.ChromeOptions()
options.headless = True
browser = webdriver.Chrome(executable_path="./drivers/chromedriver",
options=options)
browser.get("https://ift.tt/1lcoXEs")
names = browser.find_elements_by_xpath('<a id="post-66482-_Hlk47564274">
</a>//*[@id="main"]/div[3]/div[2]/ol//li')
for name in names:
print(name.text)
browser.close()
Once you’re done, save the ex03.py Python script.
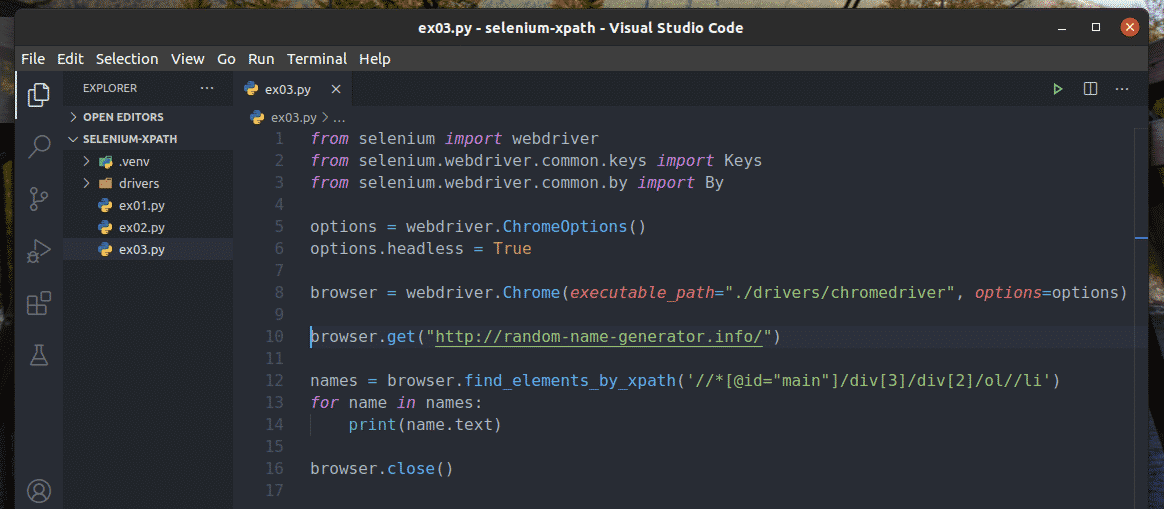
Line 1-8 is the same as in ex01.py Python script. So, I am not going to explain them here again.

Line 10 tells the browser to load the website random-name-generator.info.
![]()
Line 12 selects the name list using the browser.find_elements_by_xpath() method. This method uses the XPath selector //*[@id=”main”]/div[3]/div[2]/ol//li to find the name list. Then, the name list is stored in the names variable.
![]()
In lines 13 and 14, a for loop is used to iterate through the names list and print the names on the console.

Line 16 closes the browser.
![]()
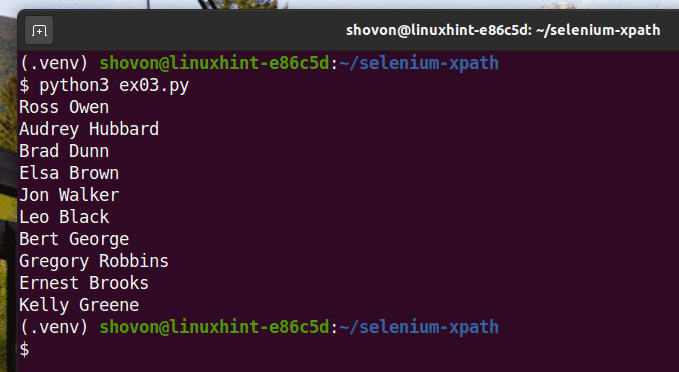
Run the Python script ex03.py as follows:

As you can see, the names are extracted from the web page and printed on the console.
Instead of using the browser.find_elements_by_xpath() method, you can also use the browser.find_elements() method as before. The first argument of this method is By.XPATH, and the second argument is the XPath selector.
To experiment with browser.find_elements() method, create a new Python script ex04.py, copy all the codes from ex03.py to ex04.py, and change line 12 as marked in the screenshot below.
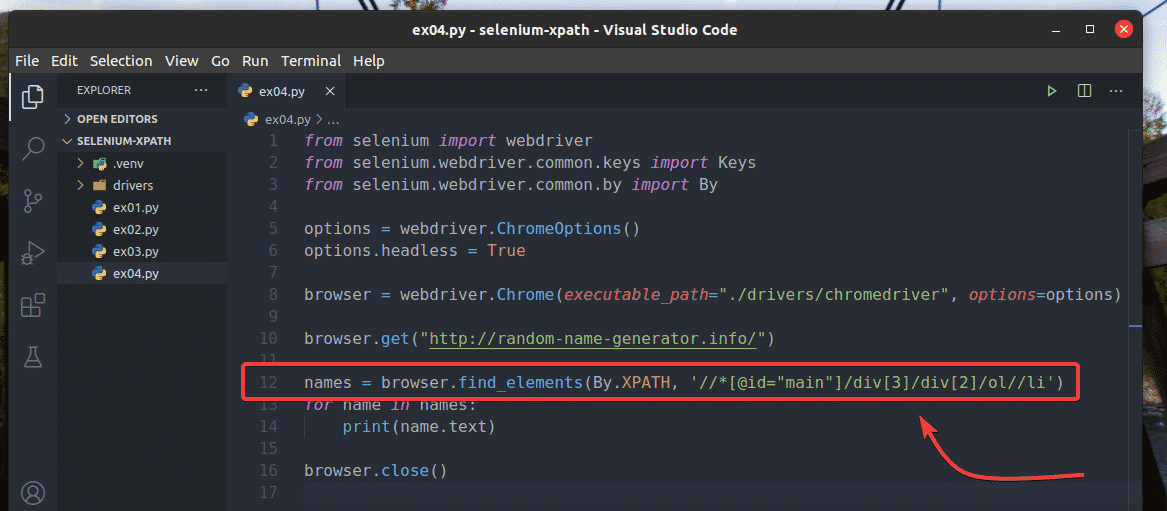
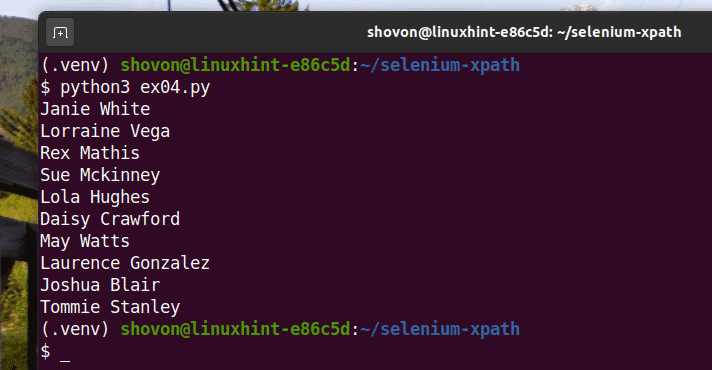
You should get the same result as before.
Basics of XPath Selector:
The Developer Tool of Firefox or Google Chrome web browser does generate XPath selector automatically. But these XPath selectors are sometimes not sufficient for your project. In that case, you must know what a certain XPath selector does to build your XPath selector. In this section, I am going to show you the basics of XPath selectors. Then, you should be able to build your own XPath selector.
Create a new directory www/ in your project directory as follows:

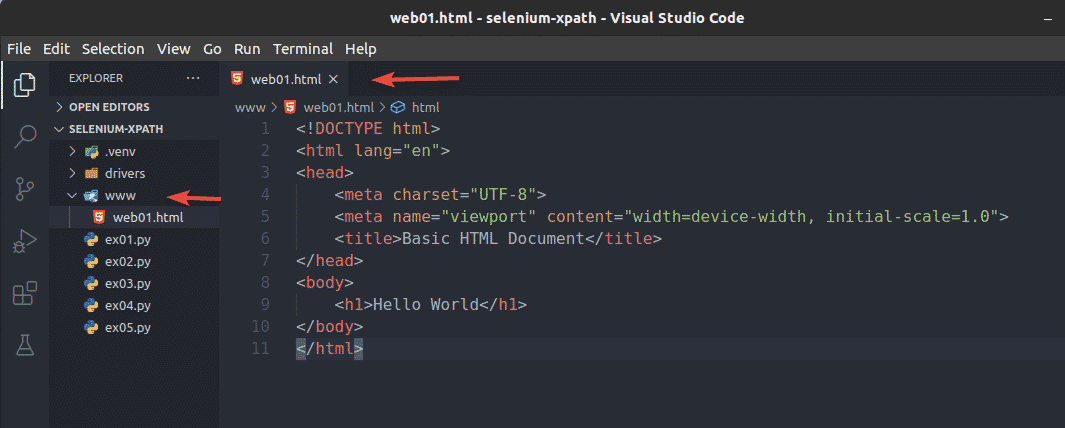
Create a new file web01.html in the www/ directory and type in the following lines in that file.
Once you’re done, save the web01.html file.
Run a simple HTTP server on port 8080 using the following command:

The HTTP server should start.

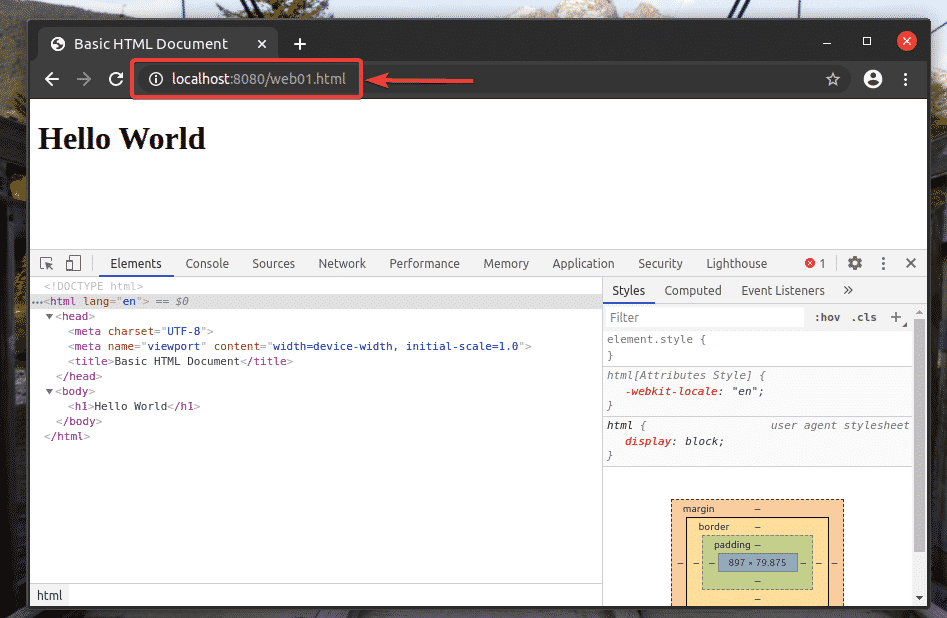
You should be able to access the web01.html file using the URL http://localhost:8080/web01.html, as you can see in the screenshot below.
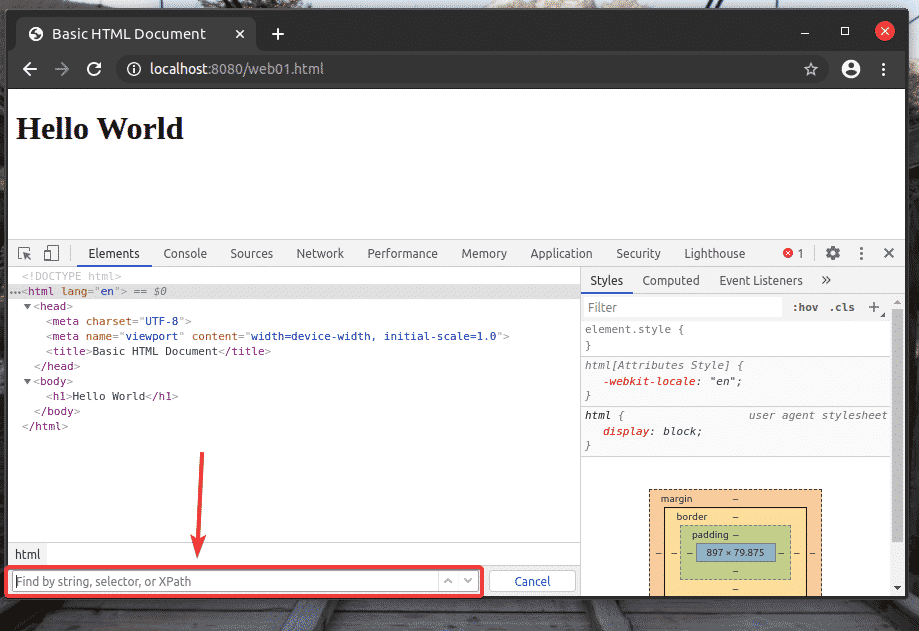
While the Firefox or Chrome Developer Tool is opened, press <Ctrl> + F to open the search box. You can type in your XPath selector here and see what it selects very easily. I am going to use this tool throughout this section.
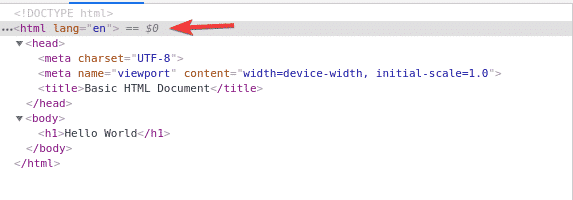
An XPath selector starts with a forward slash (/) most of the time. It’s like a Linux directory tree. The / is the root of all elements on the web page.
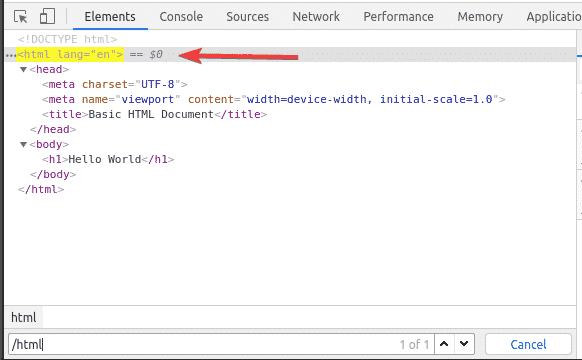
The first element is the html. So, the XPath selector /html selects the entire html tag.
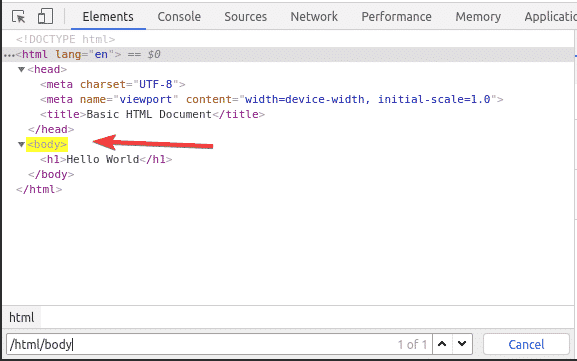
Inside the html tag, we have a body tag. The body tag can be selected with the XPath selector /html/body
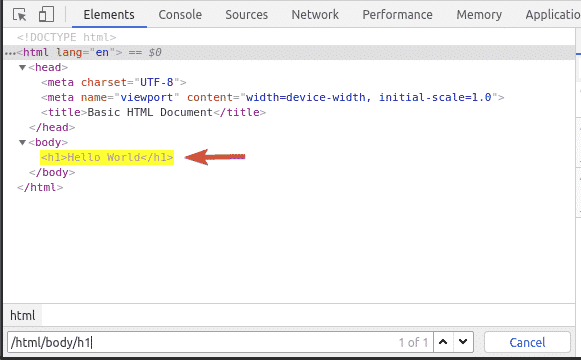
The h1 header is inside the body tag. The h1 header can be selected with the XPath selector /html/body/h1
This type of XPath selector is called an absolute path selector. In absolute path selector, you must traverse the web page from the root (/) of the page. The disadvantage of an absolute path selector is that even a slight change to the web page structure may make your XPath selector invalid. The solution to this problem is a relative or partial XPath selector.
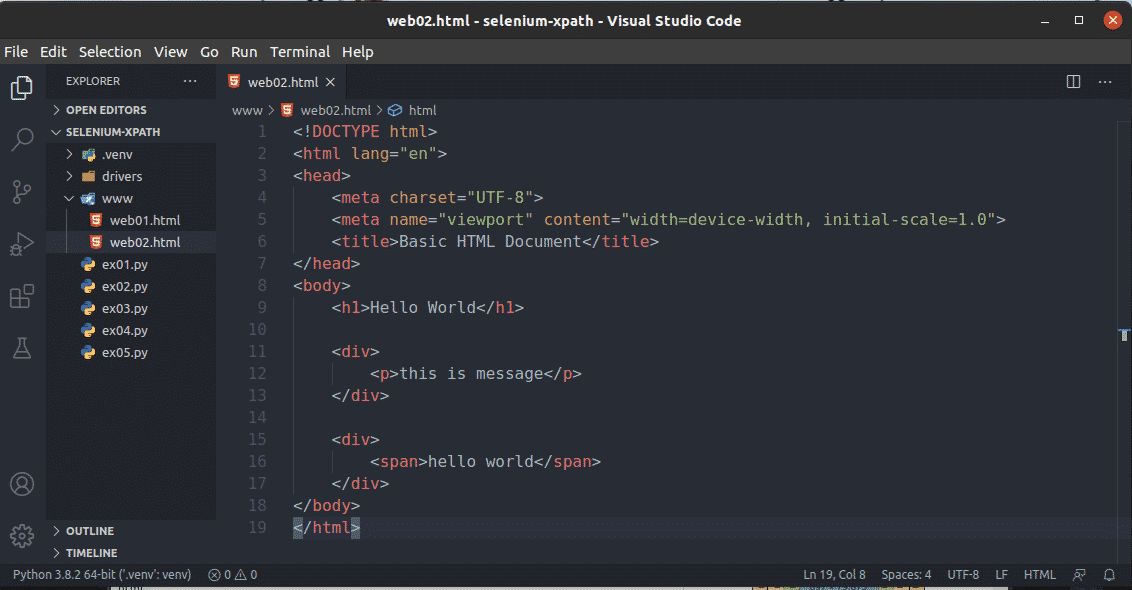
To see how relative path or partial path works, create a new file web02.html in the www/ directory and type in the following lines of codes in it.
Once you’re done, save the web02.html file and load it in your web browser.
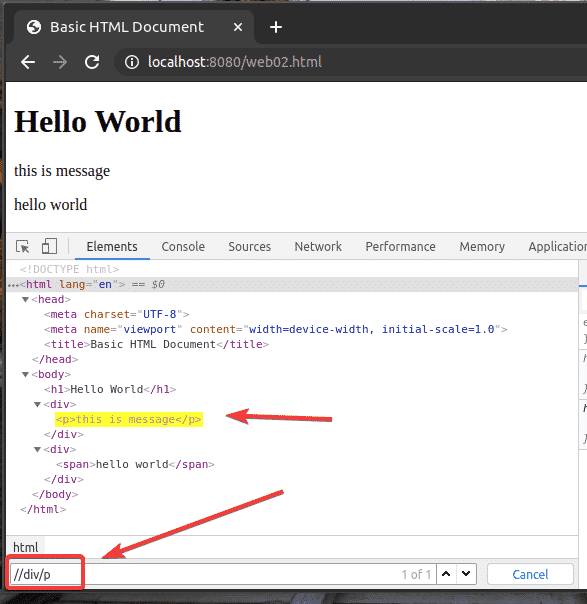
As you can see, the XPath selector //div/p selects the p tag inside the div tag. This is an example of a relative XPath selector.
Relative XPath selector starts with //. Then you specify the structure of the element you want to select. In this case, div/p.
So, //div/p means select the p element inside a div element, does not matter what comes before it.
You can also select elements by different attributes like id, class, type, etc. using XPath selector. Let’s see how to do that.
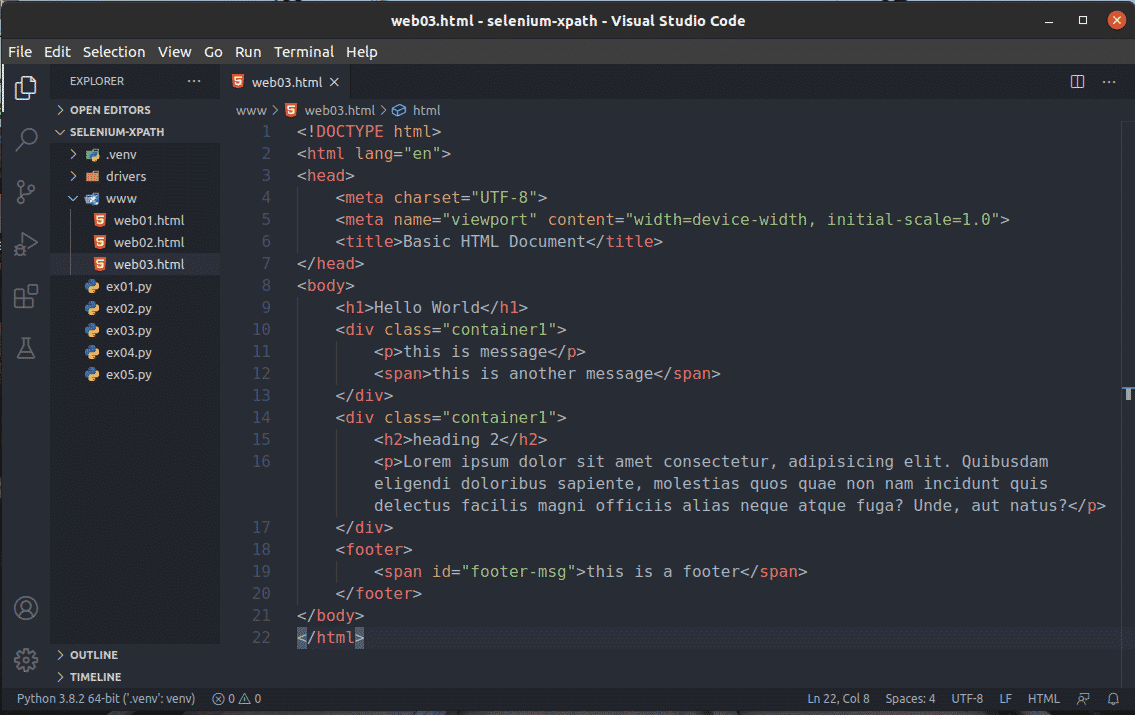
Create a new file web03.html in the www/ directory and type in the following lines of codes in it.
<html lang="en">
<head>
<meta charset="UTF-8">
<meta name="viewport" content="width=device-width, initial-scale=1.0">
<title>Basic HTML Document</title>
</head>
<body>
<h1>Hello World</h1>
<div class="container1">
<p>this is message</p>
<span>this is another message</span>
</div>
<div class="container1">
<h2>heading 2</h2>
<p>Lorem ipsum dolor sit amet consectetur, adipisicing elit. Quibusdam
eligendi doloribus sapiente, molestias quos quae non nam incidunt quis delectus
facilis magni officiis alias neque atque fuga? Unde, aut natus?</p>
</div>
<footer>
<span id="footer-msg">this is a footer</span>
</footer>
</body>
</html>
Once you’re done, save the web03.html file and load it in your web browser.
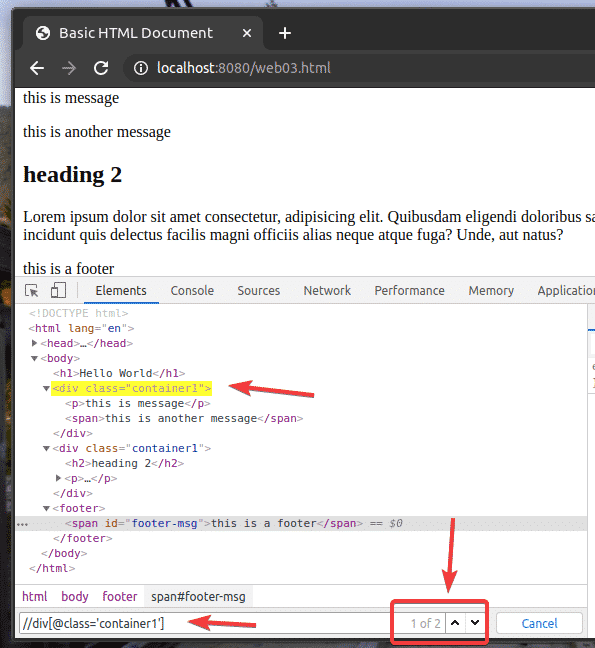
Let’s say you want to select all the div elements which have the class name container1. To do that, you can use the XPath selector //div[@class=’container1′]
As you can see, I have 2 elements which match the XPath selector //div[@class=’container1′]
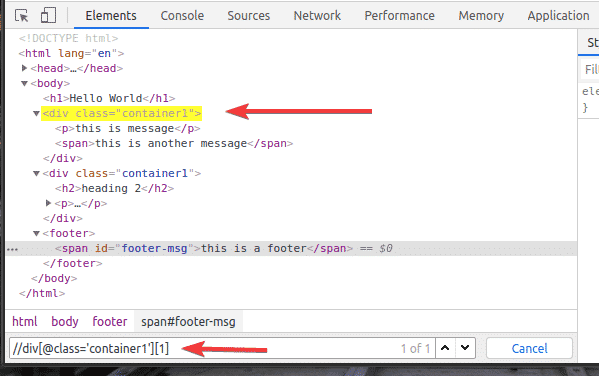
To select the first div element with the class name container1, add [1] at the end of the XPath select, as shown in the screenshot below.
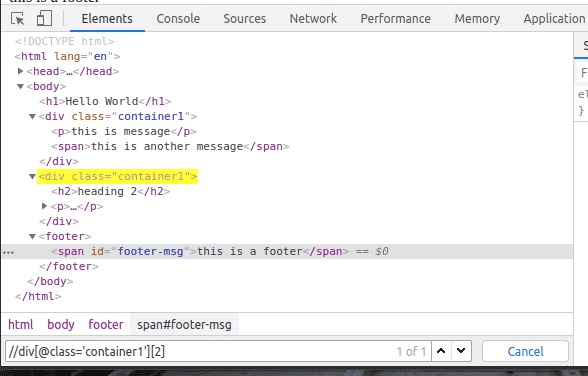
The same way, you can select the second div element with the class name container1 using the XPath selector //div[@class=’container1′][2]
You can select elements by id as well.
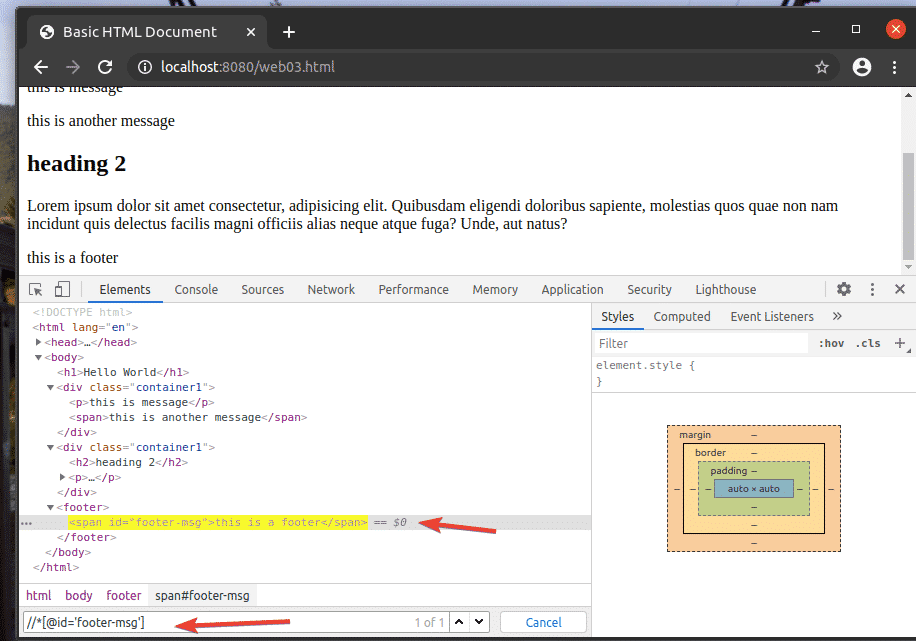
For example, to select the element which has the id of footer-msg, you can use the XPath selector //*[@id=’footer-msg’]
Here, the * before [@id=’footer-msg’] is used to select any element regardless of their tag.
That’s the basics of the XPath selector. Now, you should be able to create your own XPath selector for your Selenium projects.
Conclusion:
In this article, I have shown you how to find and select elements from web pages using the XPath selector with the Selenium Python library. I have also discussed the most common XPath selectors. After reading this article, you should feel pretty confident selecting elements from web pages using the XPath selector with the Selenium Python library.
from Linux Hint https://ift.tt/34PjaBK


0 Comments