


Kubernetes (k8s) is a free and open-source container orchestration tool. It is used for deploying, scaling and managing containerized based applications. In this article we will demonstrate how to install Kubernetes Cluster on Ubuntu 20.04 LTS Server (Focal Fossa) using kubeadm. In my lab setup I have used three Ubuntu 20.04 LTS server machines. Following are the system requirements on each Ubuntu system.
- Minimum of 2 GB RAM
- 2 Core (2 vCPUs)
- 15 GB Free Space on /var
- Privileged user with sudo rights
- Stable Internet Connection
Following are the details of my lab setup:
- Machine 1 (Ubuntu 20.04 LTS Server) – K8s-master – 192.168.1.40
- Machine 2 (Ubuntu 20.04 LTS Server) – K8s-node-0 – 192.168.1.41
- Machine 3 (Ubuntu 20.04 LTS Server) – K8s-node-1 – 192.168.1.42

Now let’s jump into the Kubernetes installation steps
Step1) Set hostname and add entries in /etc/hosts file
Use hostnamectl command to set hostname on each node, example is shown below:
$ sudo hostnamectl set-hostname "k8s-master"     // Run this command on master node
$ sudo hostnamectl set-hostname "k8s-node-0"     // Run this command on node-0
$ sudo hostnamectl set-hostname "k8s-node-1"     // Run this command on node-1
Add the following entries in /etc/hosts files on each node,
192.168.1.40    k8s-master
192.168.1.41    k8s-node-0
192.168.1.42    k8s-node-1
Step 2) Install Docker (Container Runtime) on all 3 nodes
Login to each node and run the following commands to install docker,
$ sudo apt update
$ sudo apt install -y docker.io
Now start and enable docker service on each node using beneath systemctl command,
$ sudo systemctl enable docker.service --now
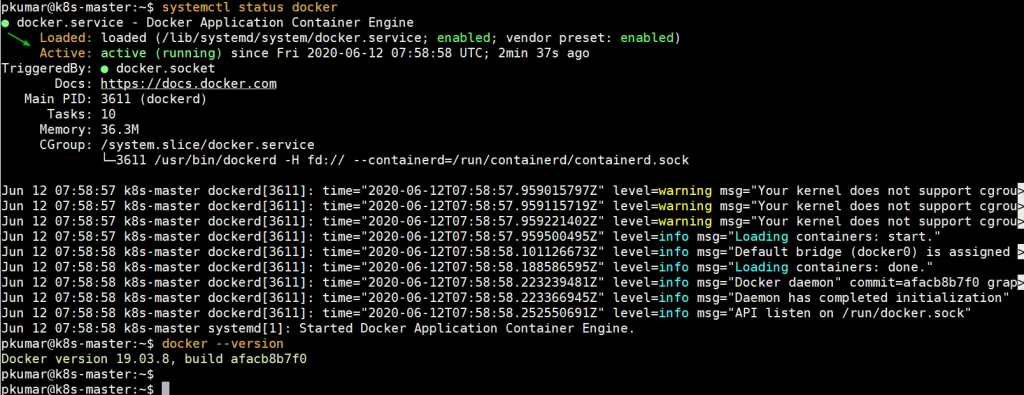
Run the following command to verify the status of docker service and its version,
$ systemctl status docker
$ docker --version
Step 3) Disable swap and enable IP forwarding on all nodes
To disable swap, edit /etc/fstab file and comment out the line which includes entry either swap partition or swap file.
$ sudo vi /etc/fstab
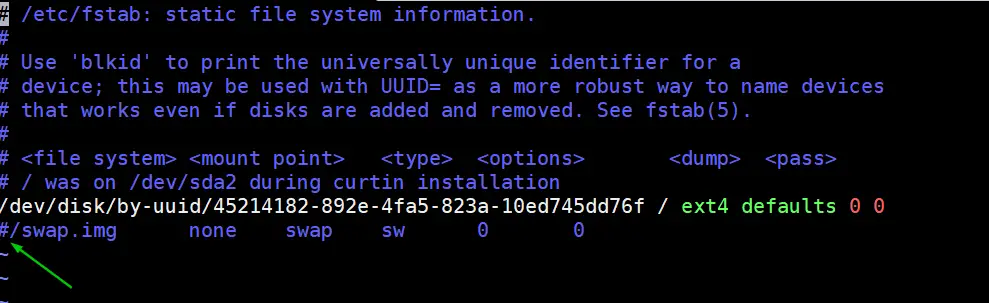
Save & exit the file
Run swapoff command to disable the swap on the fly
$ sudo swapoff -a
To enable the ip forwarding permanently, edit the file “/etc/sysctl.conf” and look for line “net.ipv4.ip_forward=1” and un-comment it. After making the changes in the file, execute the following command
$ sudo sysctl -p
net.ipv4.ip_forward = 1
$
Step 4) Install Kubectl, kubelet and kubeadm on all nodes
Run the following commands on all 3 nodes to install kubectl , kubelet and kubeadm utility
$ sudo apt install -y apt-transport-https curl
$ curl -s https://packages.cloud.google.com/apt/doc/apt-key.gpg | sudo apt-key add
$ sudo apt-add-repository "deb http://apt.kubernetes.io/ kubernetes-xenial main"
$ sudo apt update
$ sudo apt install -y kubelet kubeadm kubectl
Note : At time of writing this article , Ubuntu 16.04 (Xenial Xerus ) Kubernetes repository was available but in future, when the kubernetes repository is available for Ubuntu 20.04 then replace xenial with focal word in above ‘apt-add-repository’ command.
Step 4) Initialize Kubernetes Cluster using kubeadm (from master node)
Login to your master node (k8s-master) and run below ‘kubeadm init‘ command to initialize Kubernetes cluster,
$ sudo kubeadm init
Once the cluster is initialized successfully, we will get the following output
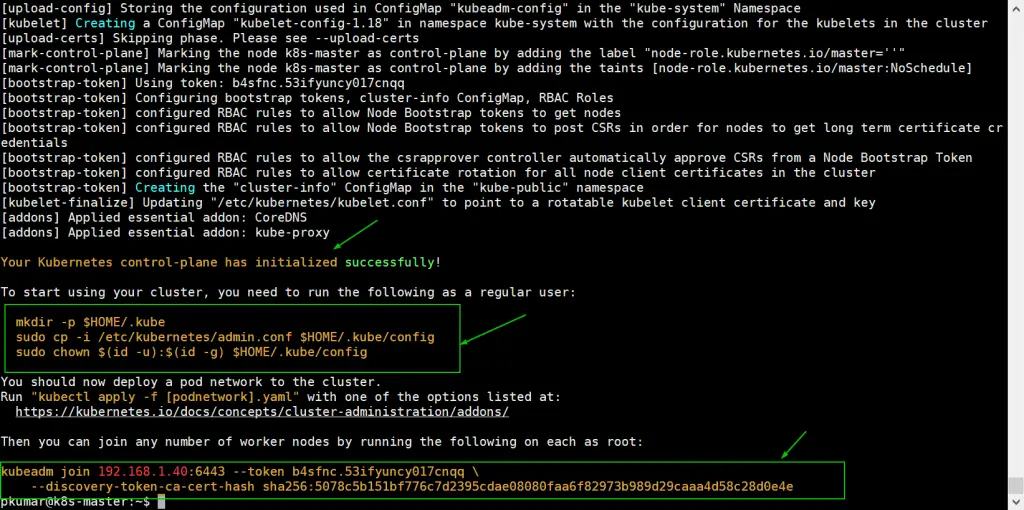
To start using the cluster as a regular user, let’s execute the following commands, commands are already there in output just copy paste them.
pkumar@k8s-master:~$  mkdir -p $HOME/.kube
pkumar@k8s-master:~$  sudo cp -i /etc/kubernetes/admin.conf $HOME/.kube/config
pkumar@k8s-master:~$  sudo chown $(id -u):$(id -g) $HOME/.kube/config
Now Join the worker nodes (k8s-node-0/1) to cluster, command to join the cluster is already there in the output. Copy “kubeadm join” command and paste it on both nodes (worker nodes).
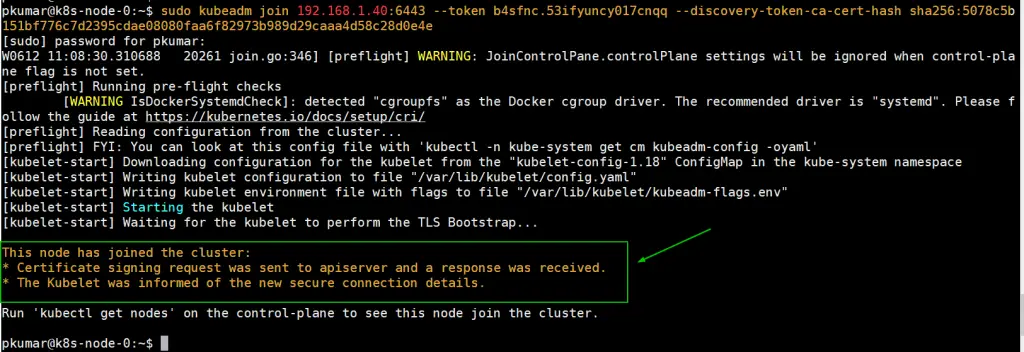
Login to Node-0 and run following command,
pkumar@k8s-node-0:~$ sudo kubeadm join 192.168.1.40:6443 --token b4sfnc.53ifyuncy017cnqq --discovery-token-ca-cert-hash sha256:5078c5b151bf776c7d2395cdae08080faa6f82973b989d29caaa4d58c28d0e4e
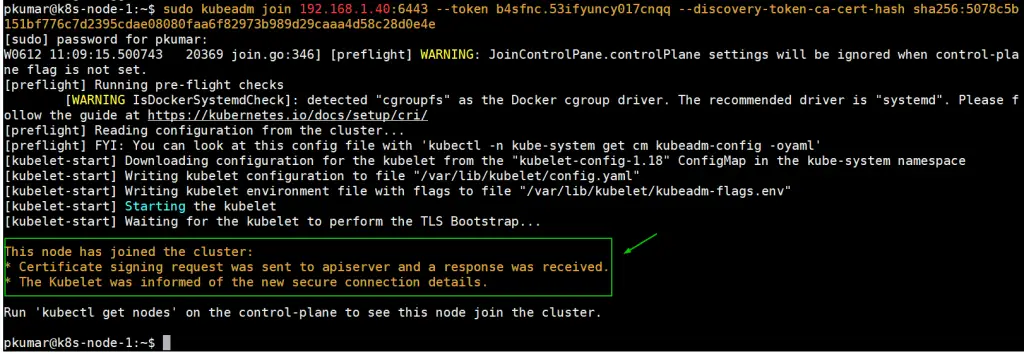
Login to Node-1 and run following command to join the cluster,
pkumar@k8s-node-1:~$ sudo kubeadm join 192.168.1.40:6443 --token b4sfnc.53ifyuncy017cnqq --discovery-token-ca-cert-hash sha256:5078c5b151bf776c7d2395cdae08080faa6f82973b989d29caaa4d58c28d0e4e
From the master node run “kubectl get nodes” command to verify nodes status
pkumar@k8s-master:~$ kubectl get nodes
NAME         STATUS     ROLES    AGE     VERSION
k8s-master   NotReady   master   27m     v1.18.3
k8s-node-0   NotReady   <none>   8m3s    v1.18.3
k8s-node-1   NotReady   <none>   7m19s   v1.18.3
pkumar@k8s-master:~$
As we can see both worker nodes and master node have joined the cluster, but status of each node is “NotReady”. To make the status “Ready” we must deploy Container Network Interface (CNI) based Pod network add-ons like calico, kube-router and weave-net. As the name suggests, pod network add-ons allow pods to communicate each other.
Step 5) Deploy Calico Pod Network Add-on (Master Node)
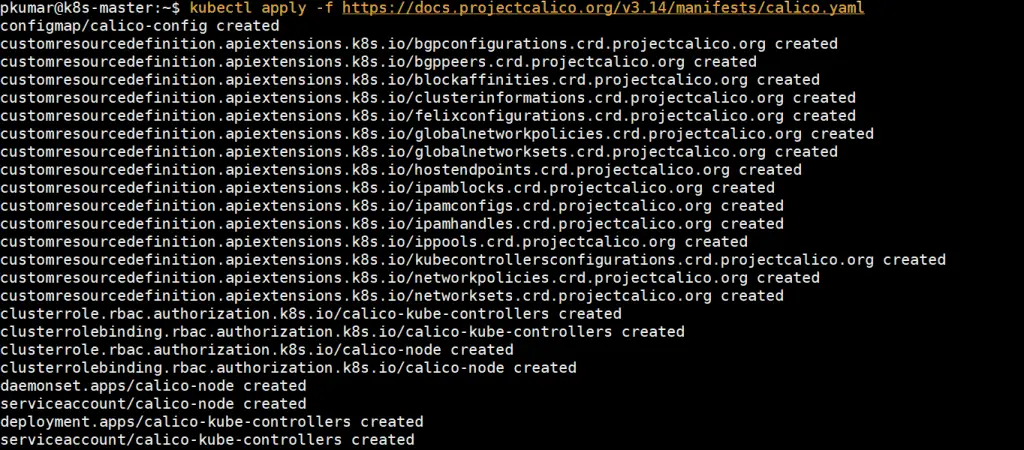
From the master node, run the following command to install Calico pod network add-on,
pkumar@k8s-master:~$ kubectl apply -f https://docs.projectcalico.org/v3.14/manifests/calico.yaml
Once it has been deployed successfully then nodes status will become ready, let’s re-run kubectl command to verify nodes status
pkumar@k8s-master:~$ kubectl get nodes
NAME         STATUS   ROLES    AGE   VERSION
k8s-master   Ready    master   39m   v1.18.3
k8s-node-0   Ready    <none>   19m   v1.18.3
k8s-node-1   Ready    <none>   19m   v1.18.3
pkumar@k8s-master:~$
Run below command to verify status of pods from all namespaces
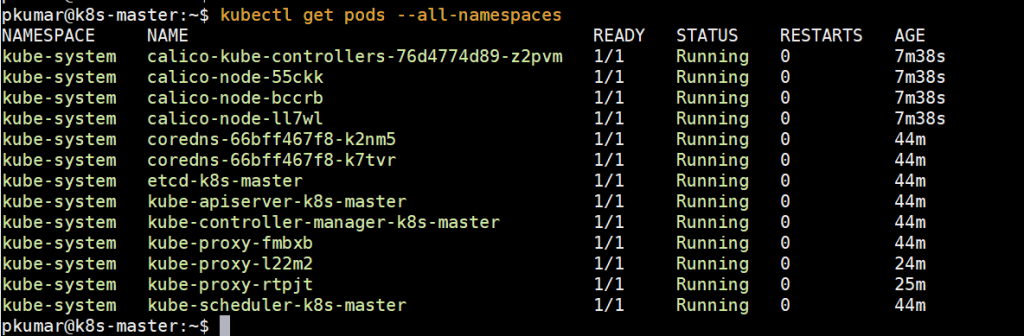
Perfect, above confirms that all the pods are running and are in healthy state. Let’s try to deploy pods, service and deployments to see whether our Kubernetes cluster is working fine or not.
Note: To enable bash completion feature on your master node, execute the followings
pkumar@k8s-master:~$ echo 'source <(kubectl completion bash)' >>~/.bashrc
pkumar@k8s-master:~$ source .bashrc
Step 6) Test and Verify Kubernetes Cluster
Let’s create a deployment named nginx-web with nginx container image in the default namespace, run the following kubectl command from the master node,
pkumar@k8s-master:~$ kubectl create deployment nginx-web --image=nginx
deployment.apps/nginx-web created
pkumar@k8s-master:~$
Run below command to verify the status of deployment
pkumar@k8s-master:~$ kubectl get deployments.apps
NAME        READY   UP-TO-DATE   AVAILABLE   AGE
nginx-web   1/1     1            1           41s
pkumar@k8s-master:~$ kubectl get deployments.apps  -o wide
NAME        READY   UP-TO-DATE   AVAILABLE   AGE   CONTAINERS   IMAGES   SELECTOR
nginx-web   1/1     1            1           56s   nginx        nginx    app=nginx-web
pkumar@k8s-master:~$
pkumar@k8s-master:~$ kubectl get  pods
NAME                         READY   STATUS    RESTARTS   AGE
nginx-web-7748f7f978-nk8b2   1/1     Running   0          2m50s
pkumar@k8s-master:~$
As we can see that deployment has been created successfully with default replica.
Let’s scale up the deployment, set replicas as 4. Run the following command,
pkumar@k8s-master:~$ kubectl scale --replicas=4 deployment nginx-web
deployment.apps/nginx-web scaled
pkumar@k8s-master:~$
Now verify status of your deployment using following commands,
pkumar@k8s-master:~$ kubectl get deployments.apps nginx-web
NAME        READY   UP-TO-DATE   AVAILABLE   AGE
nginx-web   4/4     4            4           13m
pkumar@k8s-master:~$
pkumar@k8s-master:~$ kubectl describe deployments.apps nginx-web
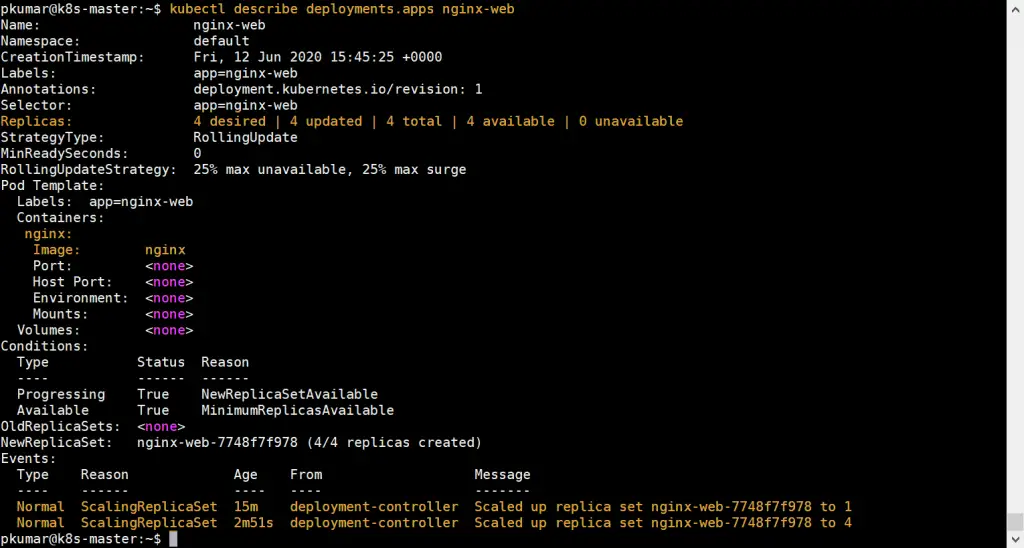
Above confirms that nginx based deployment has been scale up successfully.
Let’s perform one more test, create a pod named “http-web” and expose it via service named “http-service” with port 80 and NodePort as a type.
Run the following command to create a pod,
pkumar@k8s-master:~$ kubectl run http-web --image=httpd --port=80
pod/http-web created
pkumar@k8s-master:~$
Create a service using beneath command and expose above created pod on port 80,
pkumar@k8s-master:~$ kubectl expose pod http-web --name=http-service --port=80 --type=NodePort
service/http-service exposed
pkumar@k8s-master:~$
pkumar@k8s-master:~$ kubectl get service http-service
NAME           TYPE       CLUSTER-IP       EXTERNAL-IP   PORT(S)        AGE
http-service   NodePort   10.101.152.138   <none>        80:31098/TCP   10s
pkumar@k8s-master:~$
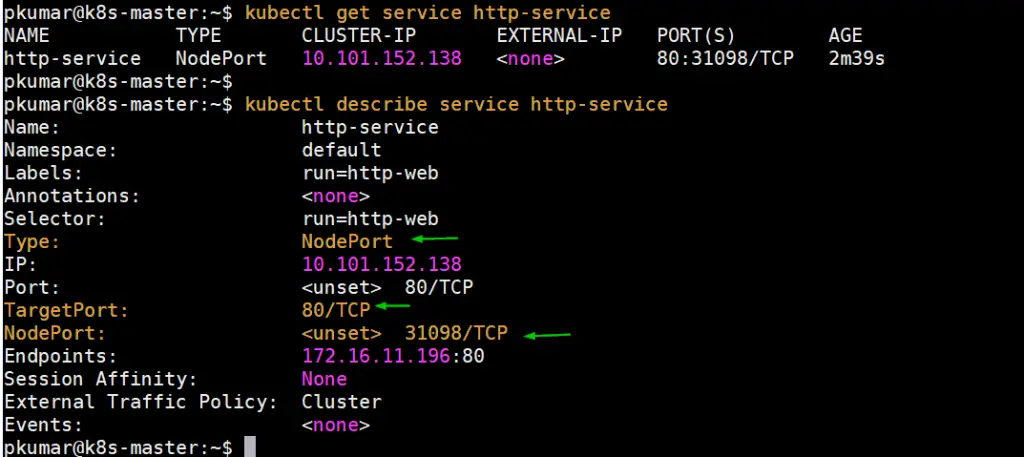
Get Node IP or hostname on which http-web pod is deployed and then access webserver via NodePort (31098)
pkumar@k8s-master:~$ kubectl get pods http-web -o wide
NAME       READY   STATUS    RESTARTS   AGE   IP              NODE         NOMINATED NODE   READINESS GATES
http-web   1/1     Running   0          59m   172.16.11.196   k8s-node-0   <none>           <none>
pkumar@k8s-master:~$
pkumar@k8s-master:~$ curl http://k8s-node-0:31098
<html><body><h1>It works!</h1></body></html>
pkumar@k8s-master:~$
Perfect, it is working fine as expected. This conclude the article and confirms that we have successfully setup Kubernetes cluster on Ubuntu 20.04 LTS Server.
from Linuxtechi https://ift.tt/2UWGurJ


0 Comments