LibreOffice Draw
Most Linux distributions ship LibreOffice office suite by default. If not, you can download it from here. Using the “LibreOffice Draw” app, you will be able to convert a PDF file into a set of images.
LibreOffice Draw, as the name suggests, allows you to create drawings, sketches, graphics, annotations and so on. By default it supports exporting PDF file to various image formats, however it only converts the first page of the PDF file. To fix this, you will need to install “Export as images” extension from here. This extension adds a new “Export as Images…” entry to “File” dropdown menu and it supports exporting multiple PDF pages.
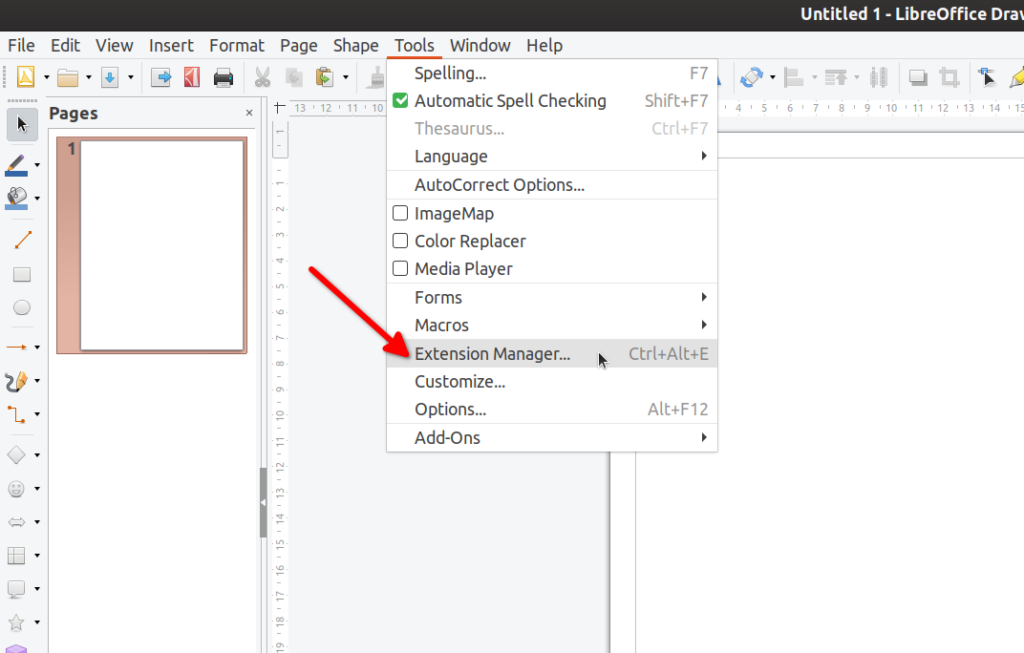
Once you have downloaded “oxt” file from the link above, add it to extension manager. Go to “Tools” > “Extension Manager…”, as shown in the screenshot below.
Click on “Add” button to add the “oxt” extension file to LibreOffice Draw.
After successfully adding the “oxt” file, a new entry will appear in the list of extensions.
A new entry “Export as images…” will be added to the “File” dropdown menu.
Open a PDF file in LibreOffice Draw and then click on “Export as images…” menu entry to start the conversion process. You will see a new window popup that will allow you to customize export options. Change the options as per your needs and click on “Export” button.
That’s it. Each page in your PDF file has now been exported as a separate image. This is by far my favorite method. The setup is quite easy and LibreOffice Draw even allows you to edit and annotate PDF files before exporting.
ImageMagick
ImageMagick is a command line tool to convert, edit and manipulate image, PDF, and SVG files. It comes with many advanced options and the app itself is quite powerful. You can see it as a FFmpeg equivalent, but mostly for image files.
ImageMagick ships with a “convert” command that can be used to convert files into different formats. To install ImageMagick in Ubuntu, run the following command:
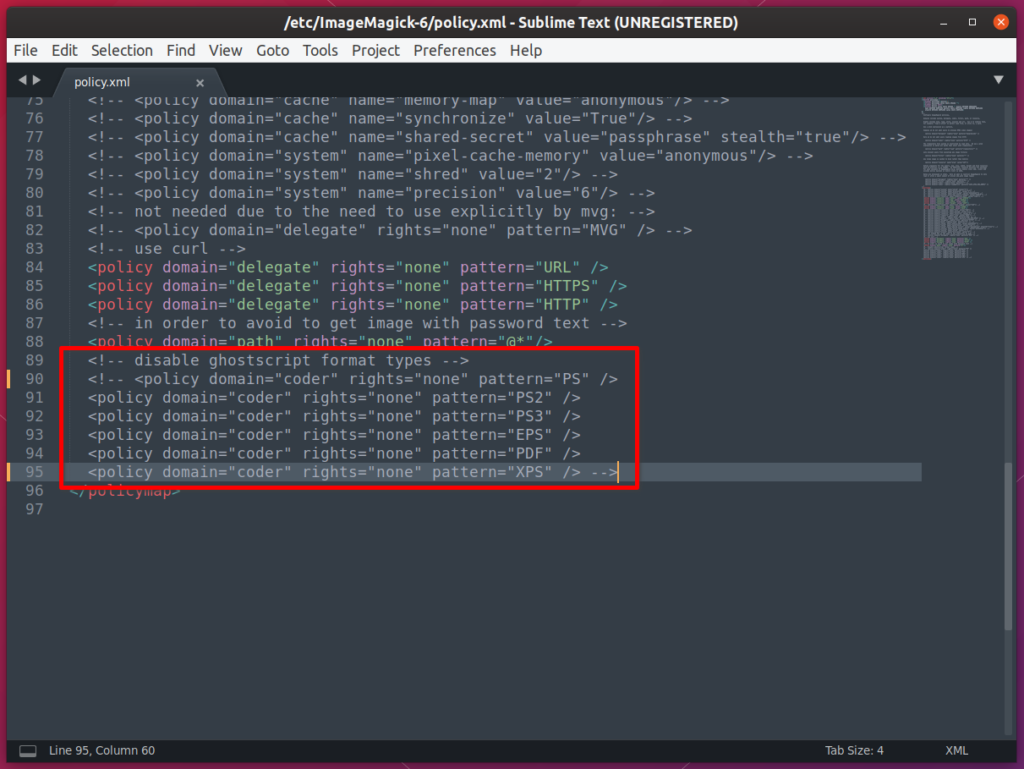
By default, PDF conversion is disabled in ImageMagick. To enable it, open the file “/etc/ImageMagick-6/policy.xml” in a text editor and comment out all the lines under “disable ghostscript format types”:
To convert a PDF file to a set of images using “convert”, use a command in the following format:
Where:
- -density stands for the DPI at which the PDF input file be loaded by the “convert” command
- pdf is the PDF file you want to convert
- -quality determines the quality of resulting images (0-100, with 100 being best)
- png is the prefix for output files (change the “png” extension for any other format like “jpg”)
Pdftoppm (PDF to PPM)
Pdftoppm is a simple command line utility dedicated to convert PDF files into PPM, PNG and JPEG file formats.
To install pdftoppm in Ubuntu, run the command below:
To convert a PDF file to a set of images using pdftoppm, use a command in the following format:
Where:
- pdf is the PDF file you want to convert
- output_file is the prefix used for output files
- -png is file format for converted output files
- -rx 150 -ry 150 is the DPI at which PDF file be loaded by pdftoppm (equivalent to imagemagick’s density option)
Inkscape
Inkscape is a free, open source, and cross-platform software for creating and editing vector graphics. Using Inkscape’s built-in export function, it is possible to convert a PDF file to a bunch of images.
Note that support for exporting multiple pages was added to inkscape only recently. So the package shipped with your distribution probably won’t work. The minimum required version you need is 1.0.0. Latest beta build of Inkscape with multi-page support can be downloaded from here in the form of AppImage. Make sure that you mark the file executable from the file manager.
To convert a PDF file into images using Inkscape, run a command in the following format:
--export-dpi=300 --export-area-page --pdf-page=$i --export-file="output-$i.png";
done
Where:
- {1..10} are page numbers of PDF, you need to specify this correctly otherwise the command won’t work (change the values as needed)
- ./Inkscape-2b71d25-x86_64.AppImage is the name of Inkscape AppImage file you downloaded from the link above (change the name as needed)
- pdf is the name of input file to be converted (change the name as needed)
- -z is for using a headless inkscape without a GUI (leave as it is)
- –export-dpi=300 is the density at which PDF file be loaded by Inkscape (change the value as needed)
- –export-area-page is for exporting entire PDF page (leave as it is)
- –pdf-page=$i refers to the page number to be exported (leave as it is)
- –export-file=”output-$i.png” is the prefix for output files (change the “output” part as needed)
Conclusion
These are the main methods you can use to convert a PDF file to multiple images. There are a few other methods and apps that can be used for conversion, but they require a lot of steps without bringing anything new to the table, so I have omitted them from this list.
from Linux Hint https://ift.tt/2ZQX1OP


0 Comments