


Let’s start with the launch of a Ubuntu 20.04 console application. The shortcut key “Ctrl+Alt+T” will be used to launch it in our system quickly. To use the usermod command in Linux, we must use it in the terminal with sudo rights. For the use of sudo rights, you have to use the keyword “su” in the shell, as shown below. It will require your root account password and press Enter to do so. You will see that we will be able to work in a sudo terminal environment.

01: Add Extra Detail to User Account
Firstly, we will use the usermod command to add some detail to some user accounts. For that, we will be using the “-c” flag with that detail and the username of an account, i.e. “Linux”. To check the updates, we have to use the grep command with the “-E” flag and the name of an account “Linux” while mentioning the path to the “/etc/passwd” file. It will show us the updated details about the user “Linux” as shown below.

02: Update Primary Group
We are capable of updating the primary group of any user in Linux using the usermod command. Firstly, we need to check the account’s details about its group using the “id” command displayed below. The “Linux” user works in the primary “Linux” group.
![]()
The “-g” flag within the usermod command can let you change the primary group of a user “Linux”. We will change the “Linux” group with the “admin” group. Using the “id” command, we can see the change in the primary group of an account “Linux”.

The capital “-G” flag within the usermod can be used to append the new groups to the specific account without changing the primary group and deleting the previous ones.

03: Update Account’s Username
The “-l” flag can be used in the usermod command to change the username or login name of any specific user so far. So, we have changed the name of the account “Linux” to “Linux admin”. The “id” command has been used to get the information regarding the account “Linux”. It outputs that the “Linux” name has not been found so far.

So, we have changed the “linuxAdmin” to “linux” username once again using the “usermod” command. After using the “id” command, we have found the details about “Linux” again.

04: Lock Account
To lock the particular account, you need to use the “-L” flag in the usermod command, as you can see beneath. The use of the “grep” command for the “Linux” user to see the “/etc/shadow” file if the account is locked or not. The output shows the “!” sign after the name of an account which illustrates that this account is locked.

05: Unlock Account
You need to use the “-U” flag within the same usermod command as demonstrated below to unlock the already locked account. Now, the output of the “grep” command shows no “!” sign.

06: Move Home Folder
You can move the contents of a home directory of a particular account to another folder of your choice. You have to check for the current home directory of an account “Linux” using the grep command with the “/etc/passwd” file details. It shows that the home folder is currently the “Linux” folder.
![]()
To change it, you have to make use of the “-d” flag for directory, “-m” flag for “move” along with the path to a new directory, and “/var/linux/”. Now the Linux folder has ch illustrated th been saved to the “var” directory as per the grep command in the image.

07: Make Passwords Visible
Using the usermod command in the shell, we can simply un-encrypt the particular user password. For this, we need to use the “-p” flag within the usermod command along with the password of the “Linux” account. The grep command will show you the password in the details.

08: Update Shell
We can use the “-s” flag in the usermod command to change the shell of a particular user. Firstly, we have to check for the current user shell using grep as it outputs “/bin/sh/”.

Using the usermod command with “-s’ flag along with the new shell “bash”, we can change the account “Linux” shell.

09: Update ID’s
We can also use the usermod command to change the user and its group ID’s. Firstly, you have to use the simple “id” command to see the current “IDs”. After that, we will be using the “-u” flag within the usermod command to change the current user “ID” for “Linux” to 1001. The “ID” for using Linux has been updated after checking the account information.

To change the group “ID”, you have to mention the new group ID with the “-g” flag along with the username in the usermod command. You can also make use of the “-u” and “-g” flags both in a single command to change both user “ID” and its group “ID” at the same time. The command is shown below. After rechecking, you can see the IDs are updated in the record.

10: Update Account’s Home Folder
Firstly, we need to check the current home folder of the specific user, i.e. Linux, and then update the directory. So, the grep command with the “-E” flag and “/etc/passwd” file location will be used to do so, as demonstrated below.

To update the folder, we need to use the “-d” flag within the usermod command along with the new path “/home/Linux/” to the current account, i.e. Linux. After using the same grep command with the “-E” flag and “/etc/passwd” file location, we will be able to see these changes.

11: Update Expiry Date
The usermod command lets us change the current expiry date of any user. Firstly the Linux sudo terminal comes up with the “chage” command to list all the account details about passwords. So, we will see all these details using a “Linux” account as displayed.
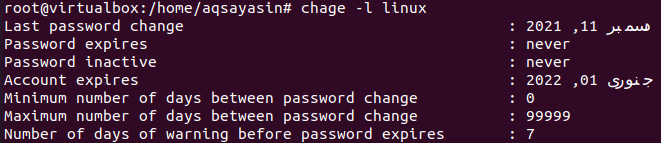
Let’s use the usermod command with the “-e” flag to change the expiry date of user “Linux” as displayed. After that, the same “chage” command will be used to list the password details of user “Linux”. In return, the output shows us the new expiry date in detail.

Conclusion:
We have done with the Linux usermod command. We have covered all the possible simplest methods to use the “usermod” command in the sudo terminal of the Ubuntu 20.04 system. We have clearly described each and every method and usermod command usage in detail to our users in this article.
from https://ift.tt/3HMNvRE


0 Comments