The EFS (Encrypting File System) Method
Encrypting a folder in Windows is made possible through EFS. It may sound technical but it is such a simple process that it can be done with just a few clicks of the mouse. There is no need to key-in any password when you access the encryption folder since the encryption is tied to your user account in a PC. This keeps your files safe from other users, that is, if there are several user accounts in the same PC. Not even the administrator can access your files or folders when you use EFS. This feature is available in Windows Pro, Enterprise and Education so if you’re a user of any of these editions, you can take advantage of this feature by following these steps.
1. Right-click on the folder you want to encrypt. Select Properties.

2. On the General tab, click Advance.
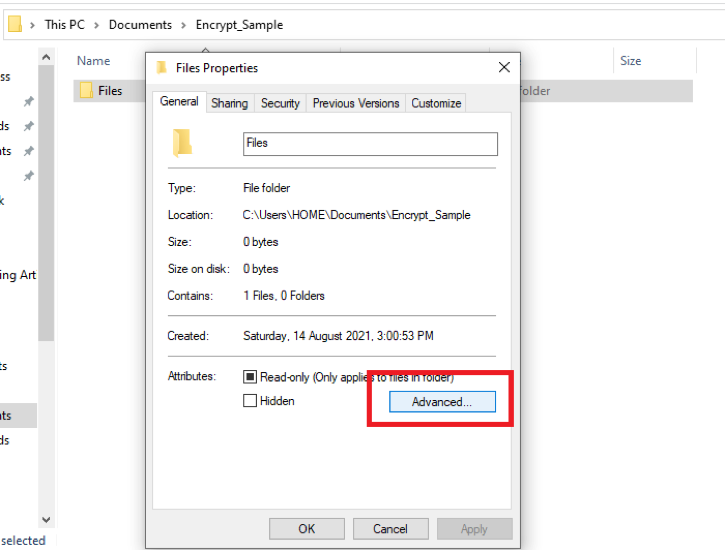
3. Check Encrypt contents to secure data. Click OK.
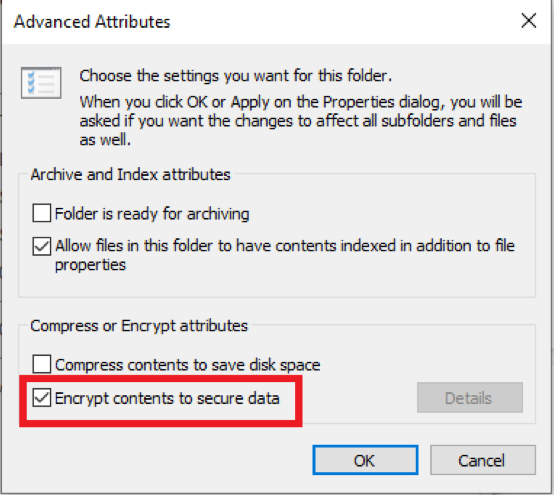
4. Click Apply. On the next window, choose Apply changes to this folder, subfolder, and files. Click OK. Click Apply on the next window. The folder is now encrypted.

Note: As the user who encrypted the folder, you will be able to access the folder and files every time you log-in to your account.
After encrypting the folder, a certificate will be generated and you will be prompted to back-up the encryption certificate. You can back it up to any location in your PC but it is recommended to save the certificate to an external drive like a thumb drive. The back-up certificate will be used in cases like your password was changed by the administrator without your knowledge or the encrypted folder is migrated to another workstation. The encrypted folder will not be accessible unless you apply the certificate.
To decrypt the folder, follow steps 1-4 but on Step 3, uncheck Encrypt contents to secure data.
The BitLocker Method
Just like EFS, BitLocker is available in Pro, Enterprise and Education editions of Windows but it was developed primarily for drive protection. You can also make use of this tool to keep your folders safe but it would require an extra step of creating a partition in your drive where you would then save the folders you need to protect.
Create a New Partition
1. Create a new disk partition in Disk Management. Right-click This PC à Manage à Disk Management.
2. Right-click on your main partition and select Shrink Volume.
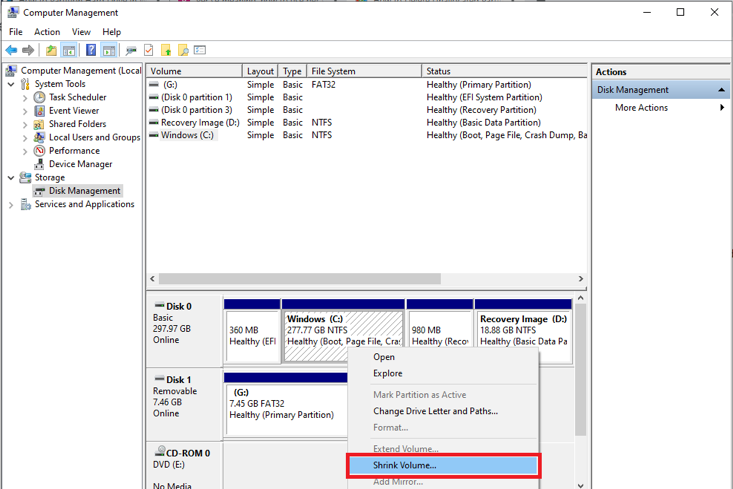
3. Set the size for the new volume. An unallocated space will then be created.
4. Right-click on the Unallocated space and select New Volume.

5. Follow the instructions to format the new partition. After formatting the partition, you will see a new drive in This PC.
Set a Password for New Drive
1. Right-click on the new drive you’ve created. Select Turn on BitLocker.
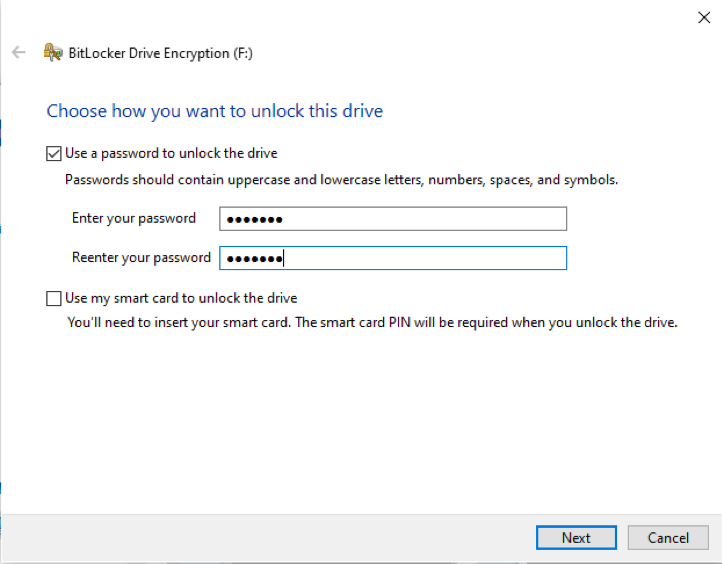
2. Check “Use a password to unlock this drive”.
3. Type your password in the Enter your password Retype it in the Reenter your password field to confirm. Click Next.
4. Choose how you want to back-up your recovery key.
5. Choose how much of your drive you want to encrypt.
6. Choose the encryption mode.
7. If you’re all set, click Start Encrypting.
8. Restart your PC to apply the encryption.
Note: After accessing the drive with a password, it will remain decrypted until you shut down or restart your PC again.
The Compression Software Method
Most compression software include a password protection feature for folders. Unlike the previous two methods, compression software is not a built-in Windows tool. What’s great about it is it can be installed in any Windows PC regardless of the edition.
In this example, we will use 7-Zip to show how to protect your folders using a compression software. 7-Zip is free and Windows-compatible software for compressing files. Simply download the software online and follow the steps below to protect your folder with a password.
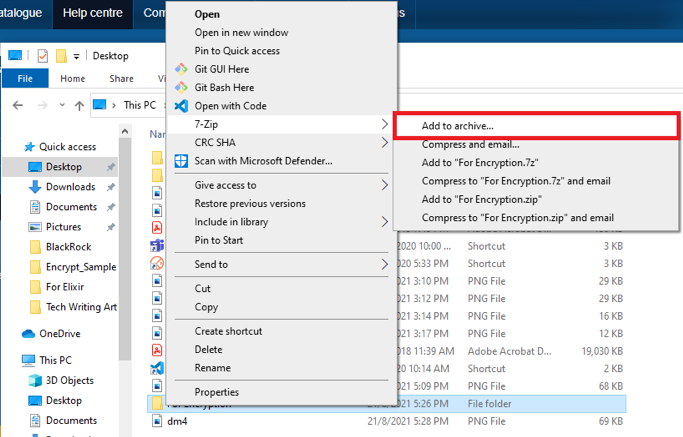
1. Right-click on the folder you want to protect with a password and Select 7-Zip à Add to Archive.
2. On the Encryption section, type and reenter the password to lock the folder. You can check Encrypt file names if you want the file names to be encrypted as well. Otherwise, leave it unchecked. Click OK. An encrypted 7-Zip (.7z) file will then be created.

Note: Make sure you delete the original folder once the encrypted zipped folder has been created.
To decrypt the folder:
1. Right-click on the encrypted folder and select Extract here.
2. Key in the password when prompted.
Third-party Password-Protection Software
Windows’ built-in encryption feature is a simple and easy way to secure your files but your files are still vulnerable to unauthorized access if for example, you forgot to log-out of your account leaving it open for other users to pry on. Similarly, if someone knows your password and logs into your account, your files are no longer safe since there is no other layer of security.
Wouldn’t it be great if Windows can include a password-protection tool? While there is still no news of that coming into fruition, you can use BitLocker and any compression software with password-protection features to keep your files safe. Aside from these, there are many third-party apps you can use to secure your folder with a password. Free software like LocK-A-FoLdeR, NEO- Easy Folder LOCKER and Folder Locker Pro offer basic password-protection for folders but if you need advanced features like password-protection plus encryption, you can purchase the software like Folder Guard and Folder Lock Lite. Some antivirus software like Bitdefender and Avast also offers file and folder protection features. You may check your antivirus software if such features are included in your package.
from https://ift.tt/3sTWTMY


0 Comments