The ADUC is among the most important Active Directory domain management solutions (ADUC). The ADUC snap-in is being utilized to cope with consumers, groups, machines, and Work Groups and execute common domain management activities.
You must first deploy the Remote Server Administration Tools in Microsoft windows before you can utilize the ADUC snap-in (RSAT). The RSAT has several command-line utilities, PowerShell plugins, and visual snap-ins for remotely managing Windows Servers, Active Directory, as well as other Windows functions and functionalities that operate on Windows Server.
Let’s start with the installation of the RSAT feature first. Login from the Windows 10 operating system and after that, click on the left-most corner search area of the Windows desktop after login. Write “Settings” in this search area and it will show up in the Settings tool. Hit on the Settings tool to exposed it quickly. Now the settings app has been launched, you will get many different options here. One of the options is “Apps”. Click on the “Apps” option to open settings for apps.

Now, the “Apps & Features” screen has been opened in the Home bar. You have to click on the option of “Optional Features” highlighted in the blue color in the presented screenshot.

The Optional Features window has been showing up. As we want to install RSAT, we have to add it first. So, you have to click on the plus sign named “Add a feature” to search for the RSAT tool.

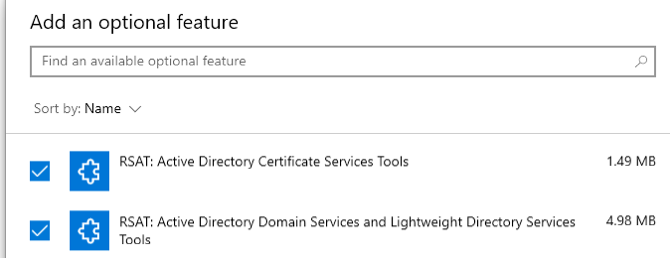
Now, a dialogue box will appear named “Add an optional feature” on your screen. You will be provided with a search bar to search the available optional feature or you can simply scroll down below to search it manually. Select the “RSAT: Active Directory Certificate Services Tools” and “RSAT: ADDS and LDST” on our screen by check-marking the checkboxes.
This window is also showing the size of a feature and tool to be installed. After the selection, we have to tap on the blue-colored button named “Install” to start installing these features on our Windows 10.
Right after the click on the “Install” button, the services and features will start installing on our system as presented in the image underneath. Take a rest because it will take a little longer to install these features on Windows 10 operating system.

Now the features have been installed, you can start using these features after the reboot. So, Restart your Windows system to see the changes that are just done by installation.

After the reboot of the Windows operating system, it’s now turning for a user to enable the Active Directory tools on our system. Therefore, You have to search the Control Panel by writing it on the search bar of your desktop. Open the Control Panel. After the opening of the control panel, click on the “Programs” section to go further.
The below-presented window will be opened. Within the different choices, below the Preference of “Programs & Features,” you have to just tap on the choice of “Turn Windows features on or off” quickly.
Control Panel > Programs > Programs and Features > “Turn Windows features on or off”

The new dialogue box named “Windows Features” will pop-up on our screen as below. Make it necessary to check-mark the “ADLT Services”. After that, you have to just expand the choice of Remote Server Administration services.
Within this option, enlarge the option of “Role Administrative Tools” and then “AD DS and AD LDS Tools”. Select the option of “AD DS Tools” and press the button “OK” to continue implementing changes.
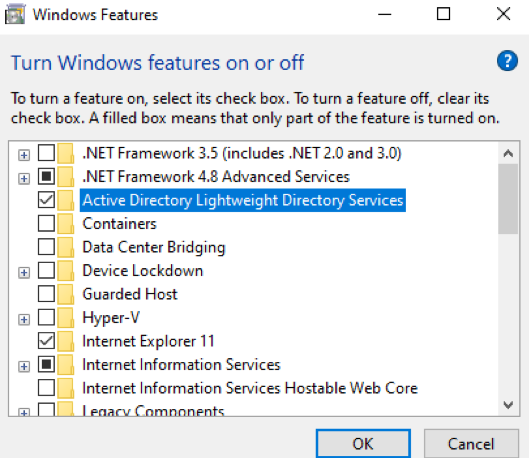
Right after the click on the “Ok” button, it will start searching for the required files from your system to implement the changes as can be seen from the output below.

Wait until the search process got completed. When the searching has been done, the output will be as below. Tap the “Close” button to continue moving forward.

After all the required snap-ins are installed especially “AD Management Tool”, let’s begin with the listing of Windows Users and Computers. For that purpose, tap on your search bar of Windows desktop first. Write Control panel on it to open it. The control panel app will be shown. Tap on it to open it. Now the control panel has been showing up with different sections.
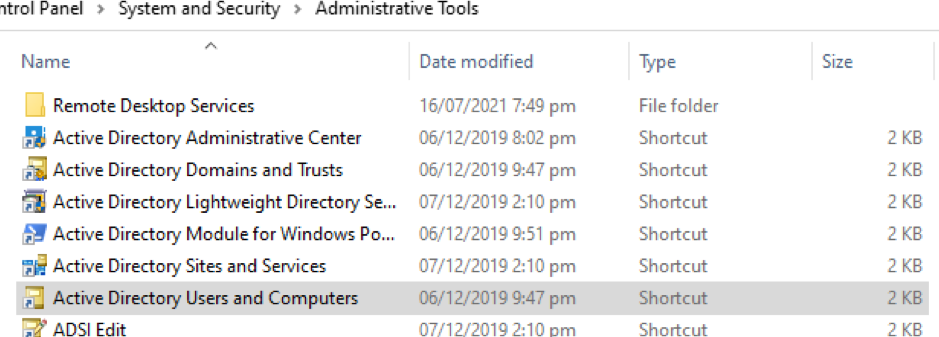
Tap on the section “System and Security” to further explore it. Now, go to the most lower section of System and Security and you will find the option of Administrative Tools. Just hit on the “Administrative Tools” to explore it more.

The file explorer of Administrative Tools has been opened as per the below output image. You will view the different shortcuts of Active Directory services. One of them will be “ADUC”. Right-click on it and tap on the option of Properties to open its properties on your screen to manage further.
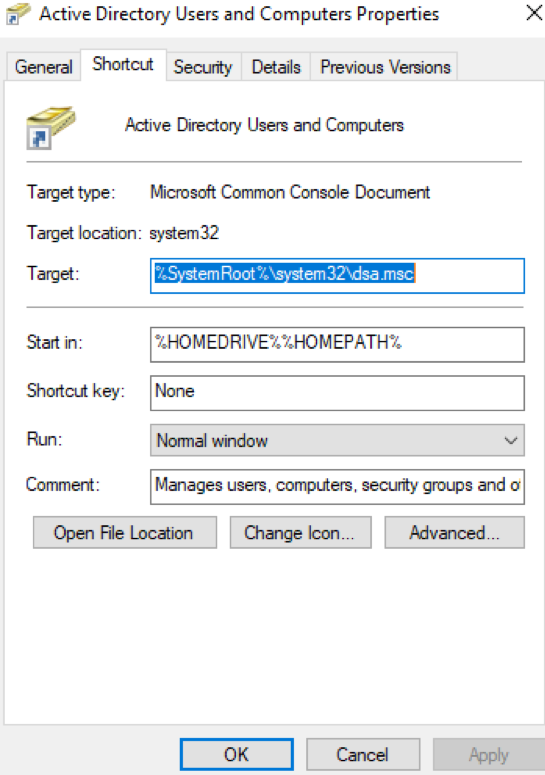
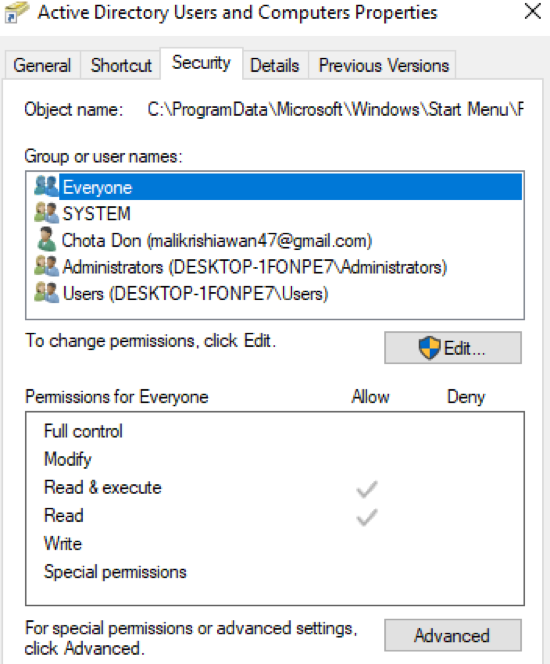
Then, the properties dialogue box for Active Directory Users and computers will be opened. We can grasp the different properties of this segment of Active Directory Users and Computers. We could see an expression at the field showing the path in the section of Shortcut.
Tap on the section of “Security” to expand and explore it in depth. You will see the list of Users and computers that are being a member of Active Directory group. You can tap on the button “Edit” to change the permissions regarding each member of the Active Directory. You can see the User “Everyone” has the only right of reading and execution none other than that. Let’s change the privileges of a user “Everyone” by clicking on the “Edit” button shown below.
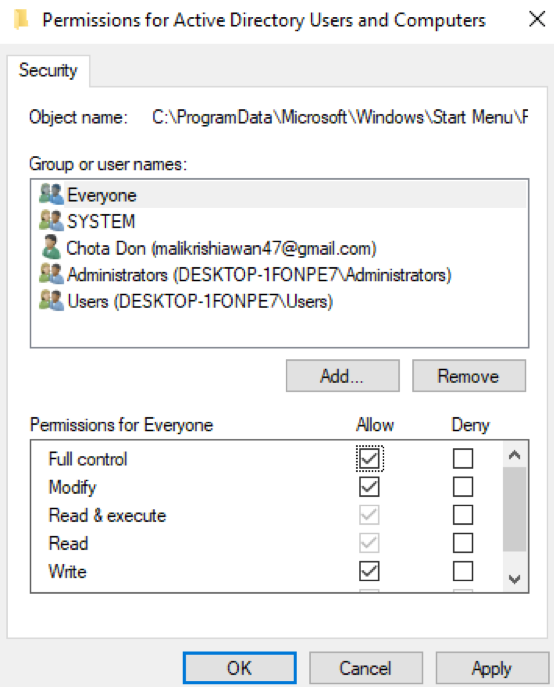
Right after the click on the “Edit” button, the Permission for Everyone and other users will be updateable. Now you can click on any user or computer, and then check-mark the checkboxes of Allow or Deny to assign rights to a particular user. This is as simple as few clicks.
Tap first on the button of “Apply” to implement changes and then hit the button of “OK” to continue doing something different. You can also add a new user by one click on the “Add” button and remove an existing user by tapping the “Remove” button.
Conclusion
We have seen how to install RSAT (Remote Server Administration Tools) in the Microsoft Windows operating system. After that, we have seen how to implement and see the changes by Turning Windows features on or off option.
Meanwhile, the main part was to see the list of Active Directory Users and Computers. We have discussed two simple ways to list the Users in Windows Active Directory.
On the other hand, it is recommended to install Window Server’s latest edition from Microsoft to implement such changes and see the list of Active Directory Users and Computers.
from Linux Hint https://ift.tt/2WUkXUf


0 Comments