Technically, when you copy/move/create new files on your ZFS pool/filesystem, ZFS will divide them into chunks and compare these chunks with existing chunks (of the files) stored on the ZFS pool/filesystem to see if it found any matches. So, even if parts of the file are matched, the deduplication feature can save up disk spaces of your ZFS pool/filesystem.
In this article, I am going to show you how to enable deduplication on your ZFS pools/filesystems. So, let’s get started.
Table of Contents:
- Creating a ZFS Pool
- Enabling Deduplication on ZFS Pools
- Enabling Deduplication on ZFS Filesystems
- Testing ZFS Deduplication
- Problems of ZFS Deduplication
- Disabling Deduplication on ZFS Pools/Filesystems
- Use Cases for ZFS Deduplication
- Conclusion
- References
Creating a ZFS Pool:
To experiment with ZFS deduplication, I will create a new ZFS pool using the vdb and vdc storage devices in a mirror configuration. You can skip this section if you already have a ZFS pool for testing deduplication.
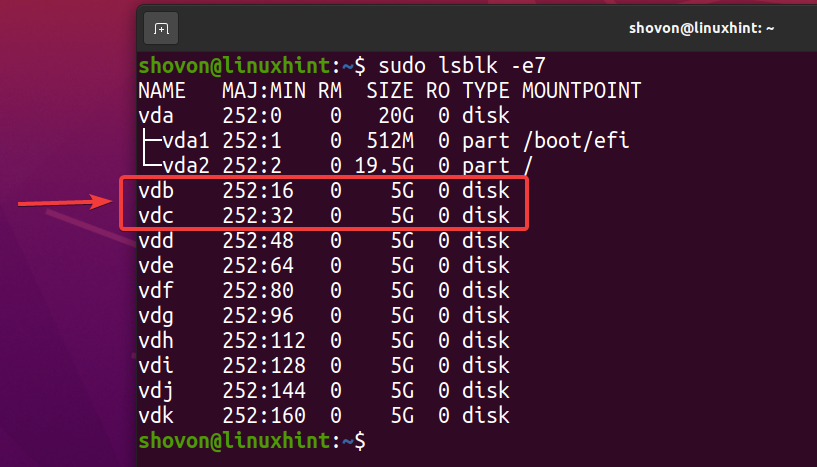
To create a new ZFS pool pool1 using the vdb and vdc storage devices in mirrored configuration, run the following command:

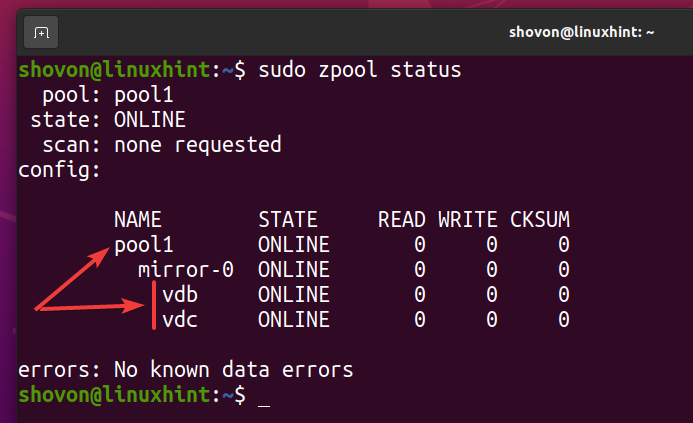
A new ZFS pool pool1 should be created as you can see in the screenshot below.
Enabling Deduplication on ZFS Pools:
In this section, I am going to show you how to enable deduplication on your ZFS pool.
You can check whether deduplication is enabled on your ZFS pool pool1 with the following command:

As you can see, deduplication is not enabled by default.

To enable deduplication on your ZFS pool, run the following command:

Deduplication should be enabled on your ZFS pool pool1 as you can see in the screenshot below.

Enabling Deduplication on ZFS Filesystems:
In this section, I am going to show you how to enable deduplication on a ZFS filesystem.
First, create a ZFS filesystem fs1 on your ZFS pool pool1 as follows:

As you can see, a new ZFS filesystem fs1 is created.

As you have enabled deduplication on the pool pool1, deduplication is also enabled on the ZFS filesystem fs1 (ZFS filesystem fs1 inherits it from the pool pool1).

As the ZFS filesystem fs1 inherits the deduplication (dedup) property from the ZFS pool pool1, if you disable deduplication on your ZFS pool pool1, deduplication should also be disabled for the ZFS filesystem fs1. If you don’t want that, you will have to enable deduplication on your ZFS filesystem fs1.
You can enable deduplication on your ZFS filesystem fs1 as follows:

As you can see, deduplication is enabled for your ZFS filesystem fs1.
Testing ZFS Deduplication:
To make things simpler, I will destroy the ZFS filesystem fs1 from the ZFS pool pool1.

The ZFS filesystem fs1 should be removed from the pool pool1.

I have downloaded the Arch Linux ISO image on my computer. Let’s copy it to the ZFS pool pool1.

As you can see, the first time I copied the Arch Linux ISO image, it used up about 740 MB of disk space from the ZFS pool pool1.
Also, notice that the deduplication ratio (DEDUP) is 1.00x. 1.00x of deduplication ratio means all the data is unique. So, no data is deduplicated yet.

Let’s copy the same Arch Linux ISO image to the ZFS pool pool1 again.

As you can see, only 740 MB of disk space is used even though we are using twice the disk space.
The deduplication ratio (DEDUP) also increased to 2.00x. It means that deduplication is saving half the disk space.

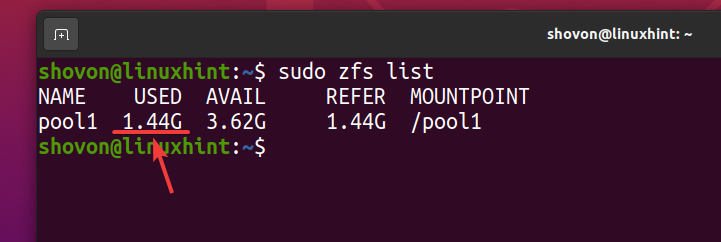
Even though about 740 MB of physical disk space is used, logically about 1.44 GB of disk space is used on the ZFS pool pool1 as you can see in the screenshot below.
Let’s copy the same file to the ZFS pool pool1 a few more times.

As you can see, after the same file is copied 5 times to the ZFS pool pool1, logically the pool uses about 3.59 GB of disk space.

But 5 copies of the same file only use about 739 MB of disk space from the physical storage device.
The deduplication ratio (DEDUP) is about 5 (5.01x). So, deduplication saved about 80% (1-1/DEDUP) of the available disk space of the ZFS pool pool1.

The higher the deduplication ratio (DEDUP) of the data you’ve stored on your ZFS pool/filesystem, the more disk space you’re saving with deduplication.
Problems of ZFS Deduplication:
Deduplication is a very nice feature and it saves a lot of disk space of your ZFS pool/filesystem if the data you’re storing on your ZFS pool/filesystem is redundant (similar file is stored multiple times) in nature.
If the data you’re storing on your ZFS pool/filesystem does not have much redundancy (almost unique), then deduplication won’t do you any good. Instead, you will end up wasting memory that ZFS could otherwise utilize for caching and other important tasks.
For deduplication to work, ZFS must keep track of the data blocks stored on your ZFS pool/filesystem. To do that, ZFS creates a deduplication table (DDT) in the memory (RAM) of your computer and store hashed data blocks of your ZFS pool/filesystem there. So, when you try to copy/move/create a new file on your ZFS pool/filesystem, ZFS can check for matching data blocks and save disk spaces using deduplication.
If you don’t store redundant data on your ZFS pool/filesystem, then almost no deduplication will take place and a negligible amount of disk spaces will be saved. Whether deduplication saves disk spaces or not, ZFS will still have to keep track of all the data blocks of your ZFS pool/filesystem in the deduplication table (DDT).
So, if you have a big ZFS pool/filesystem, ZFS will have to use a lot of memory to store the deduplication table (DDT). If ZFS deduplication is not saving you much disk space, all of that memory is wasted. This is a big problem of deduplication.
Another problem is the high CPU utilization. If the deduplication table (DDT) is too big, ZFS may also have to do a lot of comparison operations and it may increase the CPU utilization of your computer.
If you’re planning to use deduplication, you should analyze your data and find out how well deduplication will work with those data and whether deduplication can do any cost-saving for you.
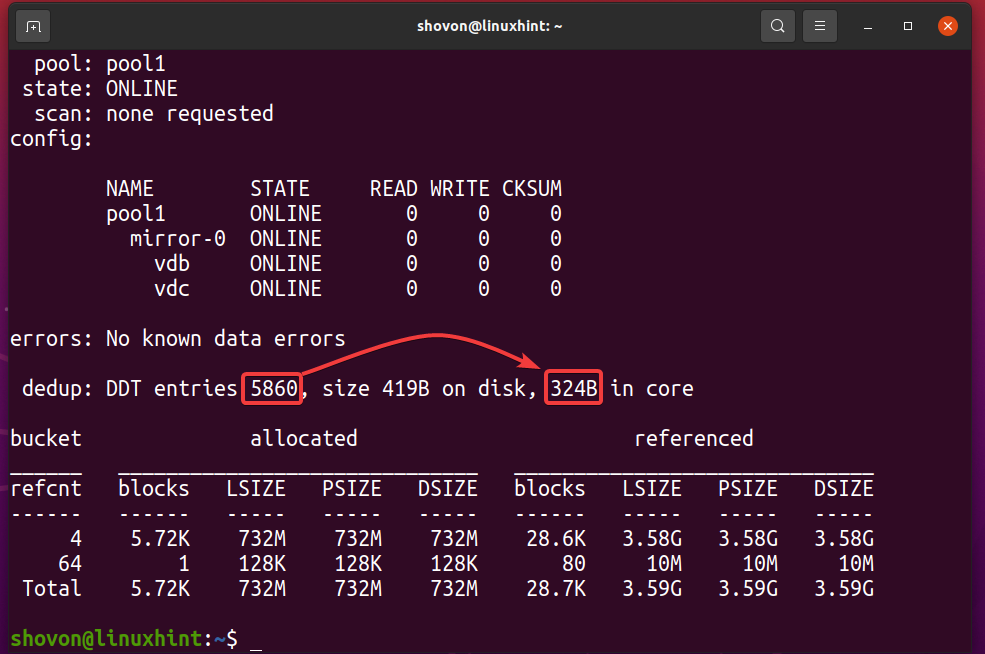
You can find out how much memory the deduplication table (DDT) of the ZFS pool pool1 is using with the following command:

As you can see, the deduplication table (DDT) of the ZFS pool pool1 stored 5860 entries and each entry uses 324 bytes of memory.
Memory used for the DDT (pool1) = 5860 entries x 324 bytes per entry
= 1,854.14 KB
= 1.8107 MB
Disabling Deduplication on ZFS Pools/Filesystems:
Once you enable deduplication on your ZFS pool/filesystem, deduplicated data remains deduplicated. You won’t be able to get rid of deduplicated data even if you disable deduplication on your ZFS pool/filesystem.
But there’s a simple hack to remove deduplication from your ZFS pool/filesystem:
i) Copy all the data from your ZFS pool/filesystem to another location.
ii) Remove all the data from your ZFS pool/filesystem.
iii) Disable deduplication on your ZFS pool/filesystem.
iv) Move the data back to your ZFS pool/filesystem.
You can disable deduplication on your ZFS pool pool1 with the following command:

You can disable deduplication on your ZFS filesystem fs1 (created in the pool pool1) with the following command:

Once all the deduplicated files are removed and deduplication is disabled, the deduplication table (DDT) should be empty as marked in the screenshot below. This is how you verify that no deduplication is taking place on your ZFS pool/filesystem.

Use Cases for ZFS Deduplication:
ZFS deduplication has some pros and cons. But it does have some uses and may be an effective solution in many cases.
For example,
i) User Home Directories: You may be able to use ZFS deduplication for user home directories of your Linux servers. Most of the users may be storing almost similar data on their home directories. So, there’s a high chance for deduplication to be effective there.
ii) Shared Web Hosting: You can use ZFS deduplication for shared hosting WordPress and other CMS websites. As WordPress and other CMS websites have a lot of similar files, ZFS deduplication will be very effective there.
iii) Self-hosted Clouds: You may be able to save quite a bit of disk space if you use ZFS deduplication for storing NextCloud/OwnCloud user data.
iv) Web and App Development: If you’re a web/app developer, it’s very likely that you will be working with a lot of projects. You may be using the same libraries (i.e. Node Modules, Python Modules) on many projects. In such cases, ZFS deduplication can effectively save a lot of disk space.
Conclusion:
In this article, I have discussed how ZFS deduplication works, the pros and cons of ZFS deduplication, and some ZFS deduplication use cases. I have shown you how to enable deduplication on your ZFS pools/filesystems.
I have also shown you how to check the amount of memory the deduplication table (DDT) of your ZFS pools/filesystems is using. I have shown you how to disable deduplication on your ZFS pools/filesystems as well.
References:
[1] How To Size Main Memory for ZFS Deduplication
[2] linux – How large is my ZFS dedupe table at the moment? – Server Fault
from https://ift.tt/3lMIGQG


0 Comments