


Vectors seem to be sequence containers that hold arrays that can grow or shrink in size. As a result, we don’t have to define its length when declaring it and can alter it afterward in the script. We may modify the size of std::vector flexibly while the program is executed as per our requirements, unlike std::array, whose size is set at the moment of creation and stays fixed until compilation time. We do not know the size of the array till build time in these situations (while the machine compiles the program). std::vector comes very handily here.
Syntax:
The std::vector definition syntax is similar to those of std::array, except that you shouldn’t need to give the array size together with the type of data, as can be seen here.
Let’s get started to get a clear understanding of std::vector in C language. Initially, we were required to open the Ubuntu 20.04 system. After that, you need to log in from it first and then open the terminal console application to start working by using Ctrl+Alt+T. Make sure you have some C++ language compiler package installed on the Ubuntu 20.04 system because, without it, we will be unable to execute our code. If you don’t have one, install the G++ compiler using the below command after updating your system and its apt package:
$ sudo apt install g++
Example 01:
Now your system is ready to be used. Our first example would be of empty vector, and then add-up values init one after another. Using the terminal shell, we have to create a new file to add code to it. Make sure to create a file with the “.cc” extension as representing c++ code. Hence, we have created a file named “main.cc” to add c++ code in it via the “touch” instruction as follows:
![]()
By default, the file has been added to the main directory of our system. You can open it from there or directly open it via a terminal using any editor. Hence, we have used the GNU Nano editor to open it with the below-stated query.
![]()
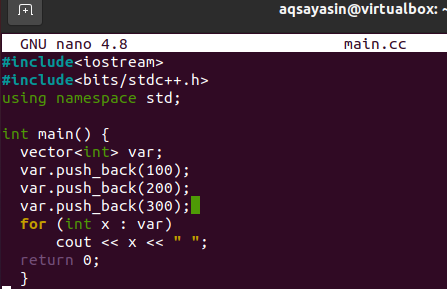
Now the file is opened in the editor, paste the below-shown code in it. This code contains the input-output standard library and support for the c language. After that, we have declared a namespace in it. The main function has been initialized. We have declared an empty integer type vector name “var” with no size specified in the main method. After this, we have used the push_back() built-in method to add the values in the vector “var” one by one. Then, we have declared the “for” loop to get the vector “var” values and print them out in the shell. Press “Ctrl+S” to save the code and “Ctrl+X” from leaving the file and return to the terminal.
So, you need to compile the file code first to execute it in the shell. Hence use the g++ install along with the name of a file “main.cc” within a query to do so:
![]()
The compilation is successful, with zero errors. Hence, execute your file with the “a.out” query as below. The output will show you the three numbers that were pushed into vector “var”.
Example 02:
In this example, we will initialize a size of a vector as well as its value. Hence open your main.cc file once again to update our previous code.
![]()
Now the file is opened, update your code as below. The overall code is the same except that we have initialized an integer variable “p” with 5. This variable will be used as vector size in the next lines of code. In the next consecutive line, we have used “p” as the size of the vector and value “15” as its value. This means the output must have a value of 15, 5 times in it. Again, the “for” loop is used to output the vector values in the shell. Save your code and leave the main.cc file.
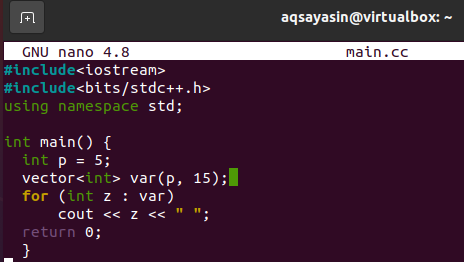
Compile your update file again to implement the changes using the g++ compiler as below. After the compilation, execute your file using the “a.out” query. You can observe it displays the value 15, five times in the shell.

Example 03:
We can also declare a vector as we declare an array. This means we can assign values to a vector within its declaration statement. Hence, in this example, we will be discussing how to do that. So, open the “main.cc” document from the home directory using the GNU editor in the shell as presented in the below query.
![]()
After the file has been opened, paste the below-appended code into it. You can see the code is comparable to the previous one, as we haven’t changed it much. The change is only on the vector statement line. We have initialized the vector along with values in it, e.g., “100”, “200”, and “300” as an array. Then we have used the “for” loop to output these values of vector in the shell. After completing the code, save the file and navigate towards your terminal shell.
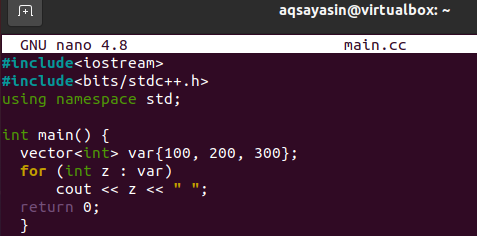
Compilation and execution of the file will be done by using the same previous commands. The output is given below in the picture.

Example 04:
The above example was about adding values to a vector as we do in the array. This time we will have a vector that will be initialized from some array. Open your file again within the editor for the update.
![]()
We have initialized an array “A” in the main method with 5 values in it. An integer p has been used to get the integer values from array size. The vector has been initialized while using array “A” as its value along with integer p.
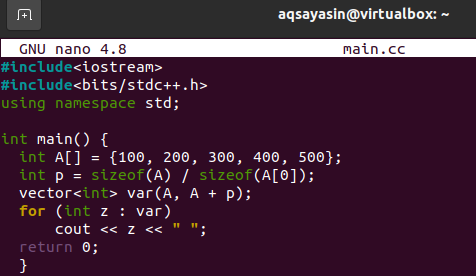
The output has been shown below.

Example 05:
You can also initialize some vector from another vector. To do this, we will update our code by opening the same file.
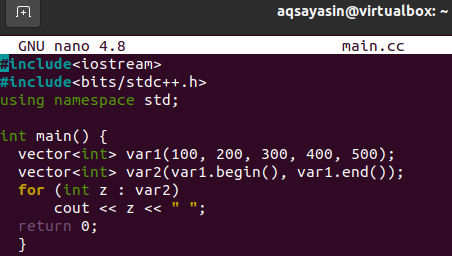
![]()
We have declared an integer type vector var1 with some integer type values in the main function. Then we have declared another integer type vector, but we haven’t given it direct values as we usually do. We used the begin()and “end” method with the name of vector 1: “var1” to add values to vector 2: “var2”. When we have printed vector 2 in the “for” loop, it works quite well.
The code works fine, as shown in the picture.

Example 06:
We will be using another method to initialize an std vector in this example. Open your file again via the shell console as below.
![]()
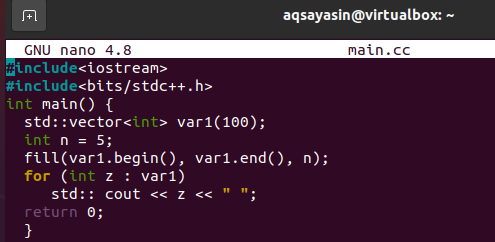
We have declared a vector “var1” of size 100 using the “std::” statement. Initialized an integer with a value of 5. We have used the “fill” method to add values in the vector “var1”. For loop has been used again to output the values.
You can see, the output is showing that the 100 values have been displayed.

Conclusion:
You have done with almost all the illustrations of vectors in the Ubuntu 20.04 system. Make sure to implement all the necessary examples to get hands-on it.
from Linux Hint https://ift.tt/3htXK34


0 Comments