Functions used in getting ids
Two types of IDs are present here. One is the current id of the process PID. Whereas the other is the id of the parent process PPID. Both these functions are built-in functions that are defined in <unistd.h> library. While running the code without using this library may cause an error and stops executing.
getpid() function in C
When some process is formed and is running, a unique id is assigned to it. This is the process id. This function helps in returning the id of the process that is currently called.
getppid() function in C
This id is useful in returning the process of the parent process/function.
Example 1
To understand the example of PID in the process in the C language. You need two tools: any text editor and the Linux terminal, on which you are supposed to run the commands. Create a file in any text editor. We have created a file name code1.c as the code is written in C language, so it should be saved with the .c extension.
We have added a single library. Then here starts the main program. In the main program, we call the built-in function getpid(); to fetch the current process’s id. And a variable is introduced and assigned. So that the value of the PID() function is stored in this variable, then we will take the print of the value using this variable.
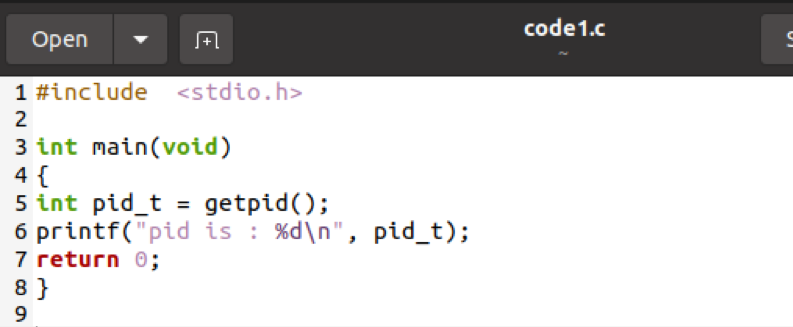
Now we want to run the contents of this file in the Linux terminal. The code prerequisite is to be compiled first and then execute. For compilation, GCC is used. If your system lack GCC, then you need to install it first by using the Sudo command.
Now compile the code written. This can be accomplished by using the following appended command.
![]()
Whereas –o is used to open the save file in the command. Then after –o, we write the filename.
After compilation, run the command.

The above image shows the process id of the function.
Example 2
In the previous example, we make use of the PID. But in this example, both the PID and PPID are used. The source code for this function is almost the same as the preceding one. Only there is another addition of an ID.
Consider a file that contains two variables in the main program that are assigned by the process IDs. One is of the current process, and the other one is of the parent process. Then similar to the first example, print both the ids through their variables.
Int ppid_t =getppid();
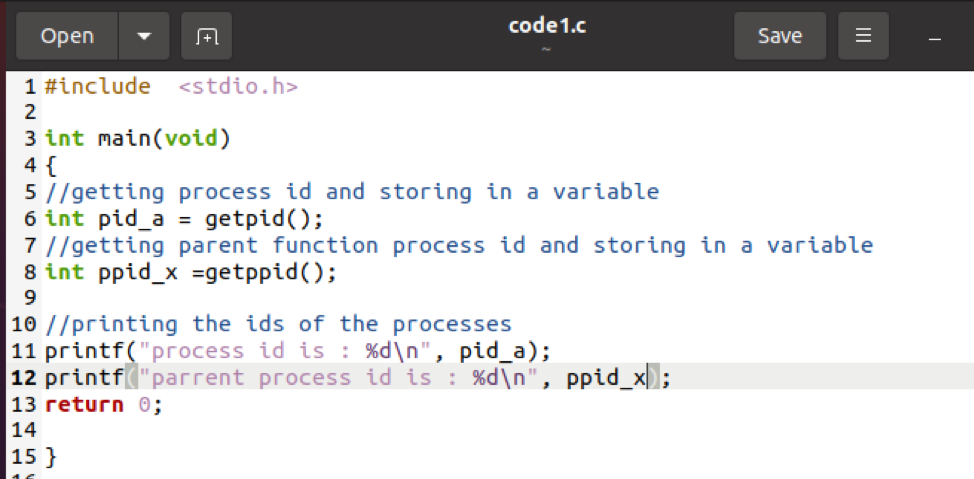
These two are the main functions of the whole code. Now, after file creation, the next step is to compile and run the file. Compile by using GCC in the command. After compilation, then run it on the terminal of Ubuntu.
$ ./code1
![]()

The output shows that the process id is displayed first, and then the parent process id is displayed.
Example 3
All the processes run and execute in a parallel manner. The parent and the child processes execute all the remaining lines collectively. Both give results at a time. But by using a fork in the C code, if this function returns a value that is less than 0, it means that the function call is terminated.
Consider a new file having two libraries in the respective header. Here a condition is used in which we have utilized the “if-else” statement. In the main program, it is stated that if the fork value is in –ive value, it will display a message that the process’s id is failed and will not be obtained. If the situation is false, then the compiler will move to the else part of the condition. In this part, the process id is obtained, then we will display this process ID and display a message that the process ID is obtained. Here we will quote the if-else statement of the source code.
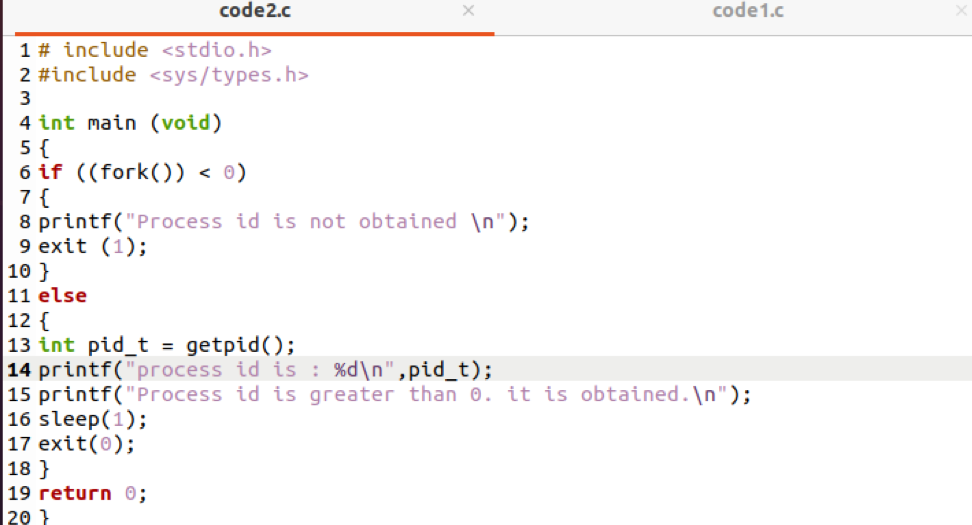
Now again, compile the code and then run it.

The output shows that the else part has been executed and will print the process id and then display a PID message.
Example 4

This is another example of explaining the same concept. Fork() function returns two different values. In the case of a child process, the value is 0, which is to be returned. At the same time, the value in the case of the parent process is the process ID of the new child.
In this example, the same if_else condition is used. But here, two conditions are applied. Comparing the PID that is less than zero and the other one equals zero. If the PID is less than zero, then it will show an error message. Whereas if the PID equals zero, it means it is a child process, and the else part shows that if the PID is greater than zero, it is a parent process.
Now compile and run the code.
$./code3

From the output, we can see that the else part is printed first means the process ID is greater than 0.
Example 5
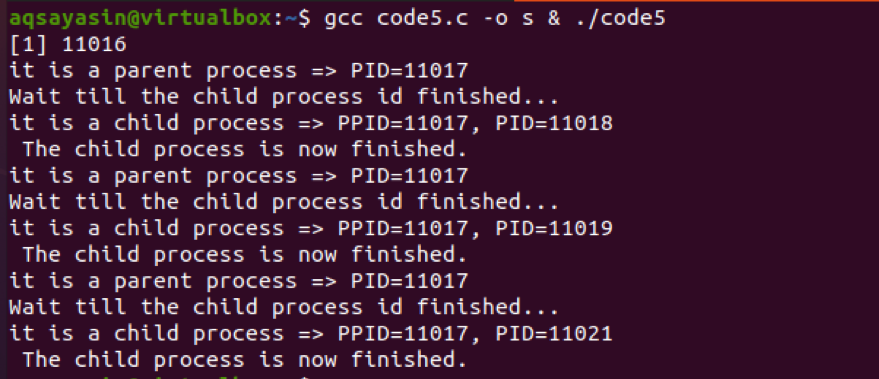
Alright, this is the last example in which we have tried to sum up all the codes described above to explain the working of this function. We can also use loops with the fork() functions to use the getpid() functions. We can use loops to create many child processes. Here we have to use the value of 3 in the loop.
Again we have to use the conditional statement in the code. The for loop starts from the one and iterate till the 3rd turn.
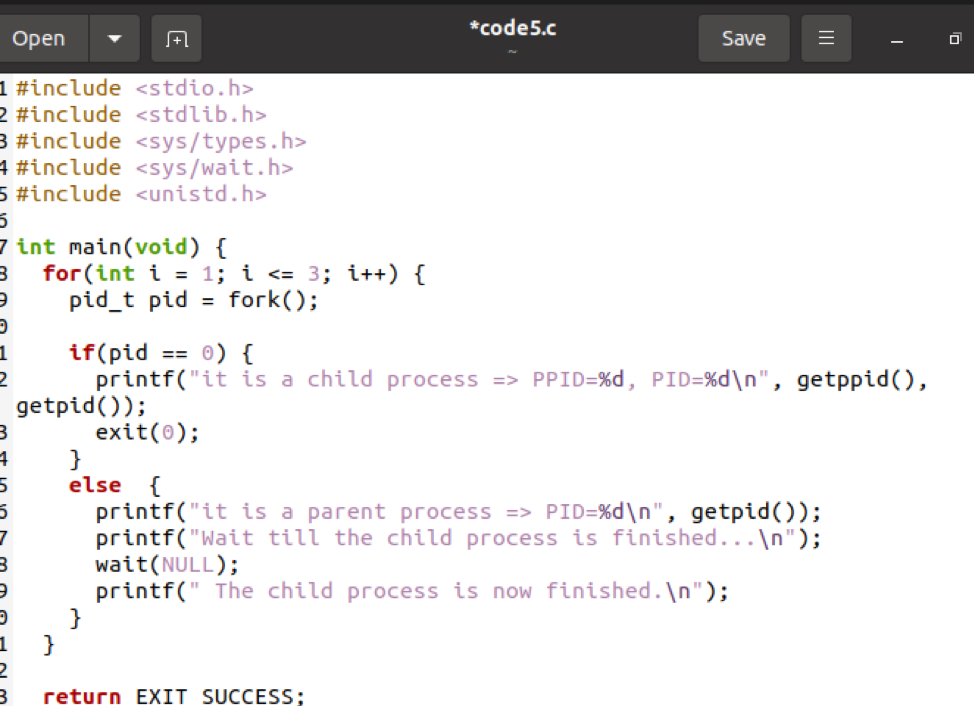
Now save the file and execute it. There is another simple method to compile and execute the code only in a single command. That is.
Now moving towards the output of the code. The id of the parent process is identical in all the child processes. This means all these processes belong to one parent. These processes are executed one afterward the other as the loop is limited to 3. Only 3 iterations will be done.
Conclusion
This article contains the basic knowledge, and the working of a getPID() function in the Linux commands. The unique id is assigned to each process through this function.
from Linux Hint https://ift.tt/3eAzien


0 Comments