Some of the features of the Hyper Backup app are:
- Backup data to local Synology NAS device.
- Backup data to remote Synology NAS devices.
- Backup data to external USB devices.
- Backup data to remote rsync file servers.
- Backup data to remote WebDAV file servers.
- Backup data to OpenStack Swift.
- Backup data to public cloud services (i.e., Dropbox, Google Drive, Amazon S3).
- Restore data from backups.
- Supports encrypted data backups.
- Data integrity checks on the backups.
- Supports incremental backups.
- Supports data deduplication which reduces backup size.
- Create backup tasks and schedule backups.
- Supports intelligent backup retention policies.
- Store multiple versions of the data.
- Browse files from any version of the backup.
- Restore specific files or folders from any version of the backup.
This article will show you how to install Hyper Backup on your Synology NAS and use it to back up data from the Synology NAS to an external USB device. I will also show you how to restore data from the backup and other features of the Hyper Backup program.
Table of Contents
- Installing Hyper Backup
- Preparing an External USB Storage for Backup
- Creating a Backup Task with Hyper Backup
- Taking a Backup with Hyper Backup
- Browsing Files/Folders from the Backup
- Checking Backup Statistics
- Managing Backup Versions
- Checking the Integrity of the Backup
- Modifying Existing Backup Tasks
- Restoring Data from Backup
- Conclusion
- References
Installing Hyper Backup
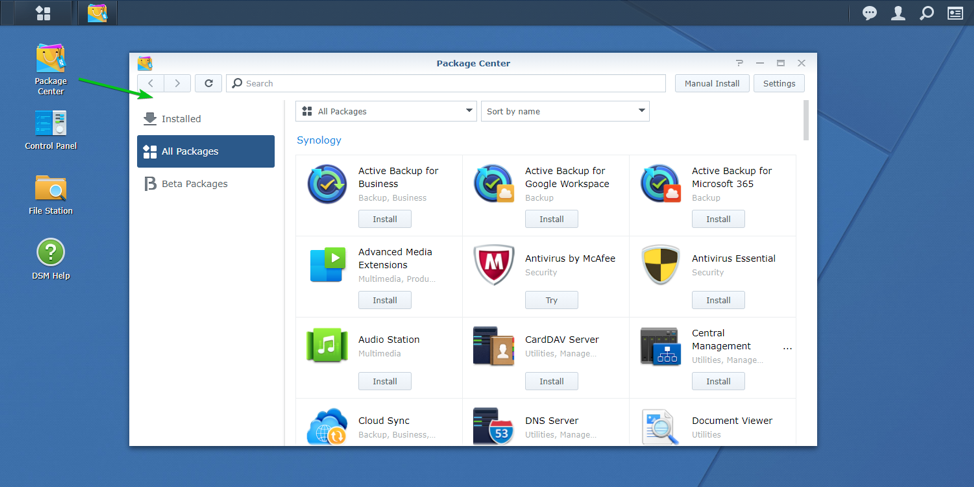
You can install the Hyper Backup app from the Package Center of your Synology NAS.
First, open the Package Center app as marked in the screenshot below.
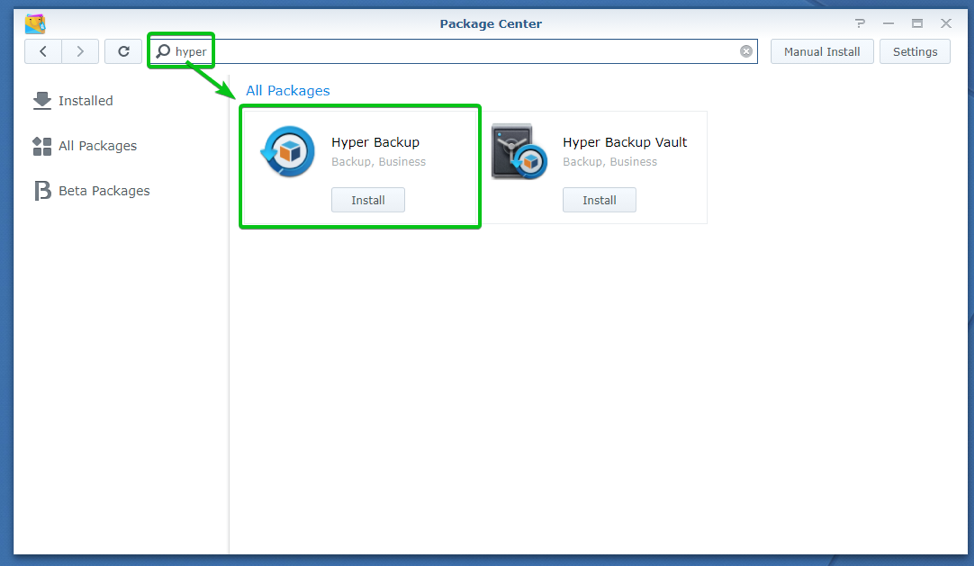
Search for the keyword hyper and the Hyper Backup app should be listed, as you can see in the screenshot below.
Click on Install as marked in the screenshot below.

Select a volume where you want to install the app using the dropdown menu and click on Next as marked in the screenshot below.

Click on Apply.
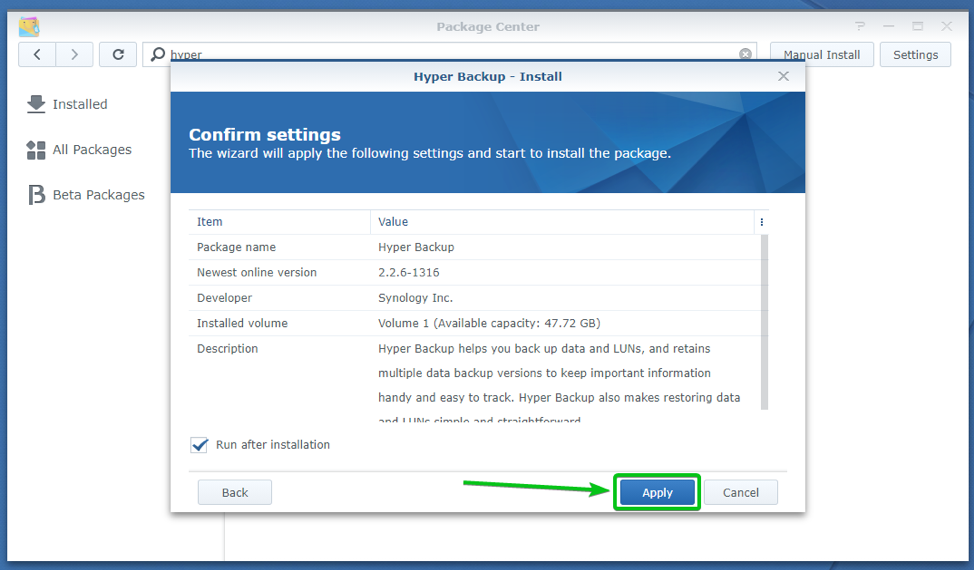
Hyper Backup should be downloaded and installed. It may take a few seconds to complete.
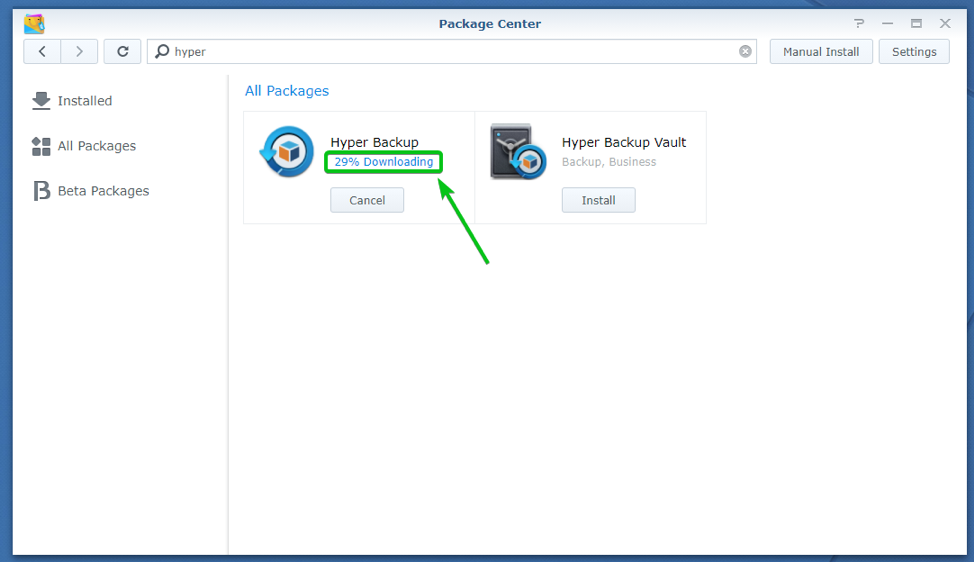
At this point, Hyper Backup should be installed.

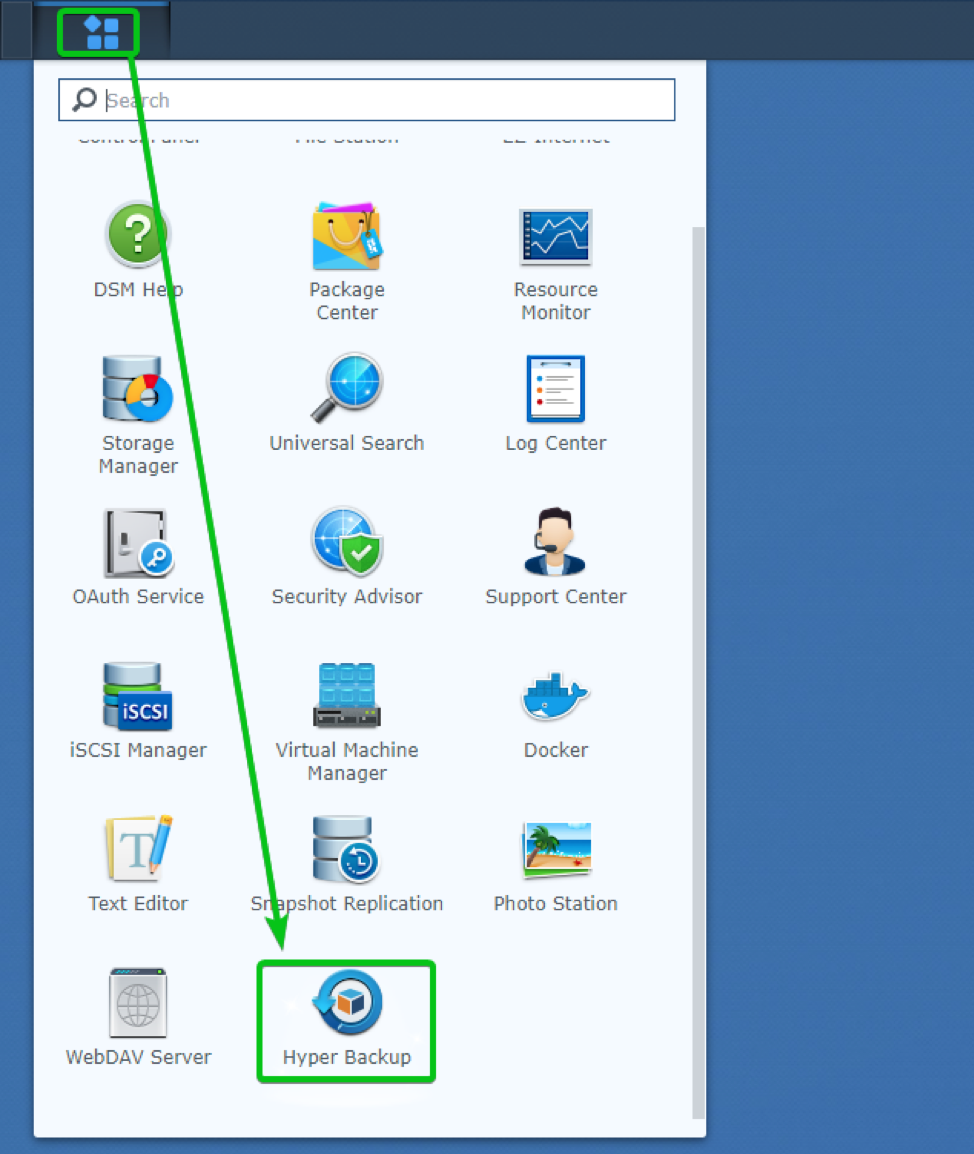
Once Hyper Backup is installed, you can start it from the Application Menu of your Synology NAS web management interface.
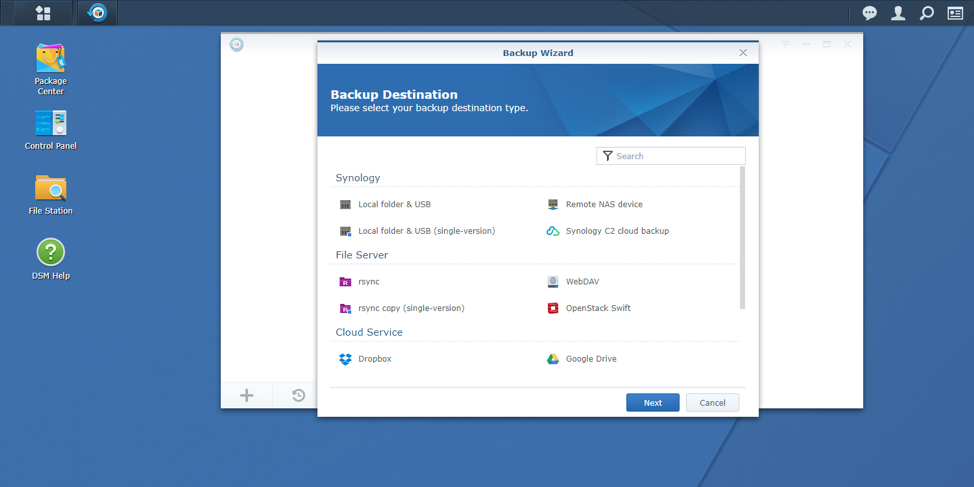
The first time you open Hyper Backup, it will ask you to set up a backup task.
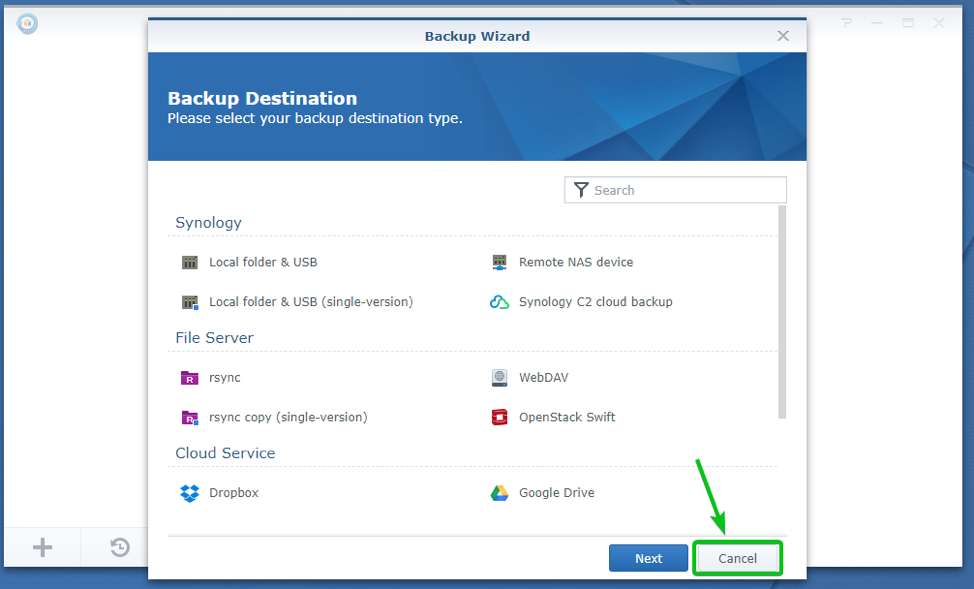
We will set up a backup task later. So, click on Cancel as marked in the screenshot below.
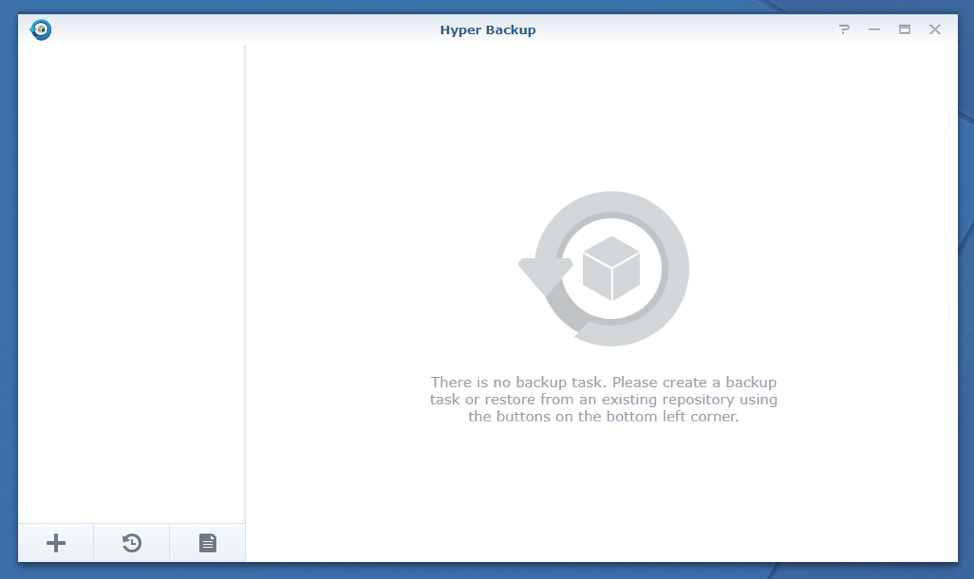
The dashboard of the Hyper Backup app should be displayed. We can do all sorts of stuff from here.
We will look into the features of the Hyper Backup app in the next sections of this article.
Preparing an External USB Storage for Backup
This article will show you how to take a backup from your Synology NAS to an external USB storage with Hyper Backup. So, I will also have to prepare an external USB storage to be used as a backup destination.
If you also want to backup data from your Synology NAS to your external USB storage device, this section is important for you.
First, insert your USB storage device in the USB port of your Synology NAS.
Then, open the Control Panel app and click on Advanced Mode as marked in the screenshot below.

Now, click on the External Devices icon as marked in the screenshot below.
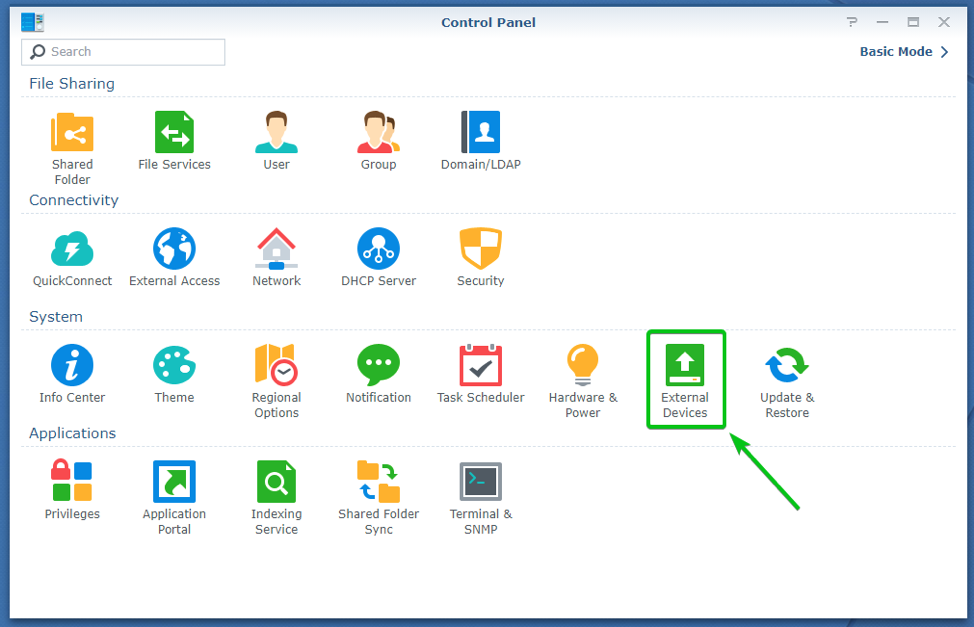
Your USB storage device should be listed here.

To learn more about the USB storage device, click on the down-arrow () icon as marked in the screenshot below.

More information about that USB storage device should be displayed.
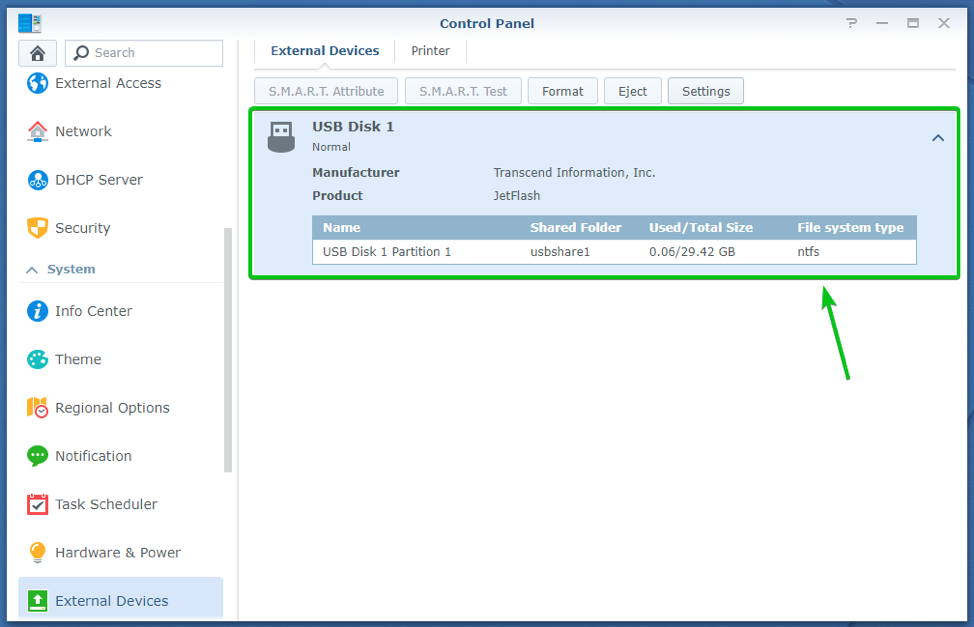
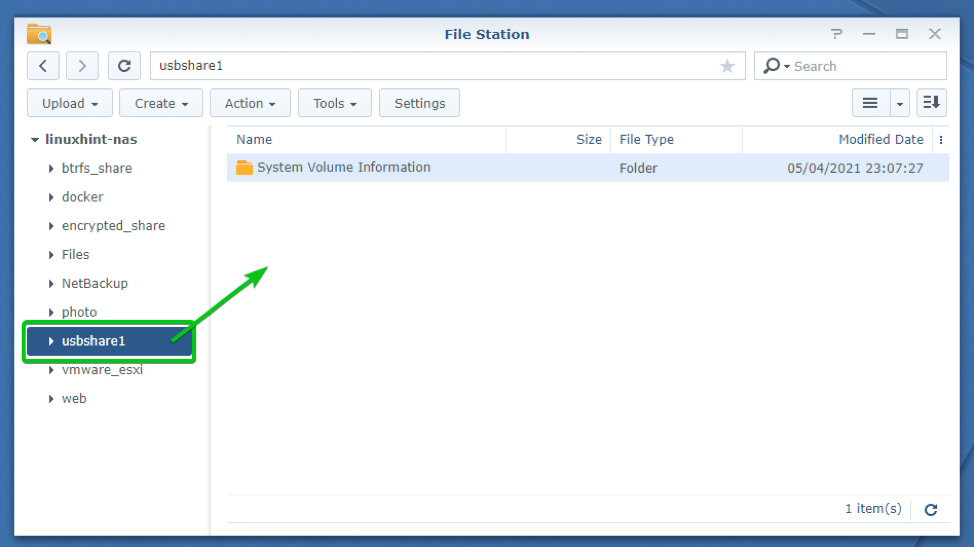
To check whether you can access the USB storage device, open the File Station app and see whether the USB storage device is accessible from there.
As you can see in the screenshot below, my USB storage device is mounted as usbshare1, and it’s accessible from the File Station app.
If, in any case, the USB storage device is not accessible from the File Station app, then you will have to format it and make it accessible to use as a backup destination.
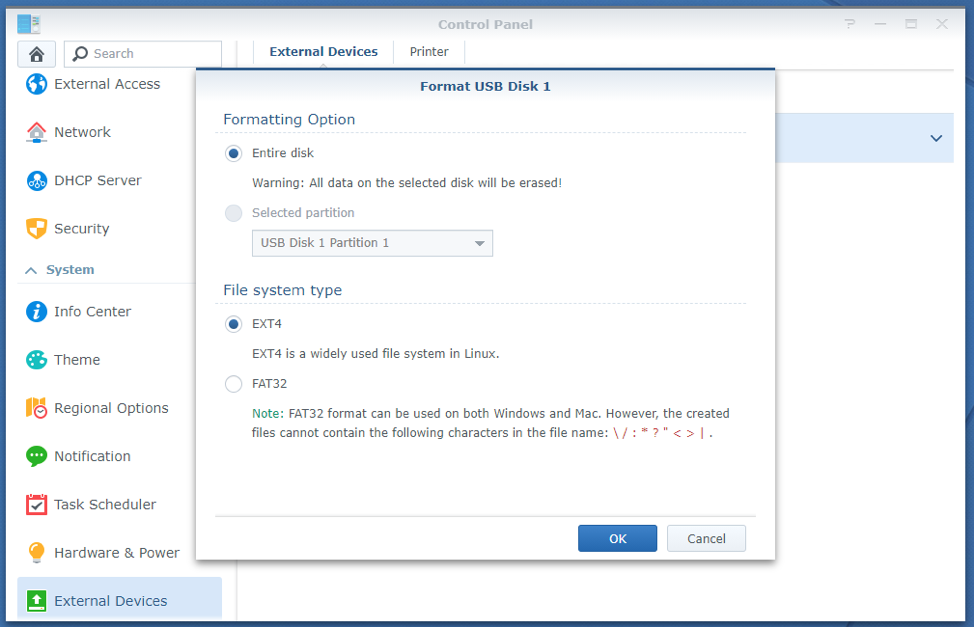
To format a USB storage device, select it and click on Format as marked in the screenshot below.
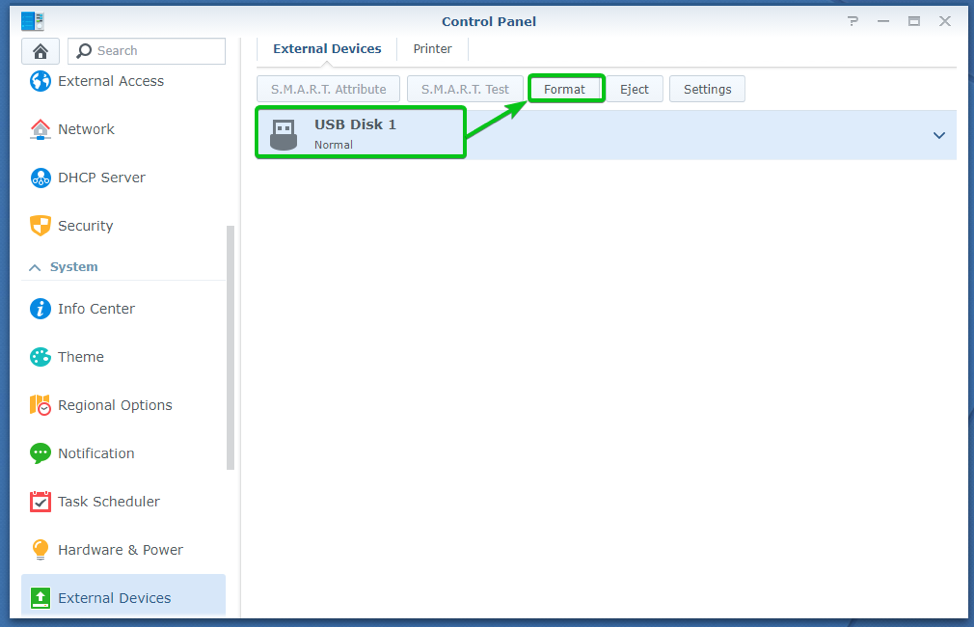
The USB storage device format window should be displayed. You can format your USB storage device from here.
This section is pretty self-explanatory. So, I won’t go any further explaining this.
Creating a Backup Task with Hyper Backup
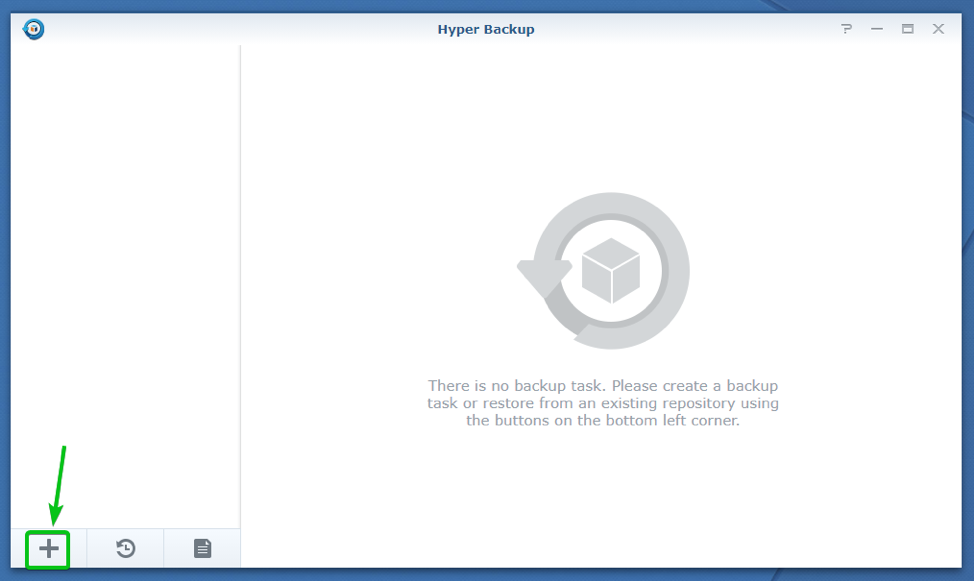
In Hyper Backup, the first thing you do is create a backup task.
To create a backup task, click on the + icon as marked in the screenshot below.
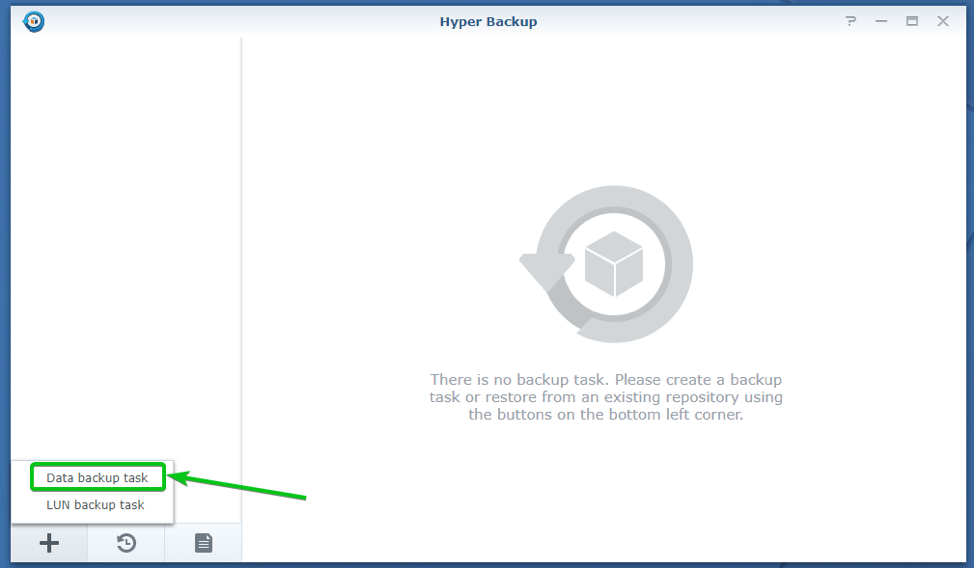
Click on the Data backup task as marked in the screenshot below.
The Backup Wizard should be displayed. You can configure your backup task from here.
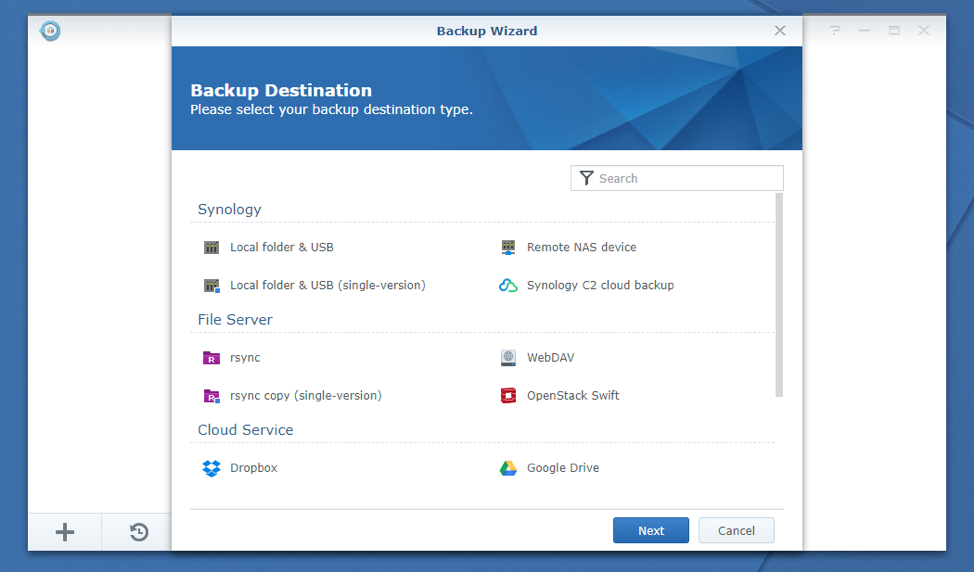
The first thing you have to do is select a backup destination. This is the location where the backup will be stored.
You can select an external USB storage device, your local or remote Synology NAS, Synology C2 cloud, rsync, WebDAV server, OpenStack Swift server, Dropbox, Google Drive, Amazon S2 cloud, and many more services as the backup destination with Hyper Backup.
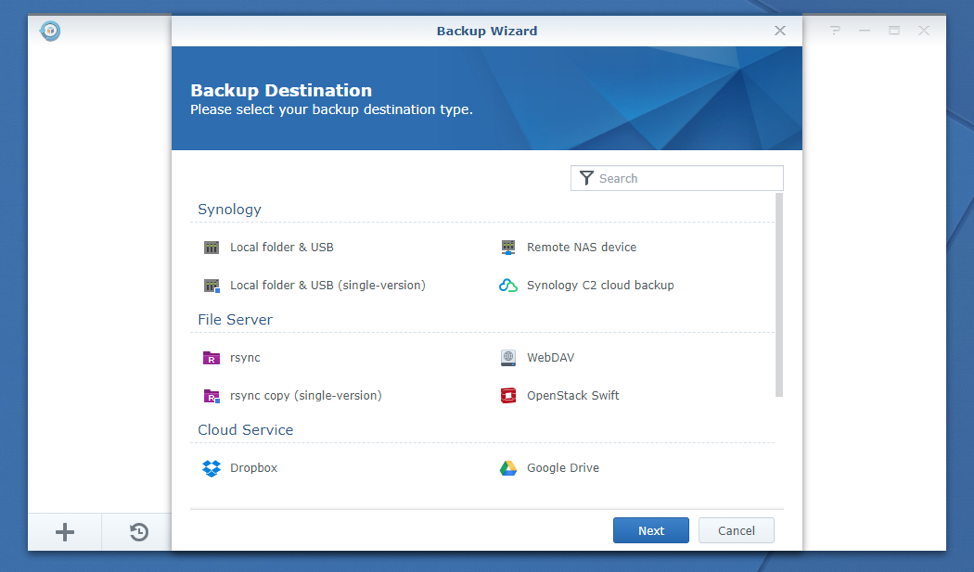
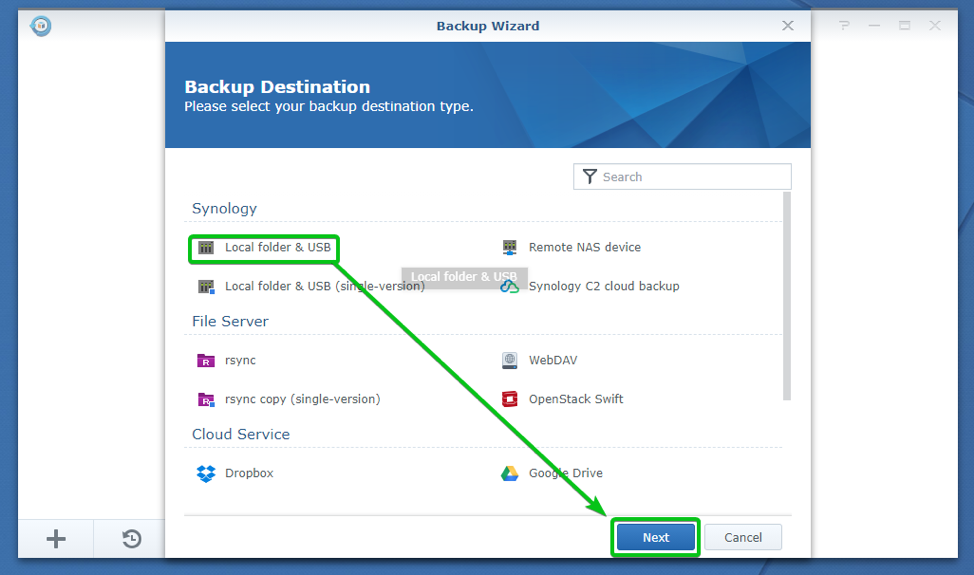
For demonstration, I will backup a shared folder to an external USB storage device. So, I will select the Local folder & USB from the list and click on Next.
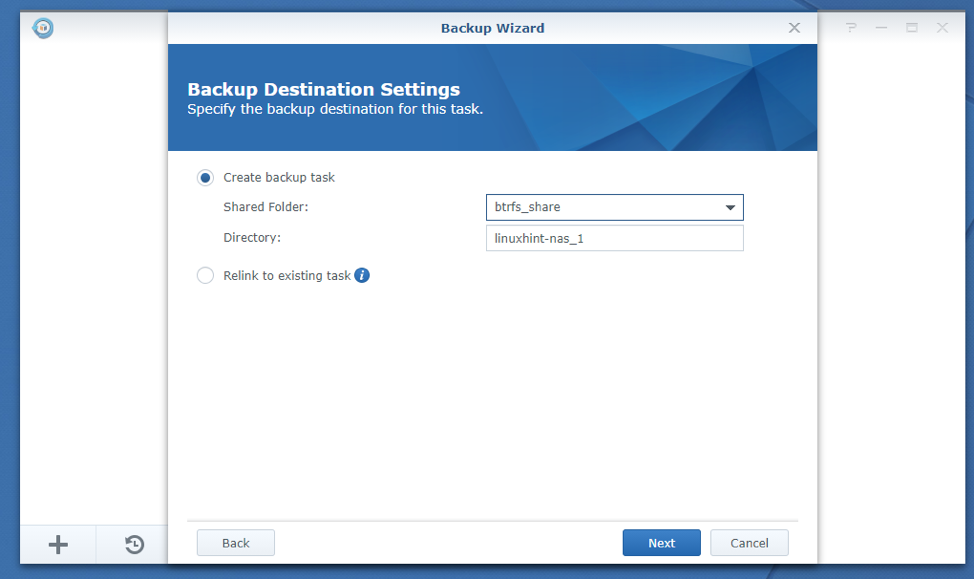
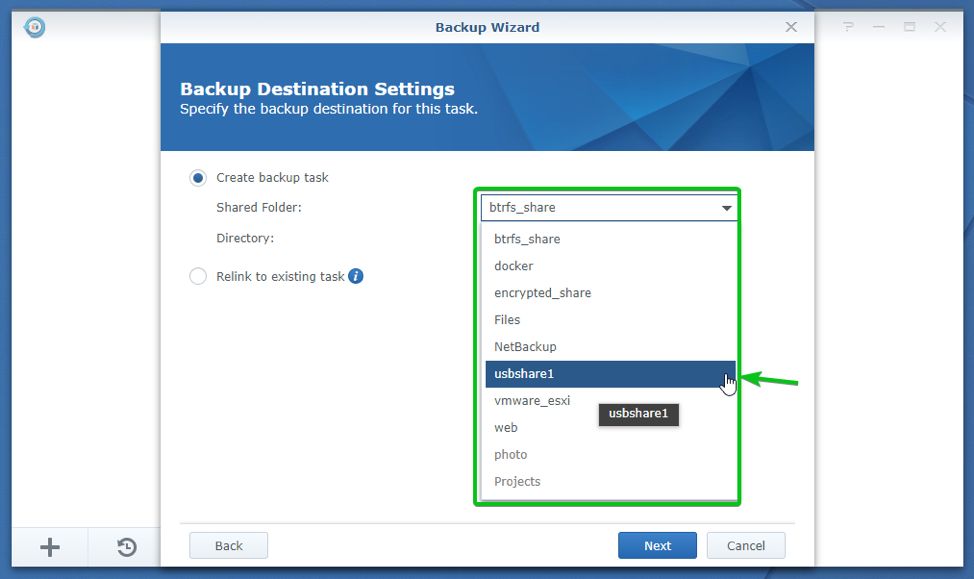
You have to select your external USB storage device from the list and configure where the backups will be stored on the USB storage device.
Select the USB storage device usbshare1 from the Shared Folder dropdown menu as marked in the screenshot below.
Type in a folder name in the Directory section. A folder with your desired name will be created at the root of your USB storage device, and all the backups you will take will be stored in that folder.
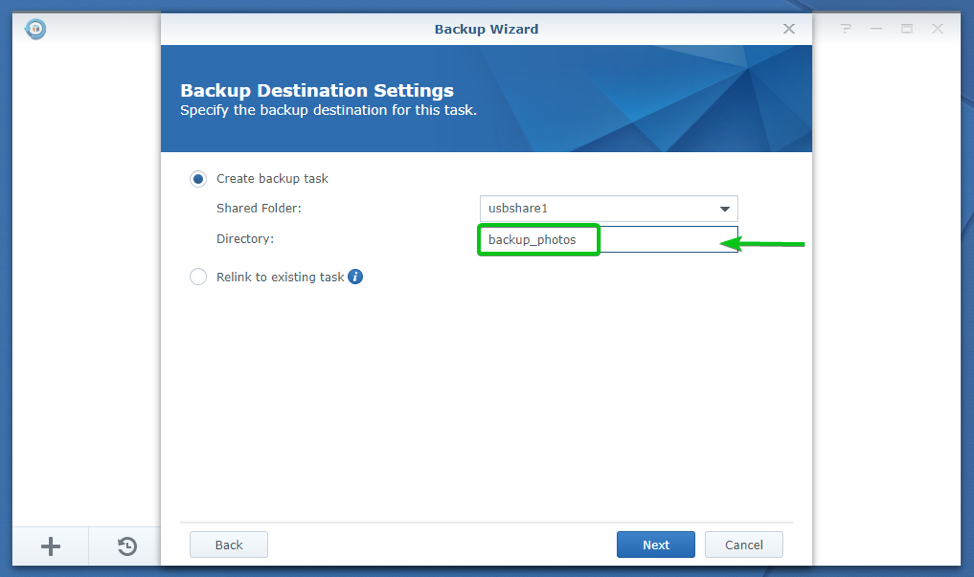
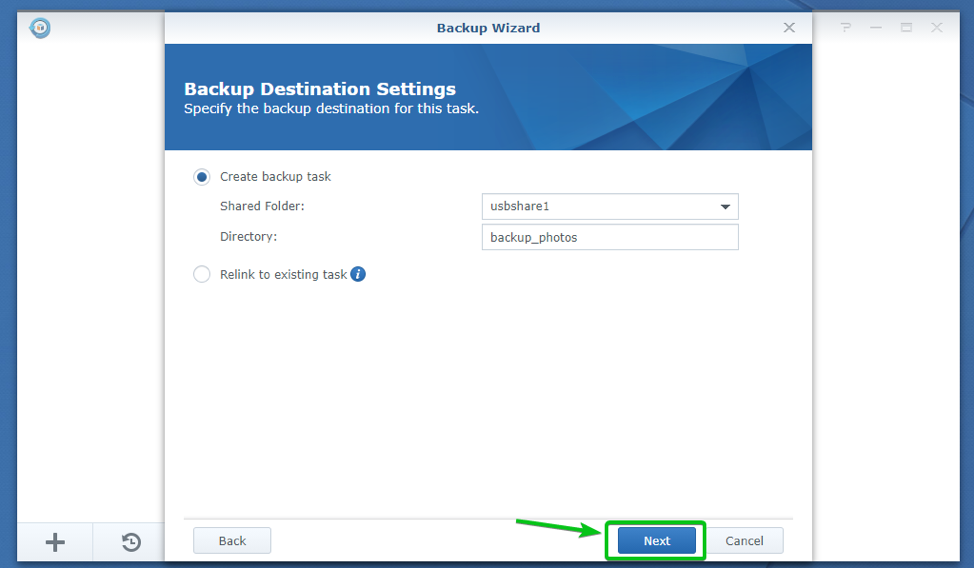
Once you’re done, click on Next.
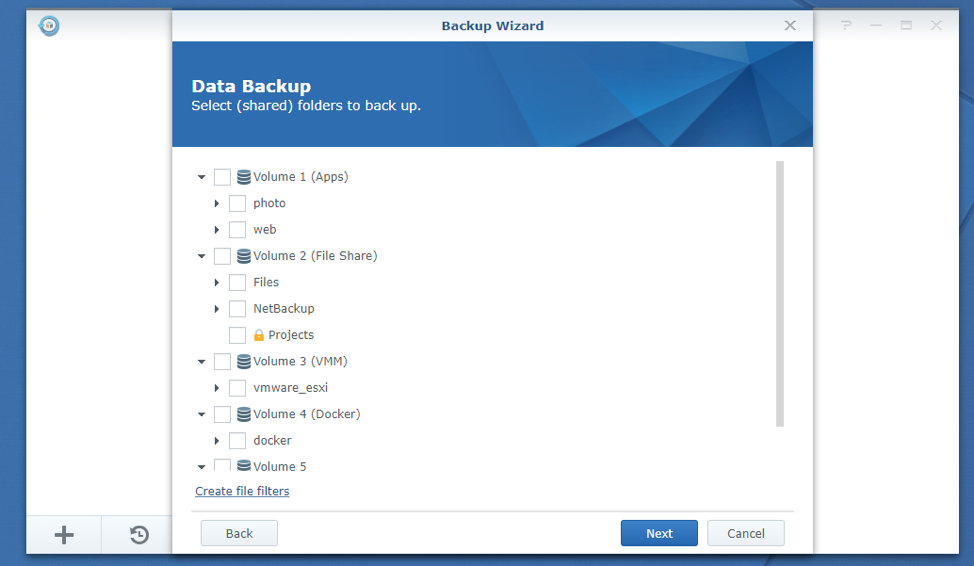
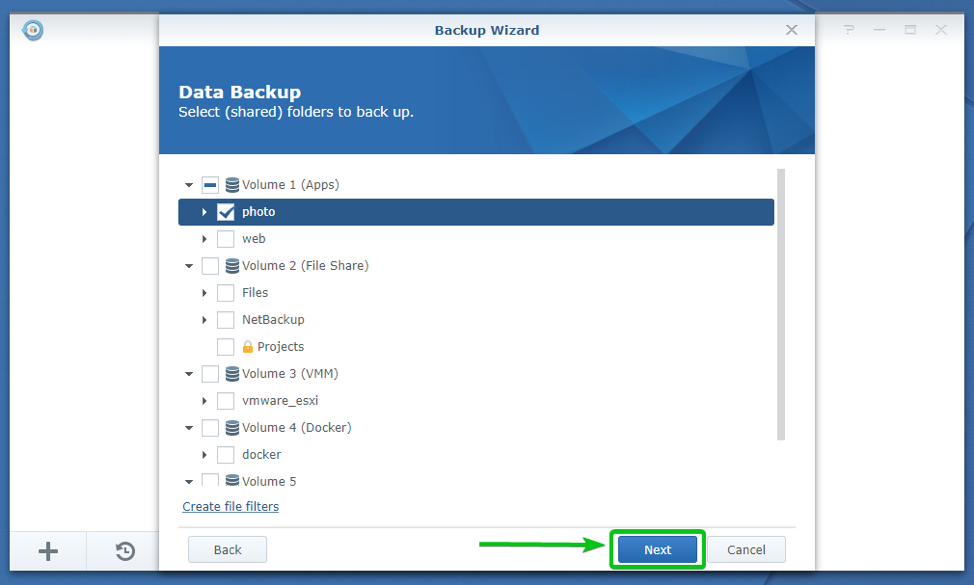
Now, you have to select the shared folders that you want to backup with Hyper Backup.
You can select as many shared folders as you want from the list. It’s up to you.
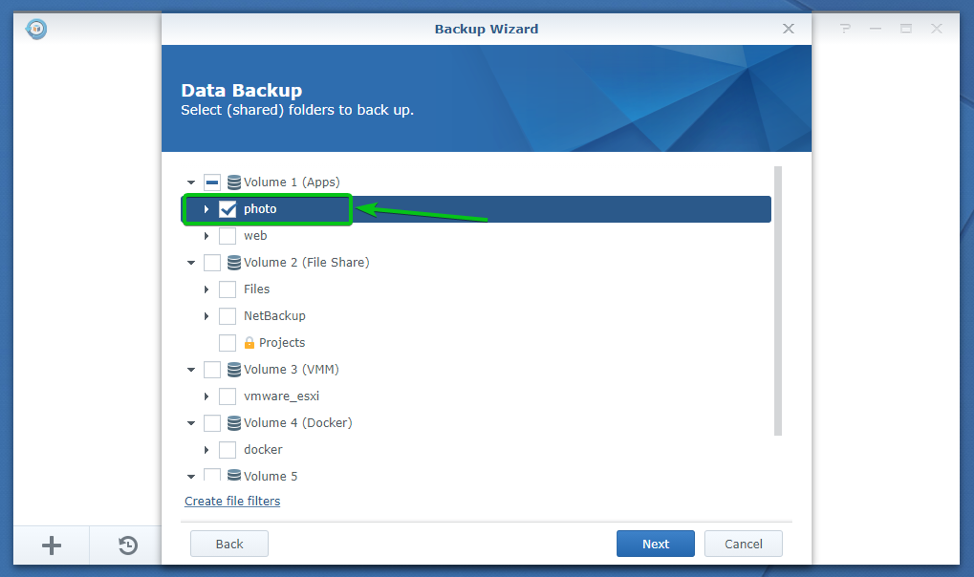
For demonstration, I will select the photo shared folder, as you can see in the screenshot below.
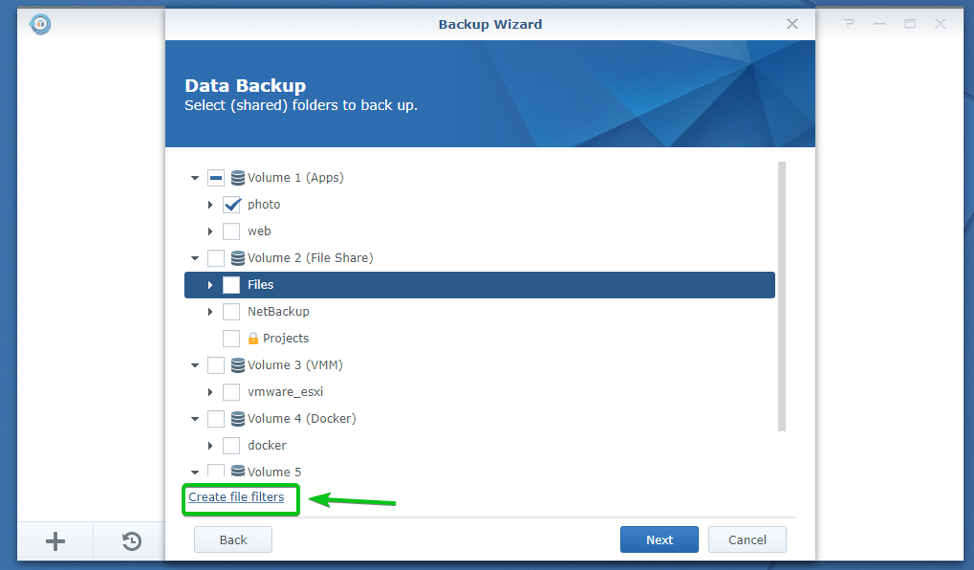
You can also create file filters and choose what files you want to backup and what files you don’t want to backup.
To create file filters, click on Create file filters as marked in the screenshot below.
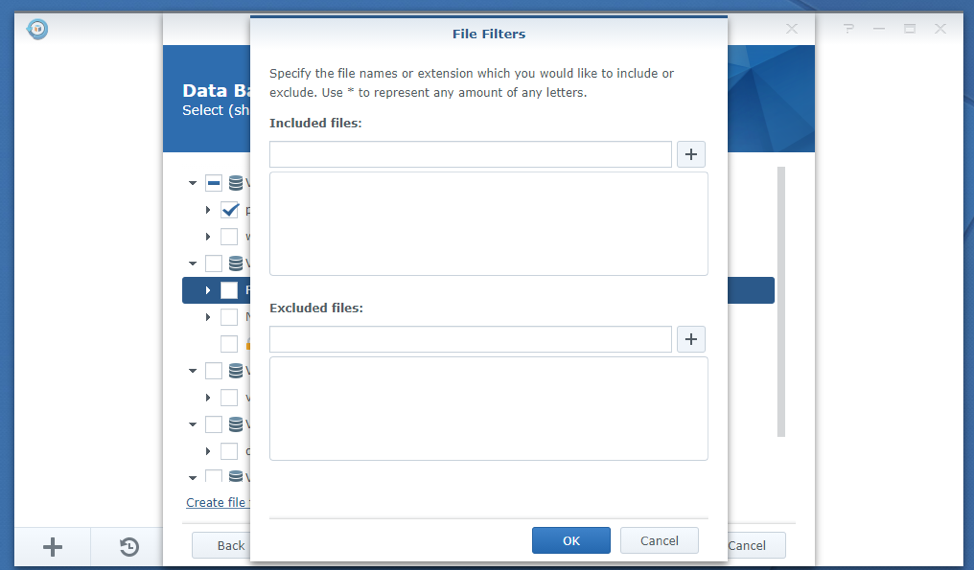
The File Filters window should be displayed. You can create filters for the files that you want to include in the backup and files that you don’t want to include in the backup from here.
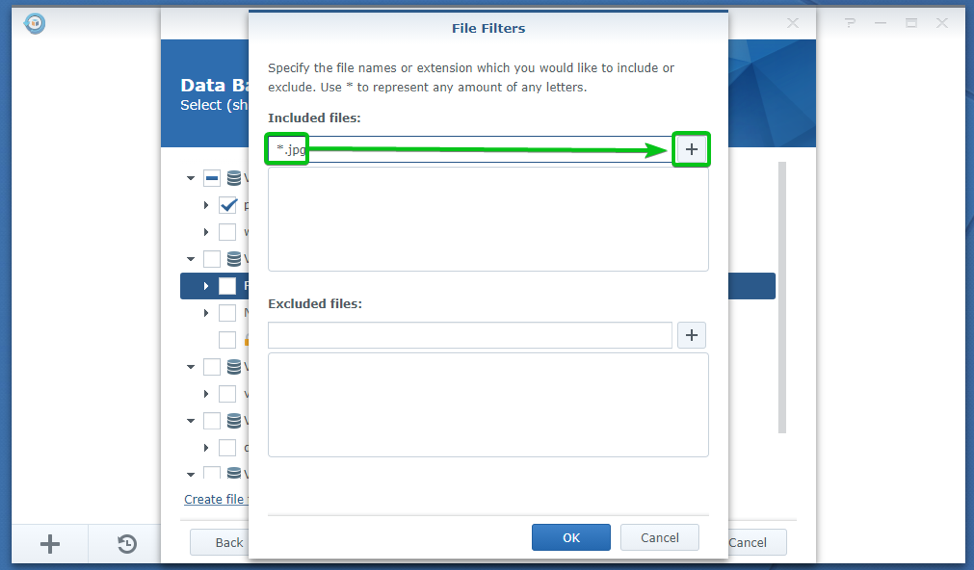
Please include all the files with the extension jpg (let’s say), type in the file filter *.jpg in the Included files section, and click on the + button as marked in the screenshot below.
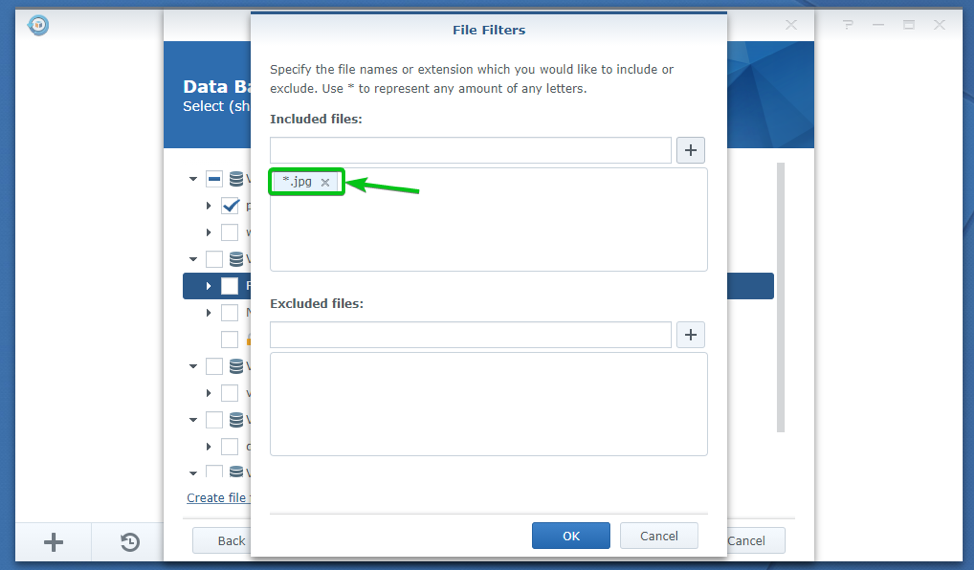
The file filter *.jpg should be added in the Included files section, as shown in the screenshot below.
You can add as many Included file filters as you need.
To exclude all the files that have the extension png (let’s say), type in the file filter *.png in the Excluded files section and click on the + button as marked in the screenshot below.
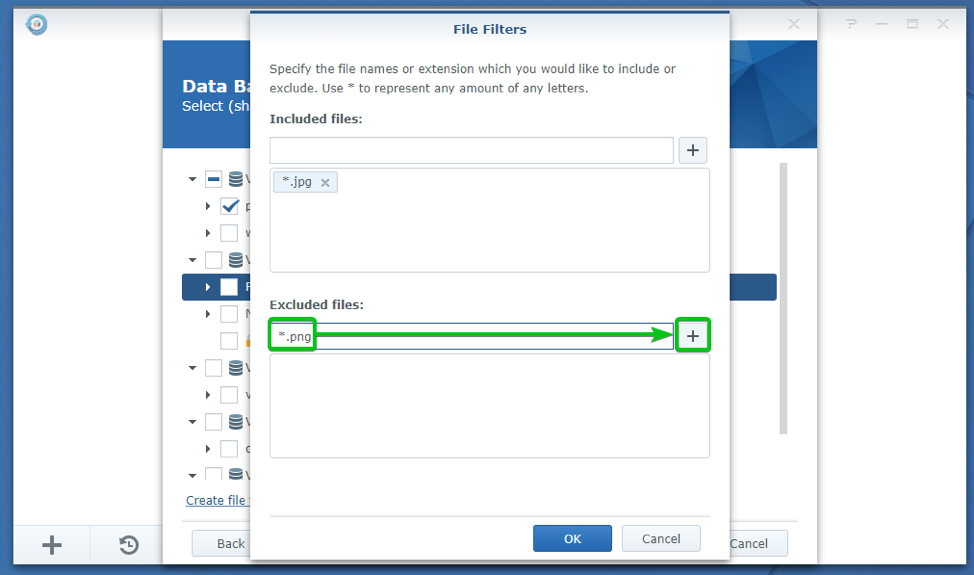
The file filter *.png should be added in the Excluded files section, as shown in the screenshot below.
You can add as many Excluded file filters as you need.
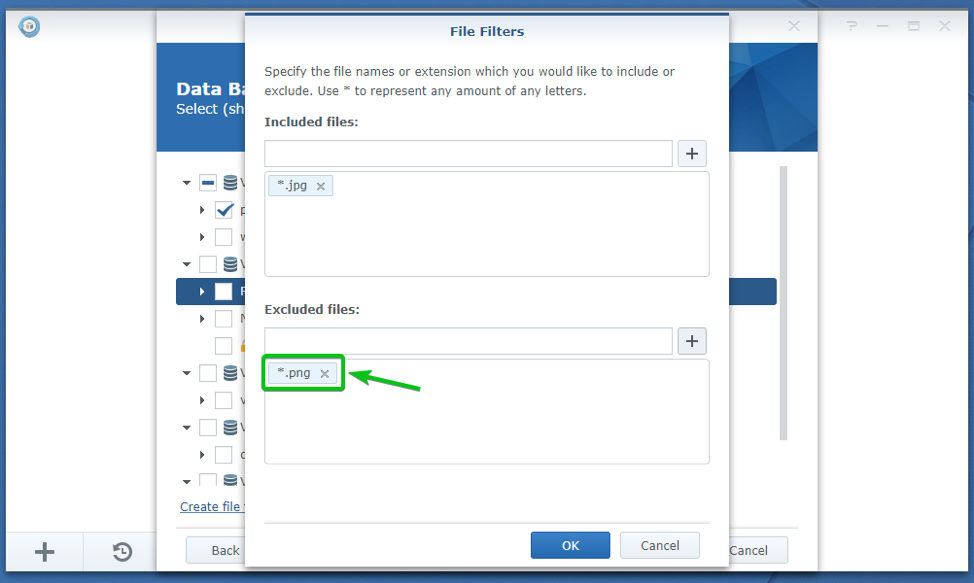
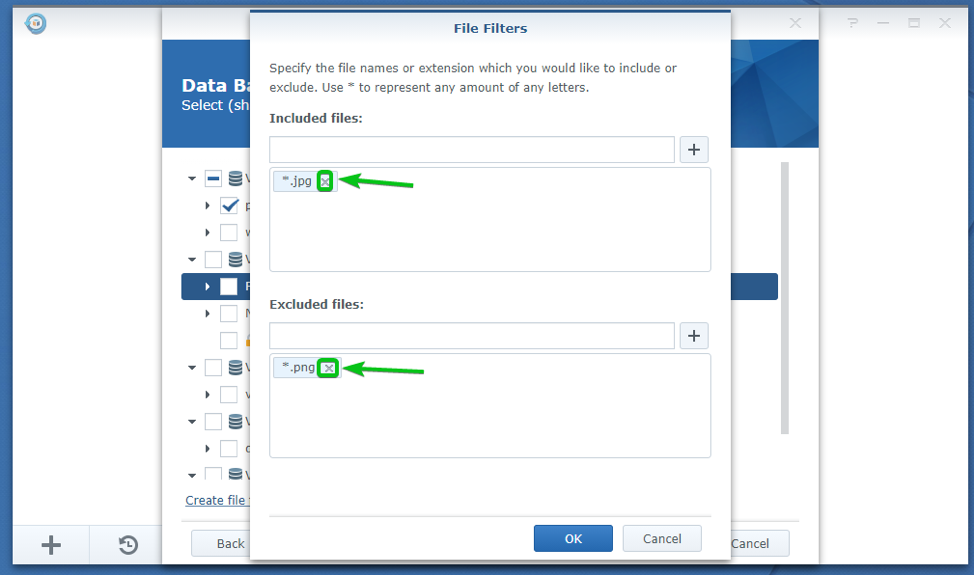
Just click on the x icon on the right side of the file filter to remove a file filter marked in the screenshot below. Your desired file filter should be removed.
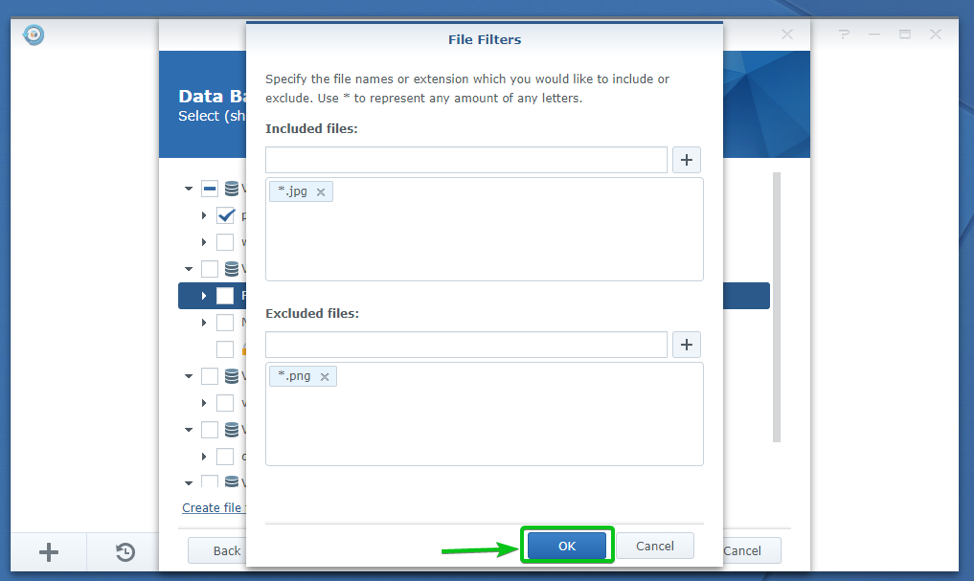
Once you’re done, click on OK to apply the file filters.
NOTE: I will not add any file filters in this article. So, I have clicked on the Cancel button.
Once you’ve selected the shared folders that you want to backup and configured file filters (optional), click on Next as marked in the screenshot below.
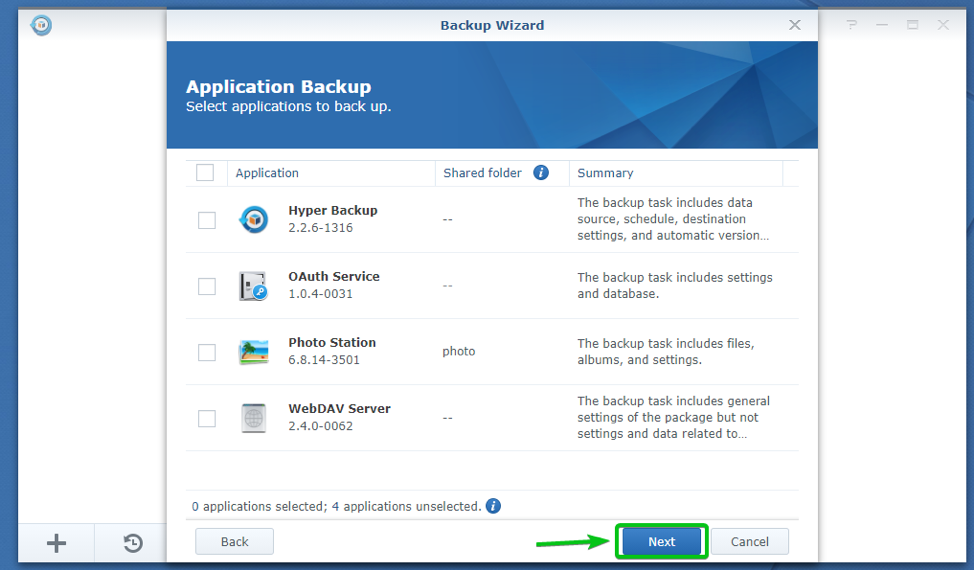
You can also backup apps installed on your Synology NAS with Hyper Backup.
Hyper Backup will list all the installed apps on your Synology NAS that you can backup, as you can see in the screenshot below.
I will not back up any apps with Hyper Backup in this article. But, if you want to backup any apps, select them from here.
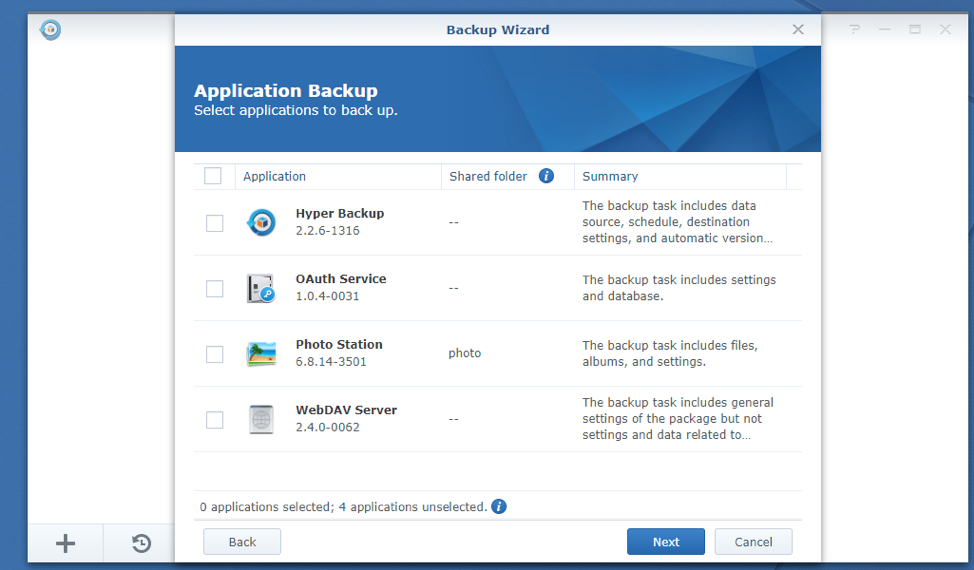
Once you’re done, click on Next, as marked in the screenshot below.
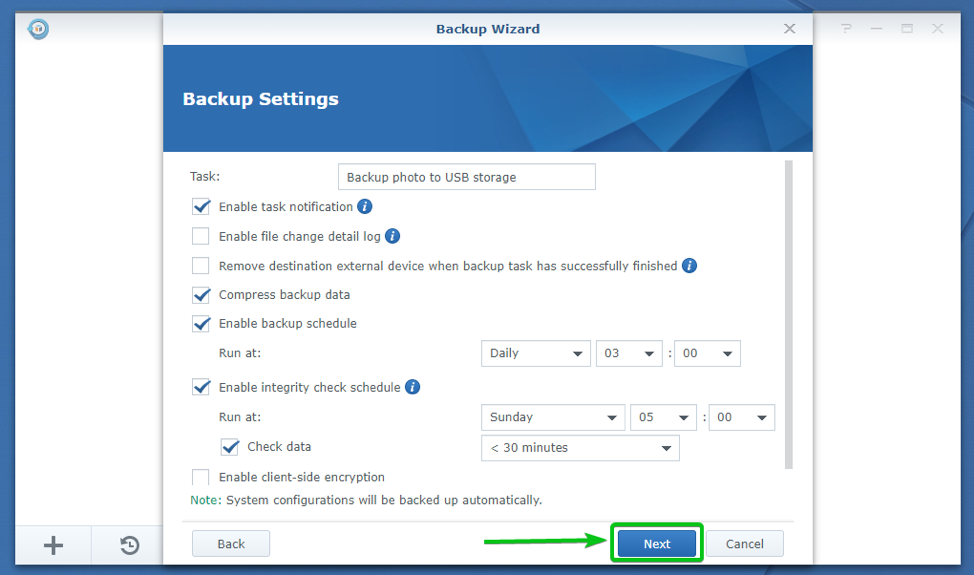
Now, you have to configure the backup settings from here.
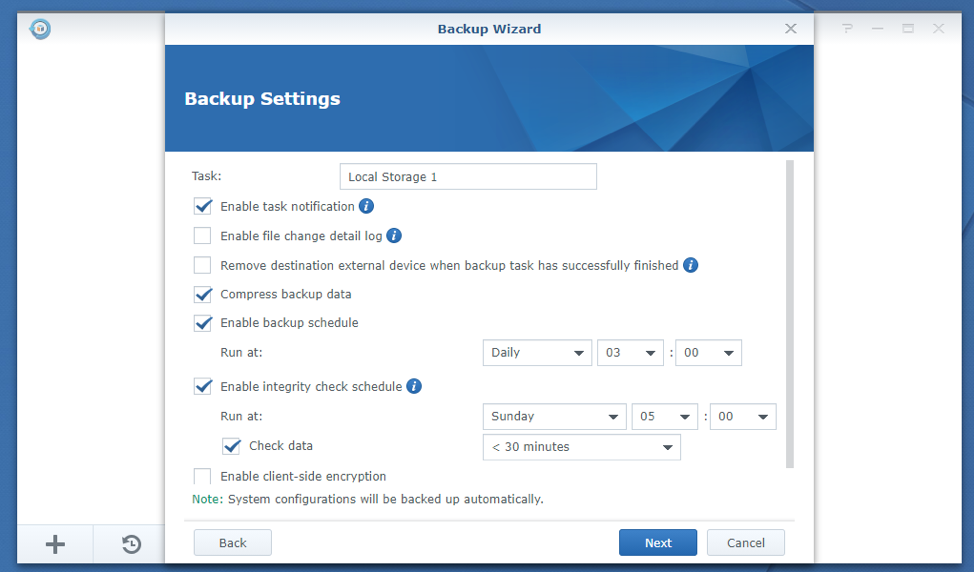
Type in a name for the backup task in the Task section as marked in the screenshot below.
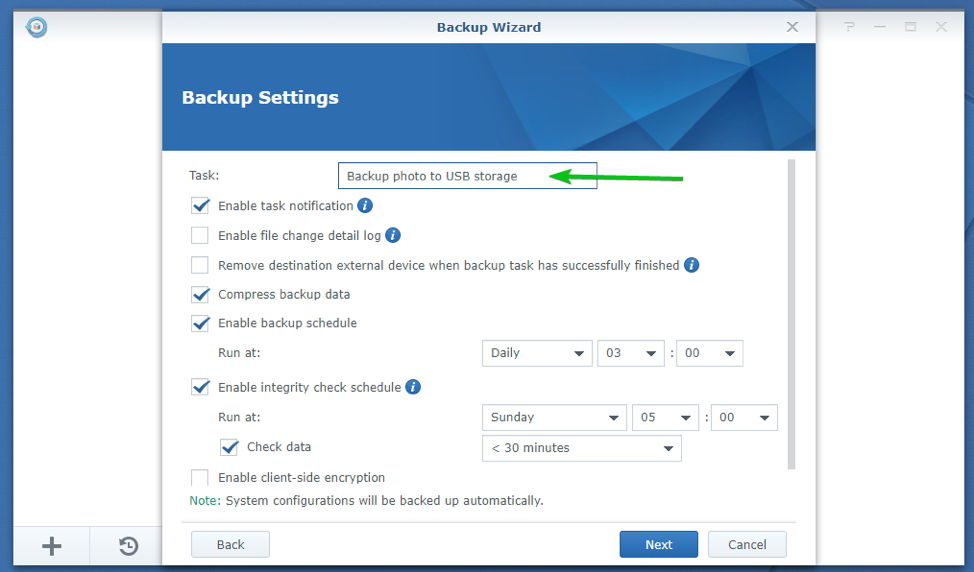
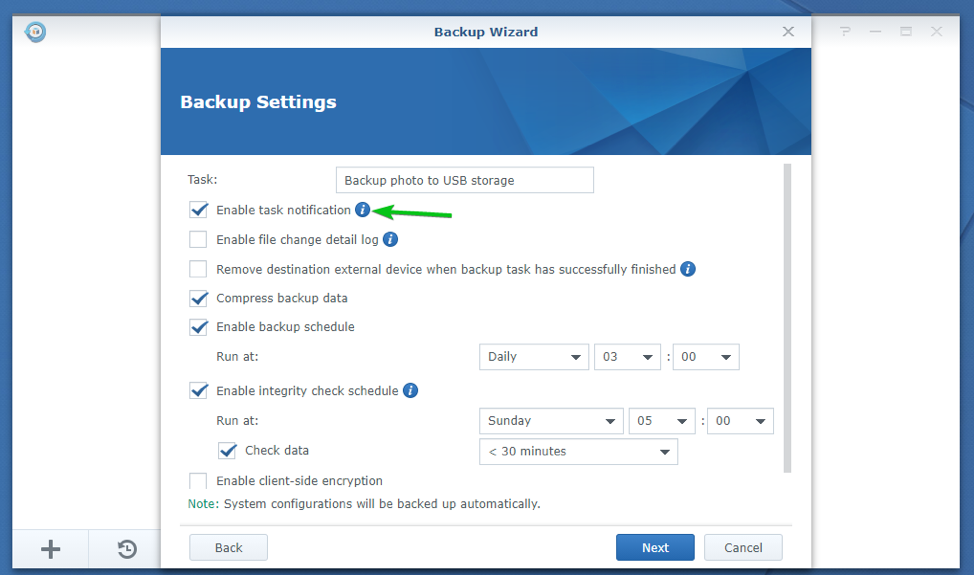
If you want Hyper Backup to send you notifications, keep the Enable task notification checkbox checked.
Otherwise, uncheck the Enable task notification checkbox.
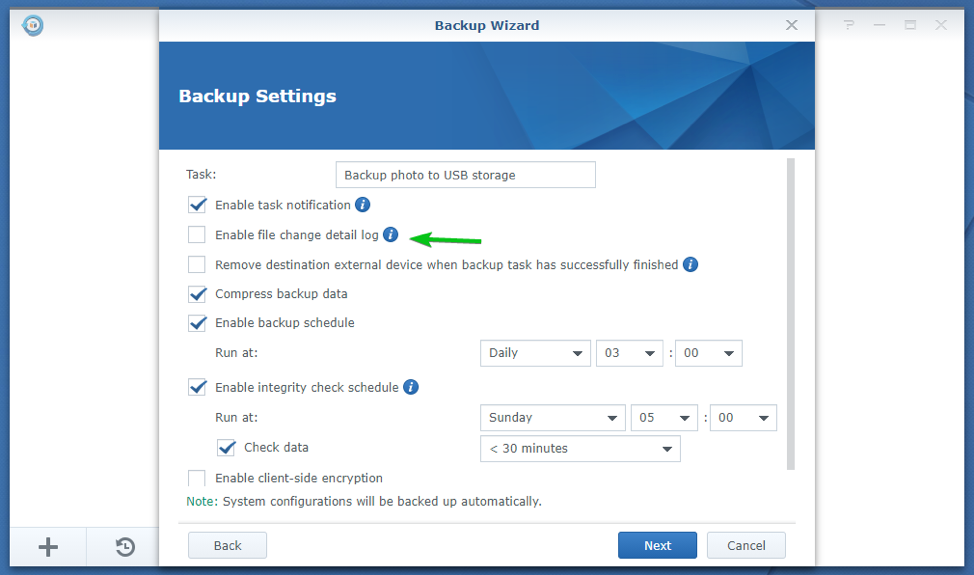
If you want to store file change detail logs, check the Enable file change detail log checkbox as marked in the screenshot below.
Enabling this option will require extra storage spaces.
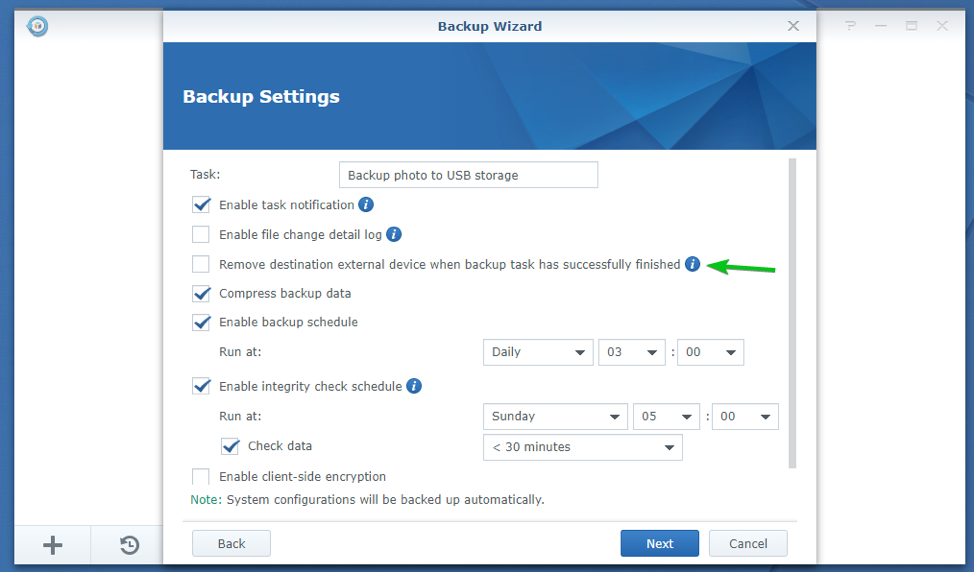
If you want to unmount the external USB storage device when the backup task is successful (once data is backed up to the external USB storage device), check the Remove destination external device when the backup task has successfully finished checkbox marked in the screenshot below.
If you want the backup data to be compressed (to save the external USB storage device), keep the Compress backup data checkbox checked as marked in the screenshot below.
Otherwise, uncheck the Compress backup data checkbox.
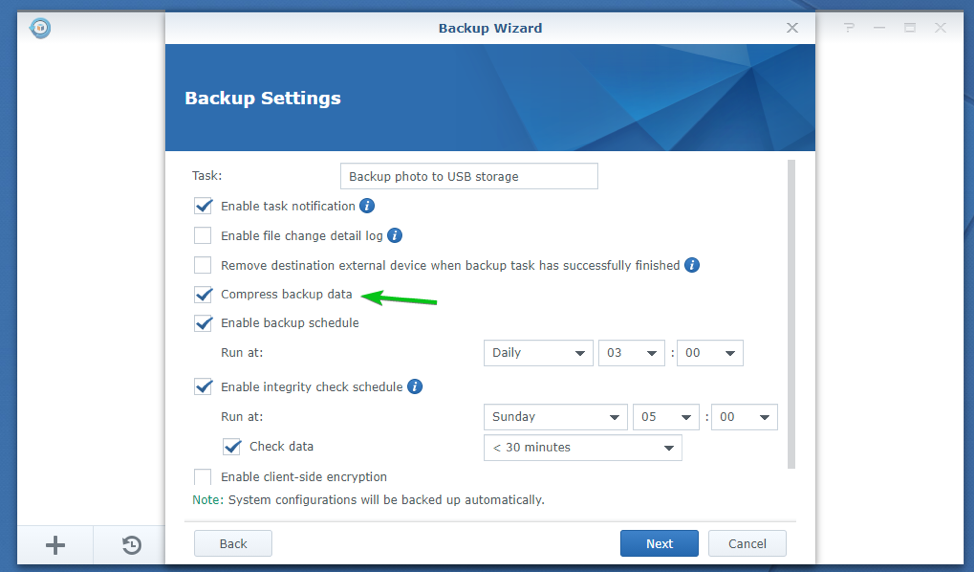
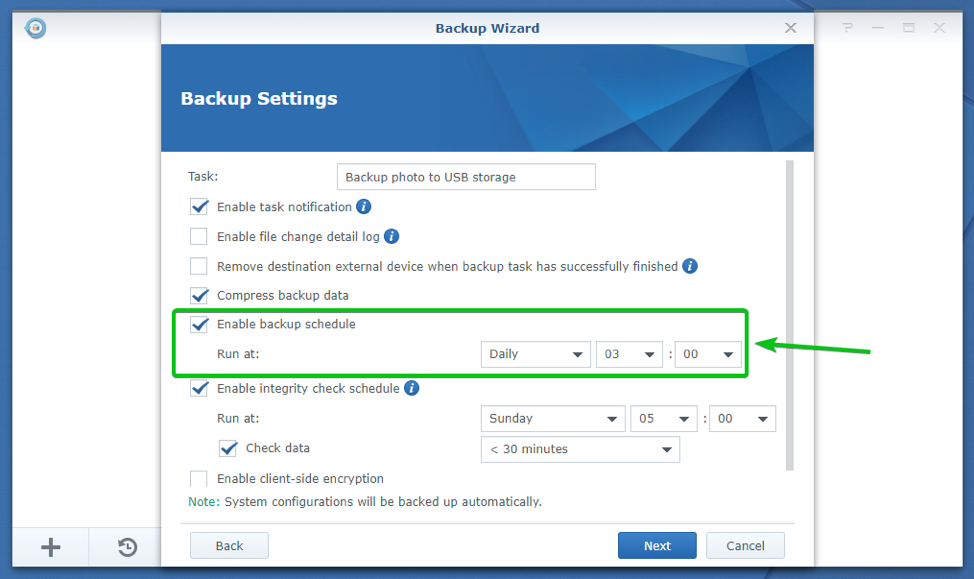
If you want the backup task to run at a specific time or hour of the day, keep the Enable backup schedule checkbox checked and configure when the backup task runs using the dropdown menus as marked in the screenshot below.
If you don’t want to configure the backup schedule and prefer to run the backup task manually, uncheck the Enable backup schedule checkbox.
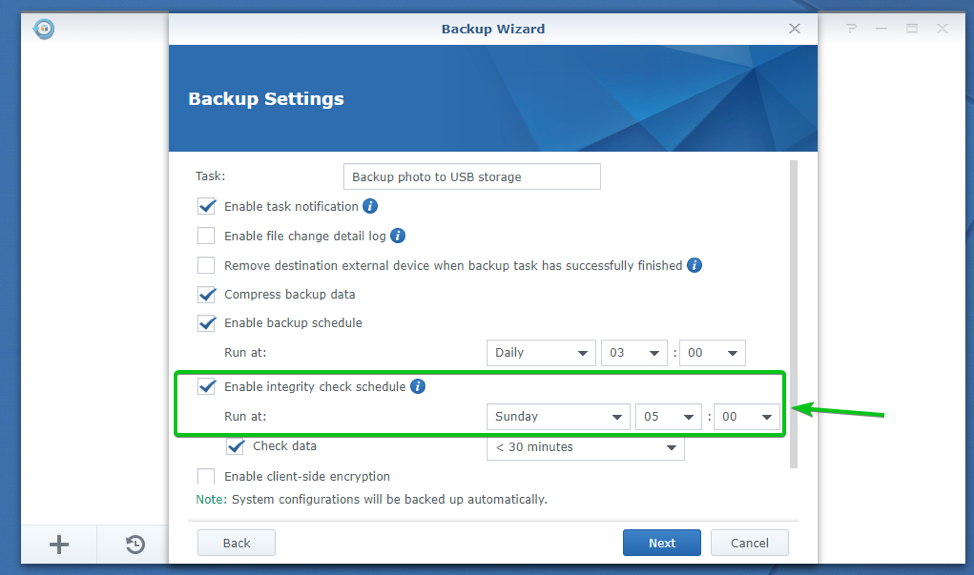
To automatically check the backed-up data on the USB storage devices for corruption, you can keep the Enable integrity check schedule checkbox and configure when to perform the integrity checks using the dropdown menus as marked in the screenshot below.
If you don’t want to configure the integrity check schedule and prefer to perform it manually, uncheck the Enable integrity check schedule checkbox.
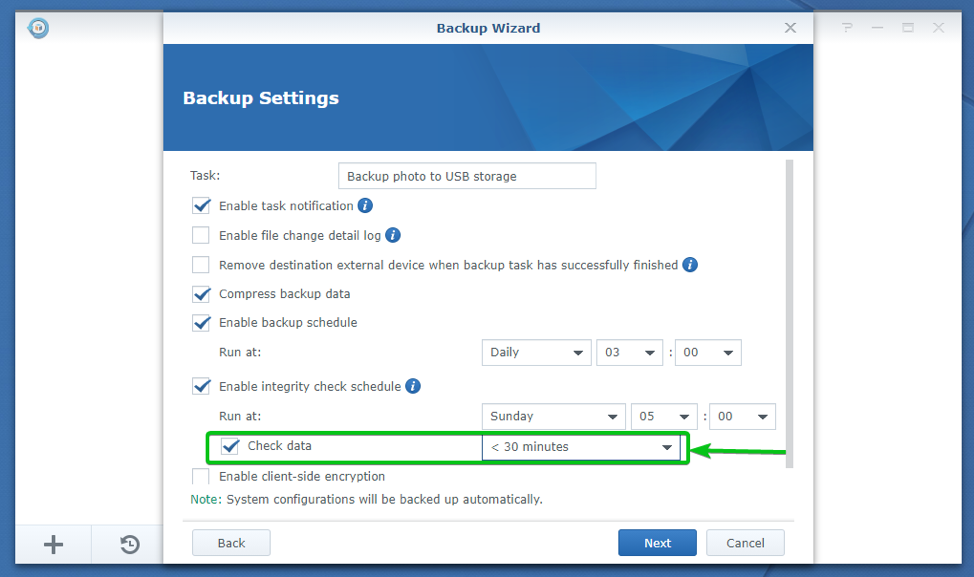
If you are willing to keep the integrity check schedule enabled, you can also set a time within which the integrity checking task must finish.
Integrity checking puts a lot of pressure on the destination storage device (USB storage device in this case). If you have lots of data, it may take a long time to complete. So, sometimes it’s a good idea to limit the runtime for the integrity check task.
To limit the runtime for the integrity check task, keep the Check data checkbox checked and use the dropdown menu to adjust the runtime depending on the size of your data.
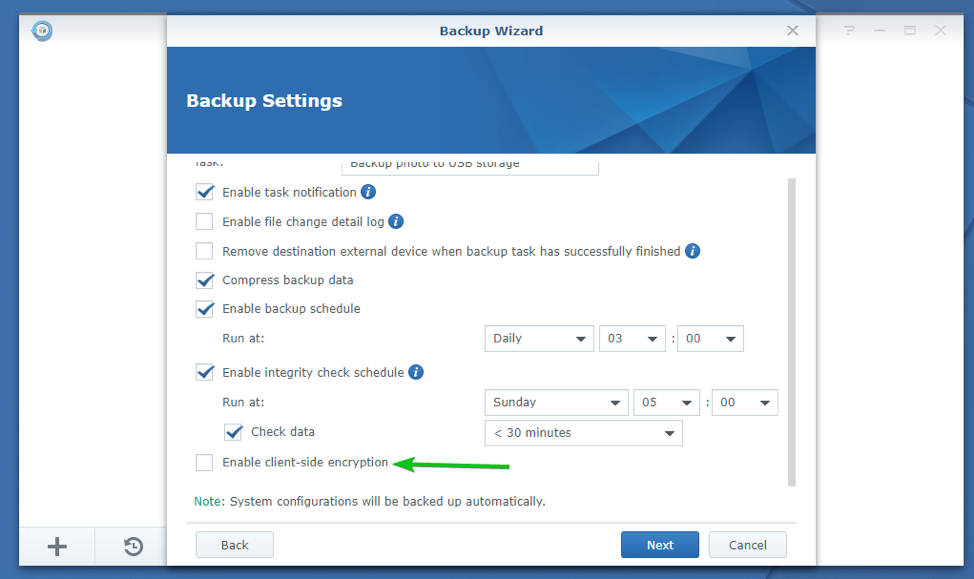
If you want to encrypt the data you are backing up, check the Enable client-side encryption checkbox as marked in the screenshot below.
If you want to encrypt your backup data, you have to configure it while creating the backup task. You can’t enable or disable encryption after the backup task is created.
Once you’re done, click on Next.
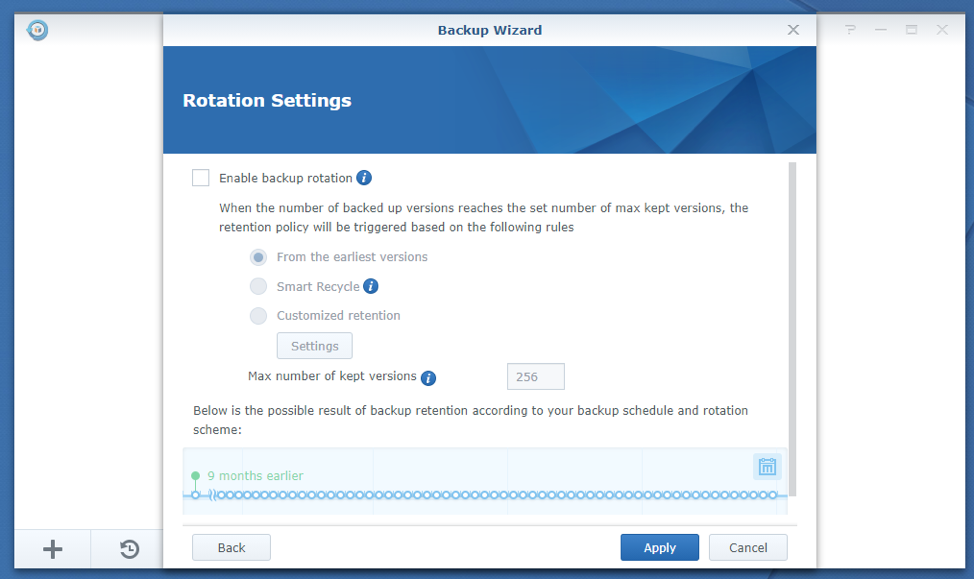
Now, you can configure the backup rotation settings from here.
Backup rotation will keep a specific number of the latest versions of the backup and remove older backups automatically to save storage spaces.
To enable backup rotation, check the Enable backup rotation checkbox as marked in the screenshot below.
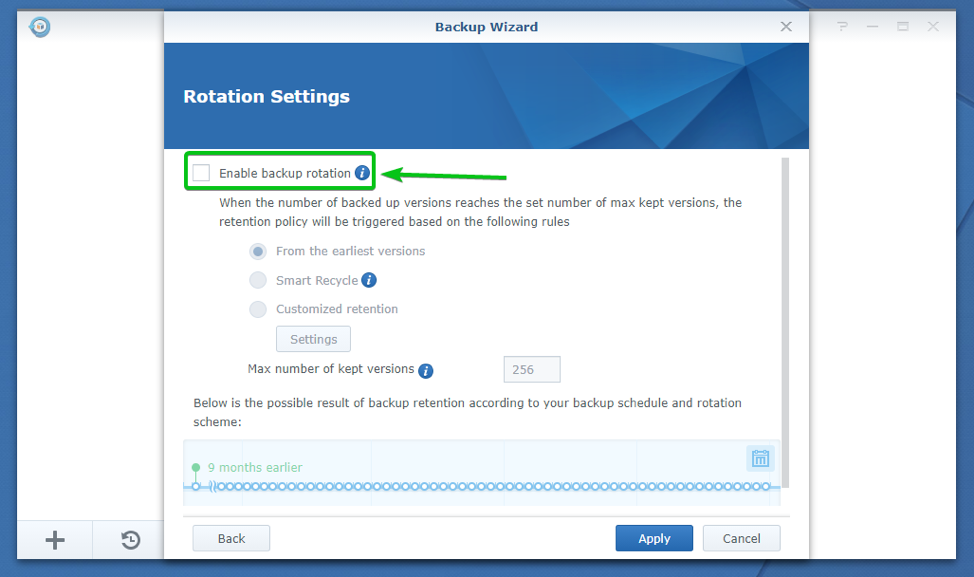
Now, you can select one of the 3 retention policies.
- From the earliest versions: This retention policy will remove older versions of the backups once the number of backups exceeds the number of backups you want to keep.
- Smart Recycle: This retention policy will keep the number of latest versions of the backups you have configured to keep just as before. But, some conditions will be applied to keep only the latest versions of the hourly, daily, and weekly backups. The version of the backup that meets the conditions will be kept, and if all the existing versions of the backups meet the conditions, only the older versions will be removed, and the latest versions will be kept. It is an intelligent retention policy.
The conditions are:
Hourly versions from the past 24 hours: Keep the earliest backup version created each hour.
Daily versions from the past 1 day to 1 month: Keep the earliest backup version created each day.
Weekly versions older than 1 month: Keep the earliest backup version created each week. - Customized retention: You can add retention period and versioning interval depending on your needs.

You can type in the number of backup versions you want to keep in the Max number of kept versions section as marked in the screenshot below.
When the backup version number exceeds this number, the older backup versions will be removed depending on the retention policy.
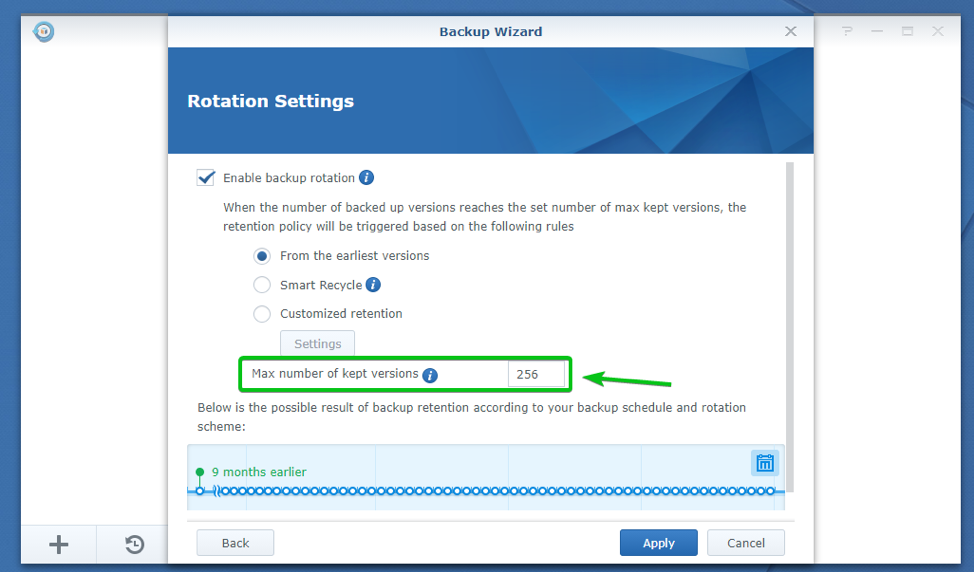
In the marked section of the screenshot below, you can see how your backup versions will be retained and the earliest recovery point in the timeline.
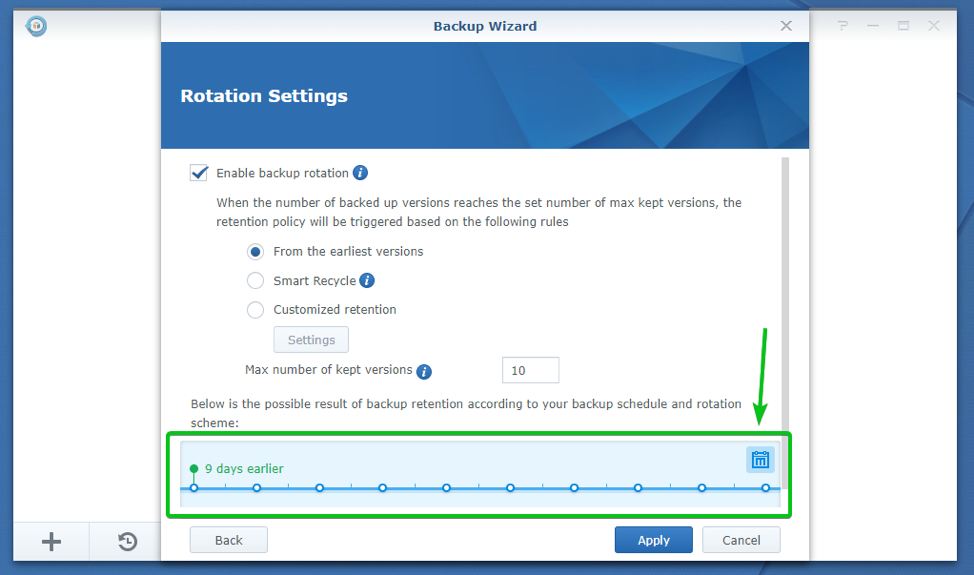
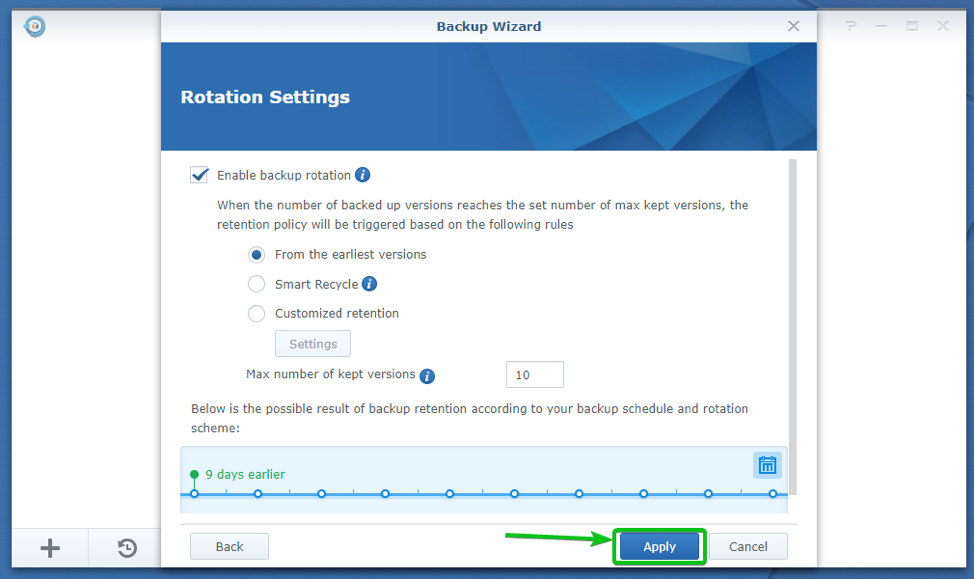
Once you’re done, click on Apply.
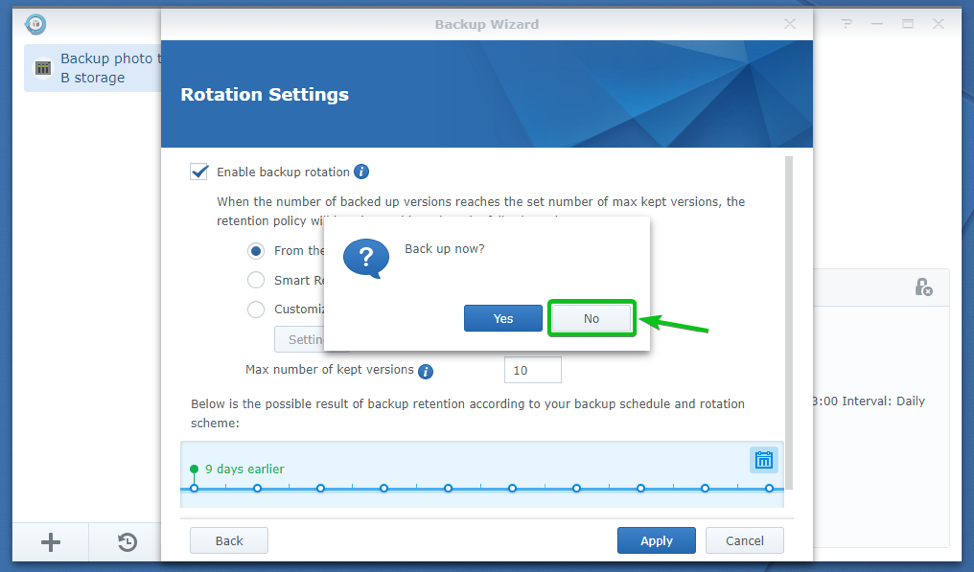
You will be asked whether you want to take a backup of your data right away.
Click on Yes, if you do want to take a backup of your data right now.
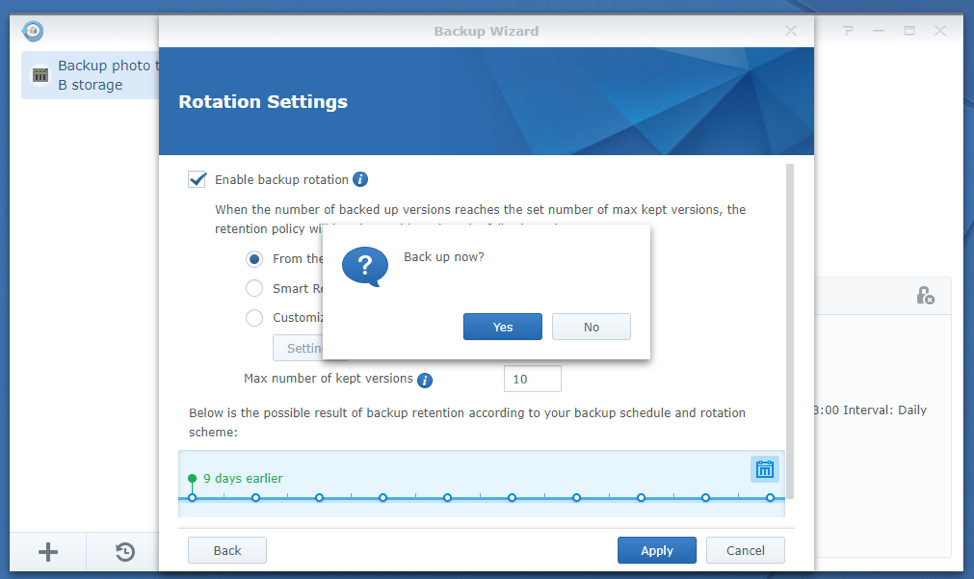
I want to show you how to take a backup of your data manually. So, I will click on No.
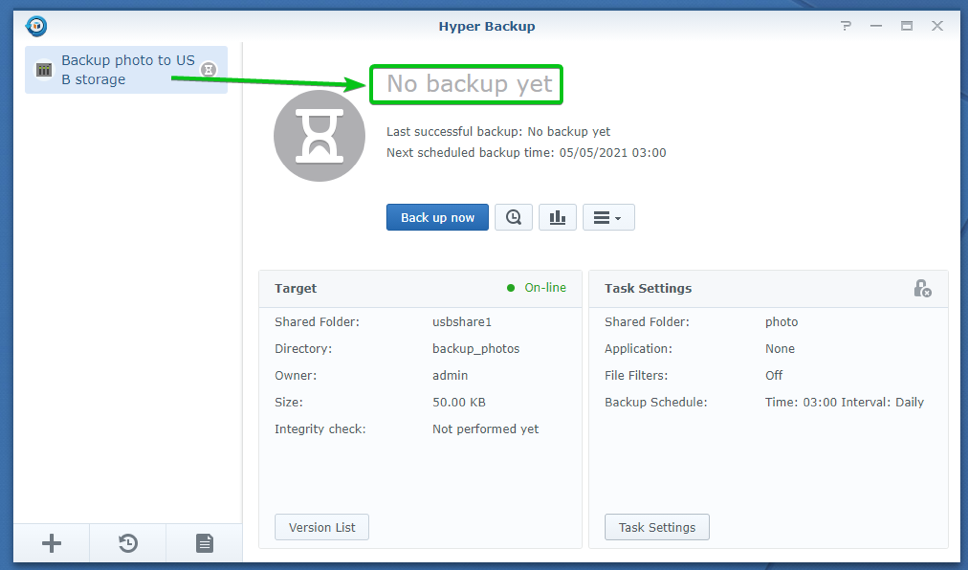
As you can see, a new backup task Backup photo to USB storage is created, and the task did not backup anything yet. I will show you how to take a backup manually in the next section of this article.
Taking a Backup with Hyper Backup
You can take a manual backup of your data anytime you want.
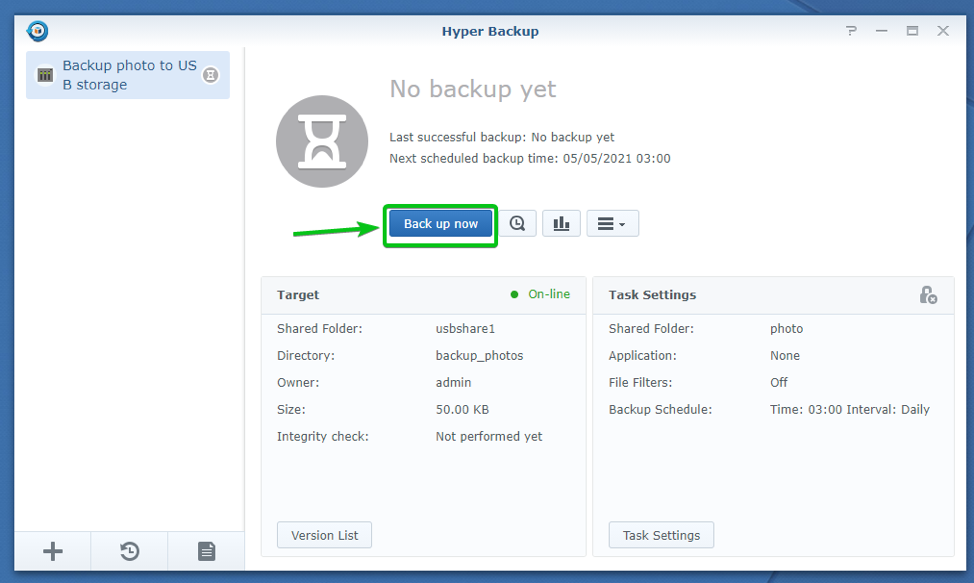
To take a backup using the backup data task you’ve created earlier, select it and click on Back up now as marked in the screenshot below.
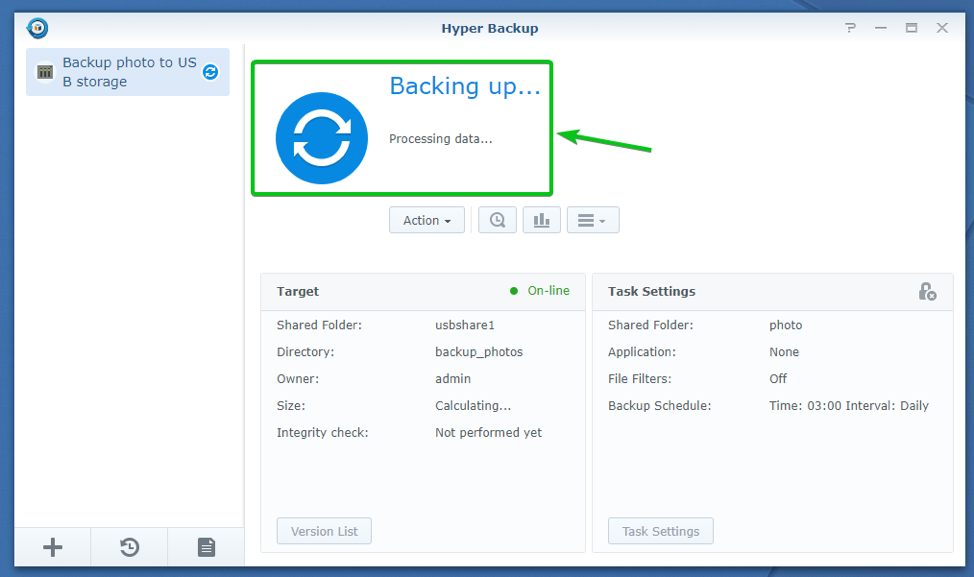
As you can see, the data backup task is running.
You can cancel a data backup task anytime.
To cancel a data backup task while it’s running, click on Action > Cancel as marked in the screenshot below.
I am not going to cancel the data backup task right now.
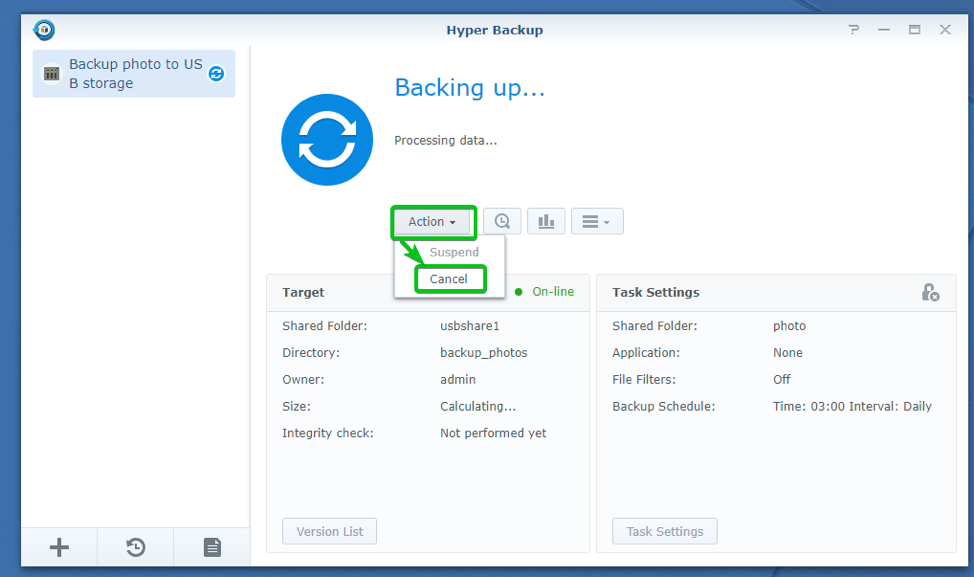
As you can see, the data is being backed up to my external USB storage device. It may take a while to complete depending on the size of your data.
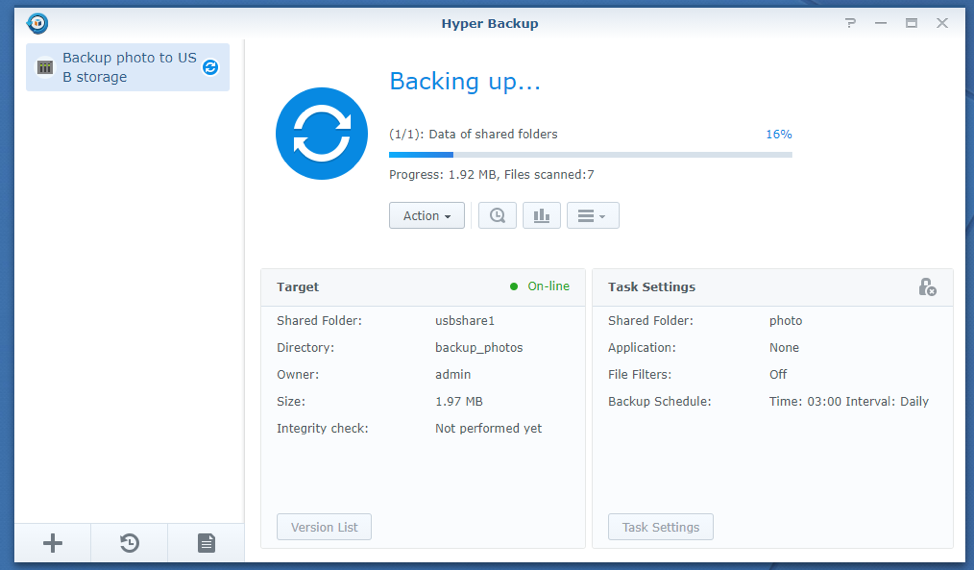
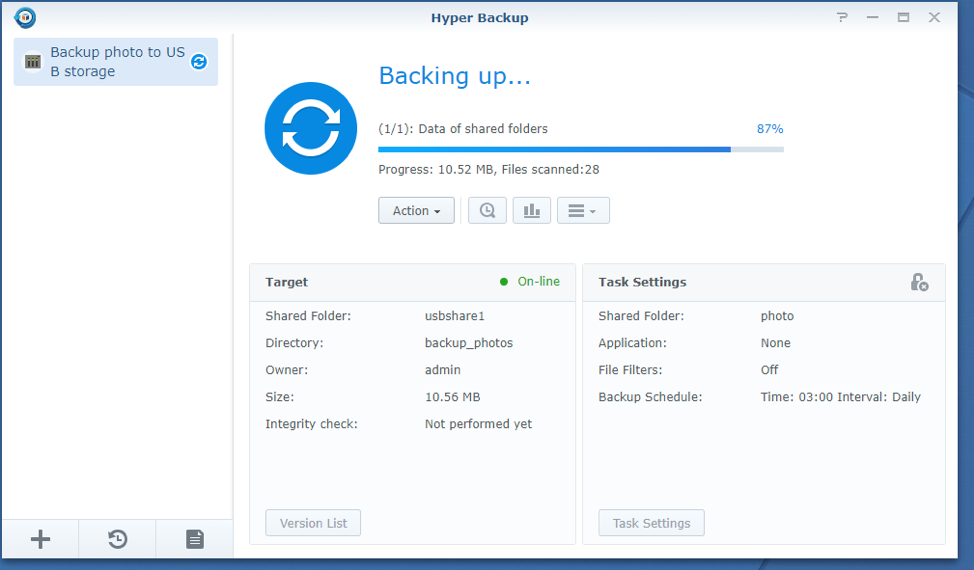
The backup task is almost complete.
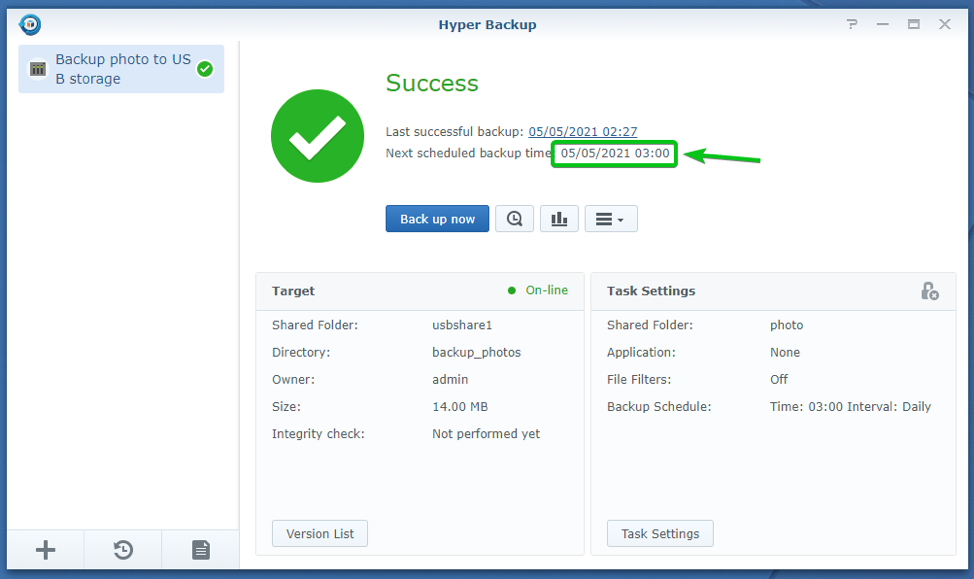
Once the backup is successful, you should see the Success status as marked in the screenshot below.
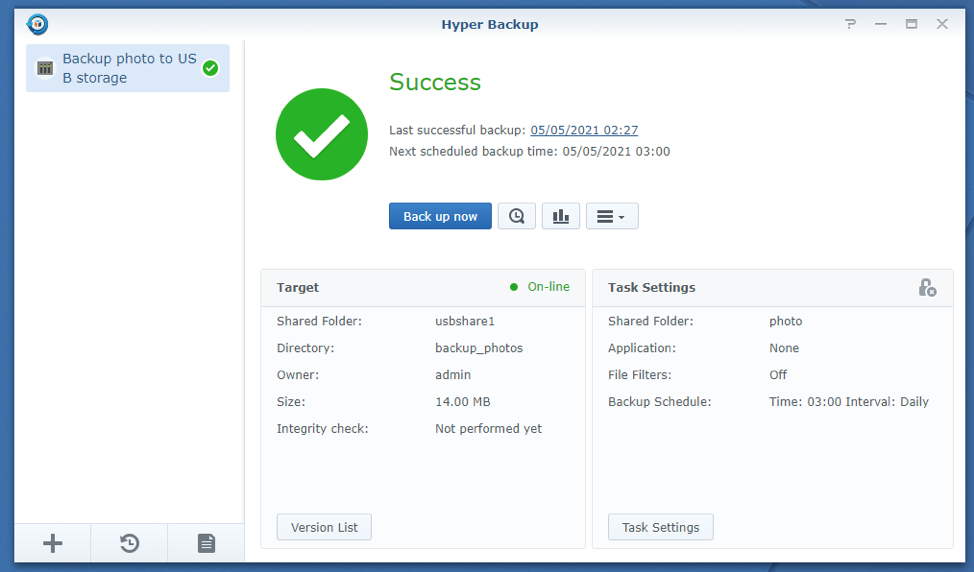
You can see when the next scheduled backup will be taken in the Next scheduled backup time section as marked in the screenshot below.
Browsing Files/Folders from the Backup
You can browse the files/folders from the backups you’ve taken with Hyper Backup.
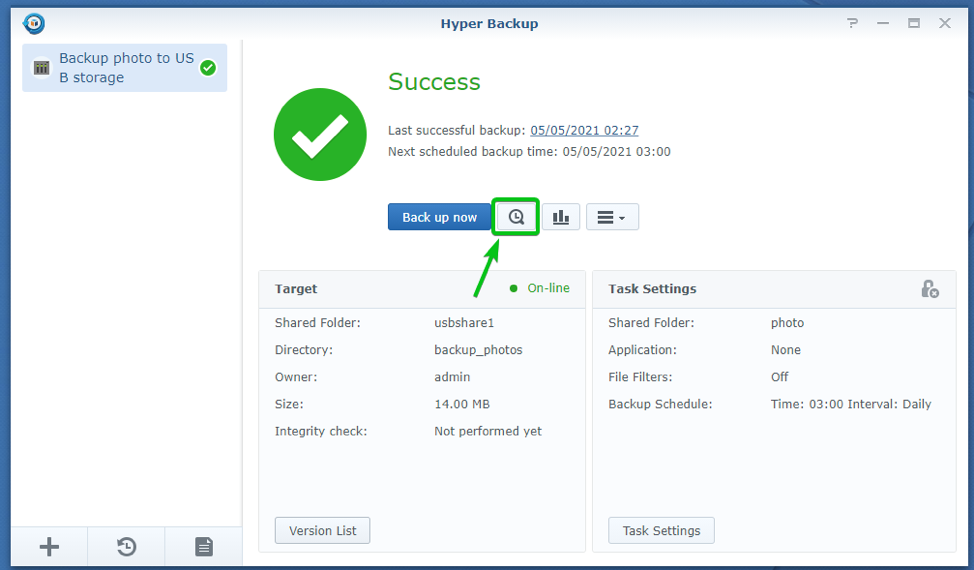
To do that, click on the clock icon () as marked in the screenshot below.
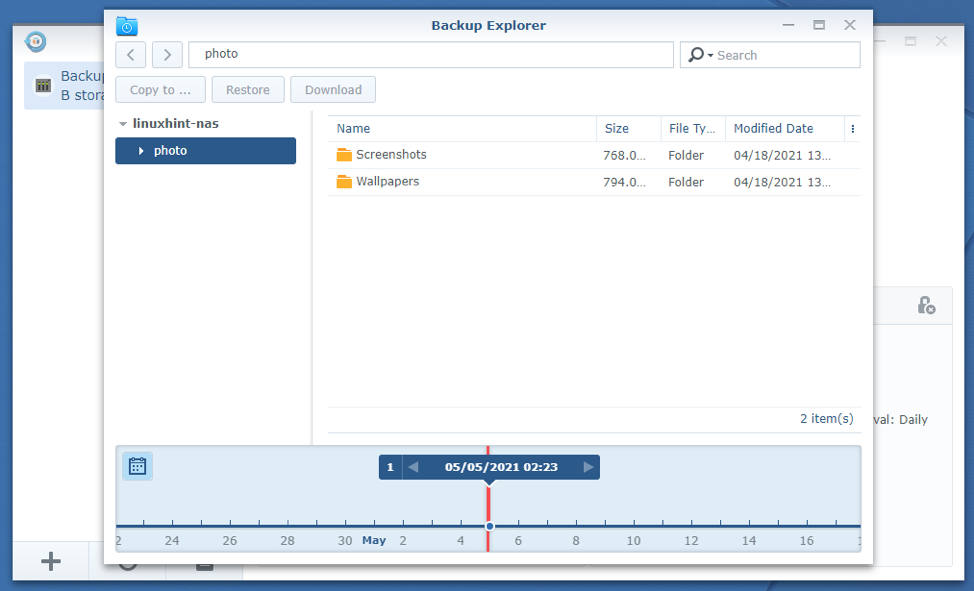
The Backup Explorer window should be displayed.
You can browse all of your backed-up data from the Backup Explorer window.
You can also copy files/folders from the backup to your Synology NAS, restore files/folders from the backup, and download files/folders from the backup to your computer.
You can use the timeline to navigate to an earlier version of your backup and browse the files/folders of that backup version as well.
Checking Backup Statistics
You can check the statistics of your backup with Hyper Backup.
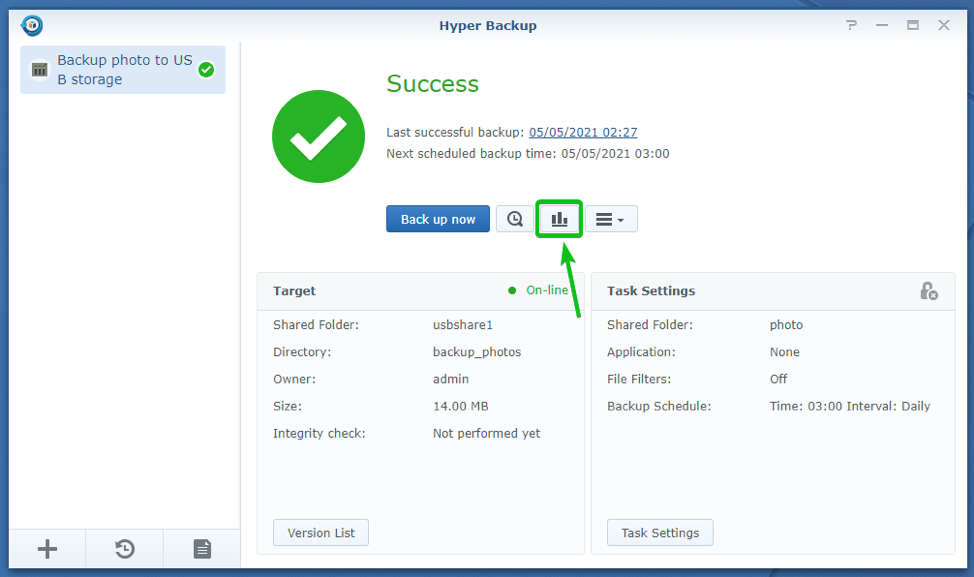
To check the statistics of your backup, select a backup task and click on the icon as marked in the screenshot below.
The Backup Statistics window should be displayed.
In the Destination Usage tab of the Backup Statistics window, you should see the amount of disk space the backup used on the destination device (in our case, the external USB storage device) on each of the backups you’ve taken within a time range.
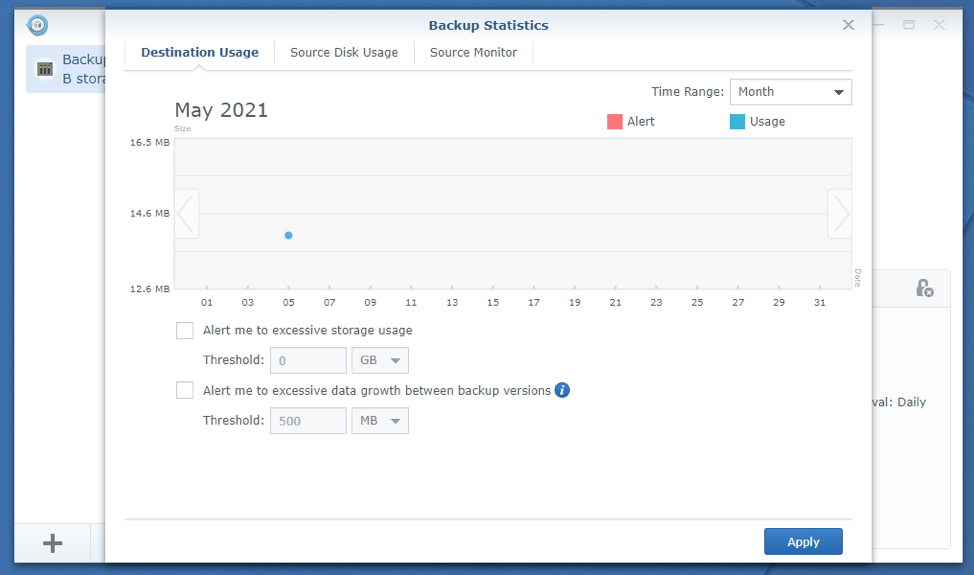
In the Source Disk Usage tab of the Backup Statistics window, you can see the amount of disk space the data you’ve backed up consumed on your Synology NAS on each of the backups you’ve taken within a time range.
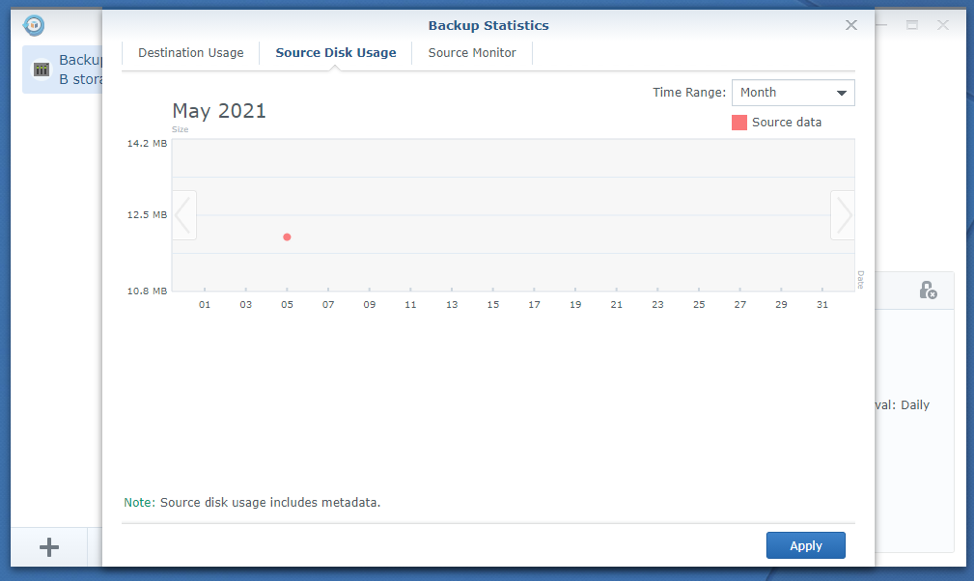
In the Source Monitor tab of the Backup Statistics window, you can see the number of files added, modified, or deleted on each of the backups you’ve taken within a time range.
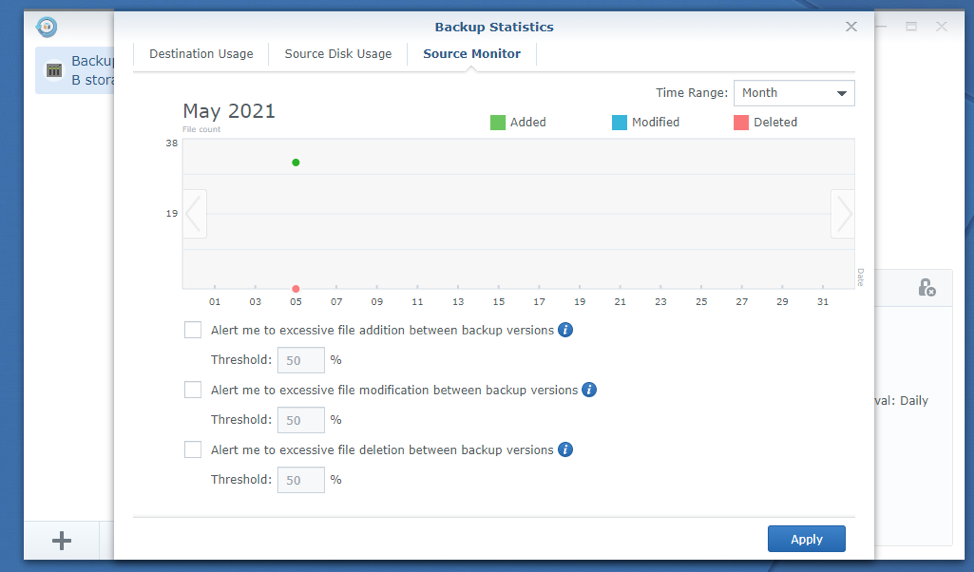
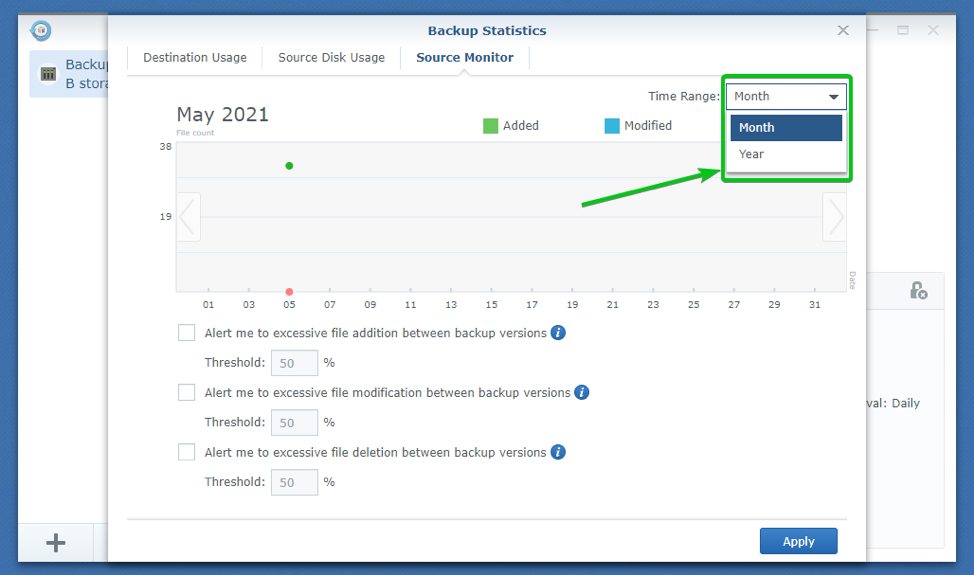
The default time range is set to Month. You can also change it to Year from the Time Range dropdown menu, as shown in the screenshot below.
The Time Range dropdown menu is available on all the tabs of the Backup Statistics window.
Managing Backup Versions
To see all the backup versions a backup task has created, select the task and click on Version List as marked in the screenshot below.

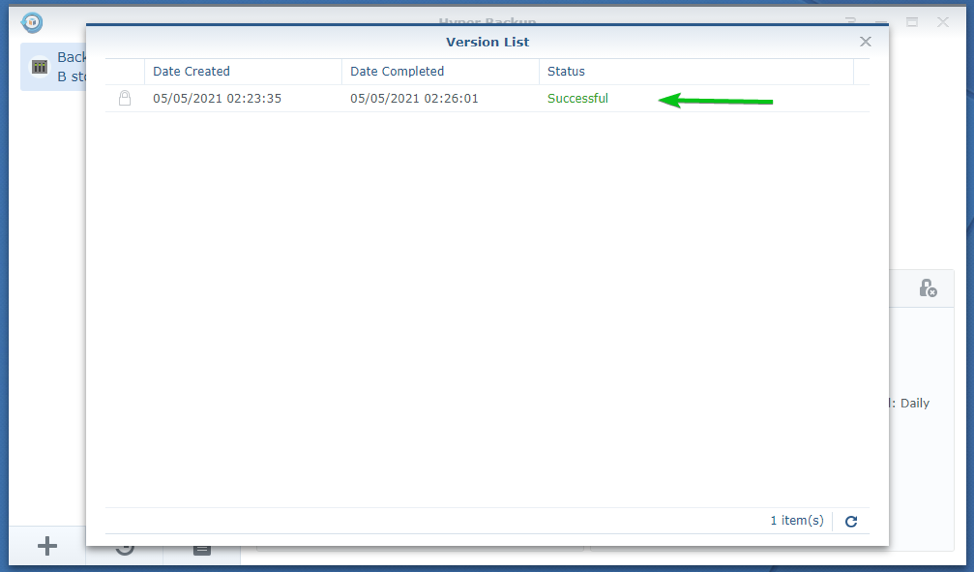
The Version List window should be displayed.
As you can see, the backup I have taken is listed here.
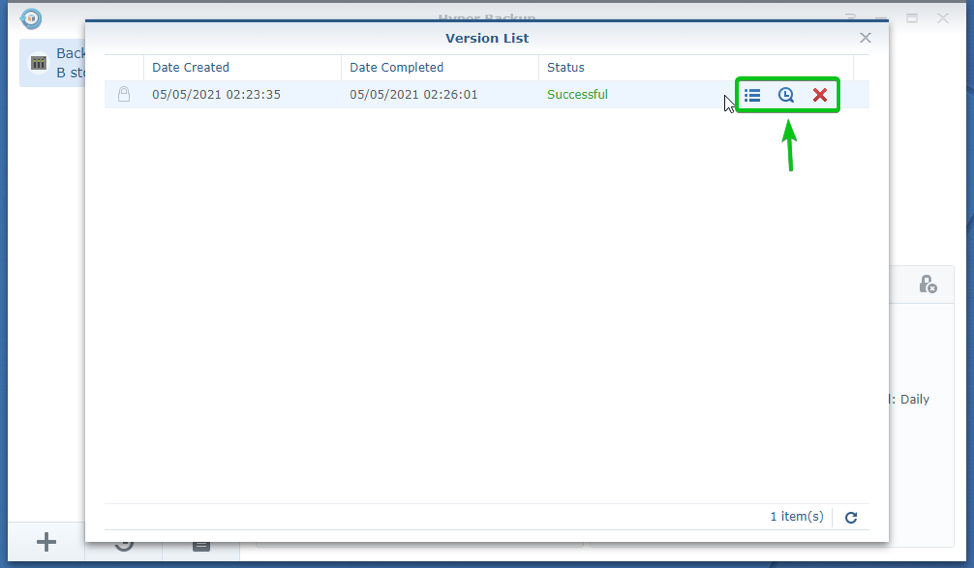
To manage a backup version, hover the mouse cursor over it, and you should see more options as marked in the screenshot below.
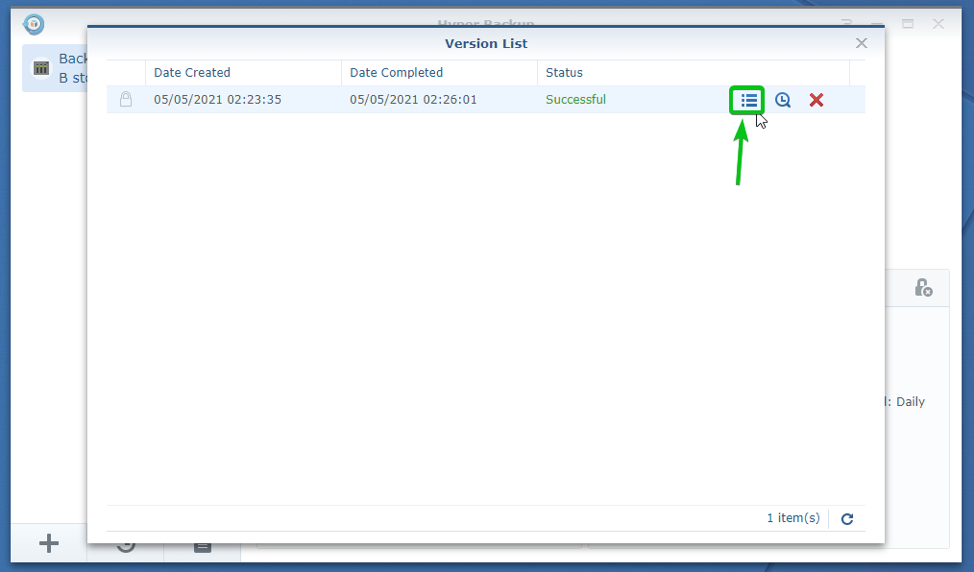
To see more information about a backup version, click on the icon as marked in the screenshot below.
The Backup Version Information window should be displayed.
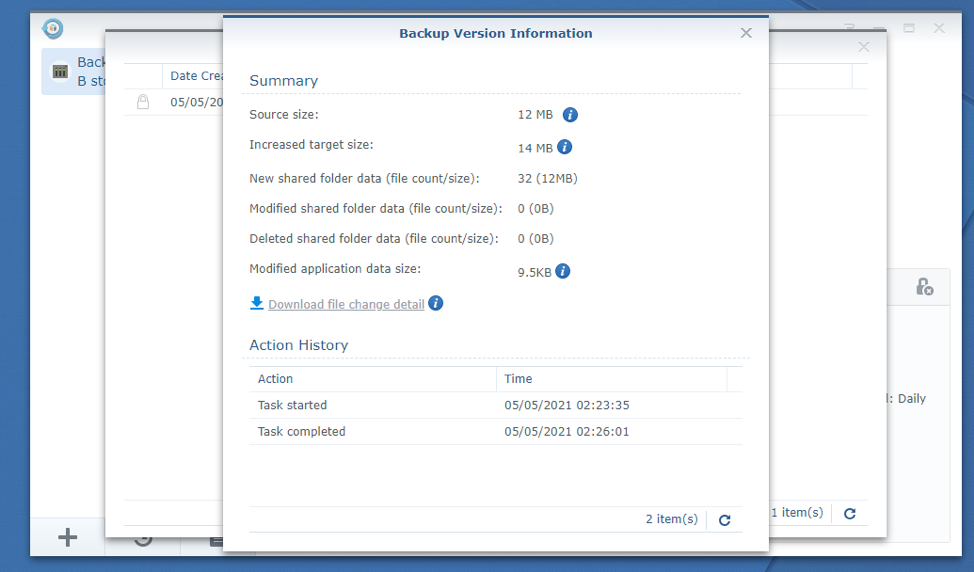
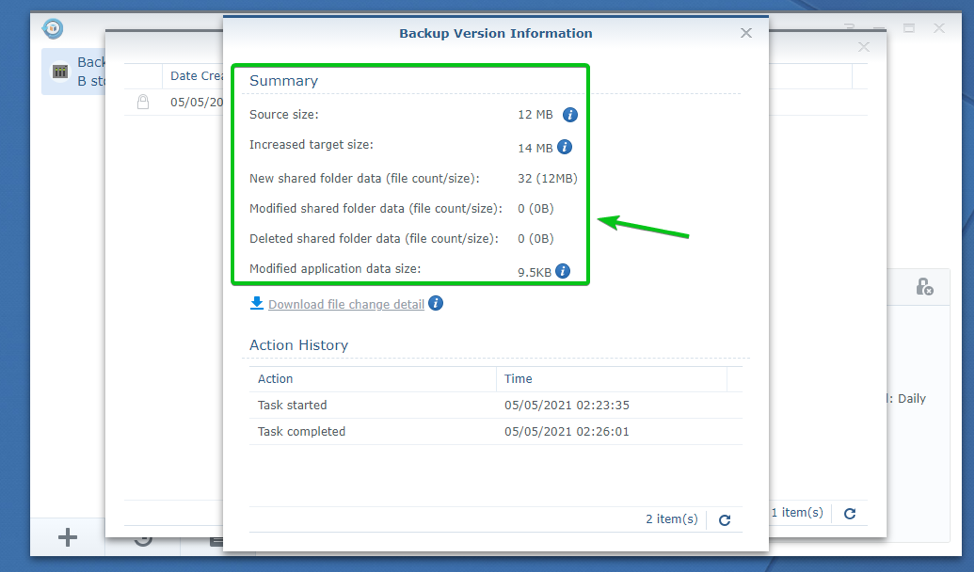
You can find the following information in the Summary section of the Backup Version Information window.
Source size: The original size of the backed-up data on your Synology NAS.
Increased target size: The size of the backup data on your destination device. In this case, the external USB storage device.
New shared folder data (file count/size): The number of newly added files to the backup and the size of these newly added files.
Modified shared folder data (file count/size): The number of files that were already in the backup but were modified in this version of the backup and the size of these modified files.
Deleted shared folder data (file count/size): The number of files that were already in the backup but were deleted in this version of the backup and the size of these deleted files.
Modified application data size: The size of the application and configuration data modified in this backup version.
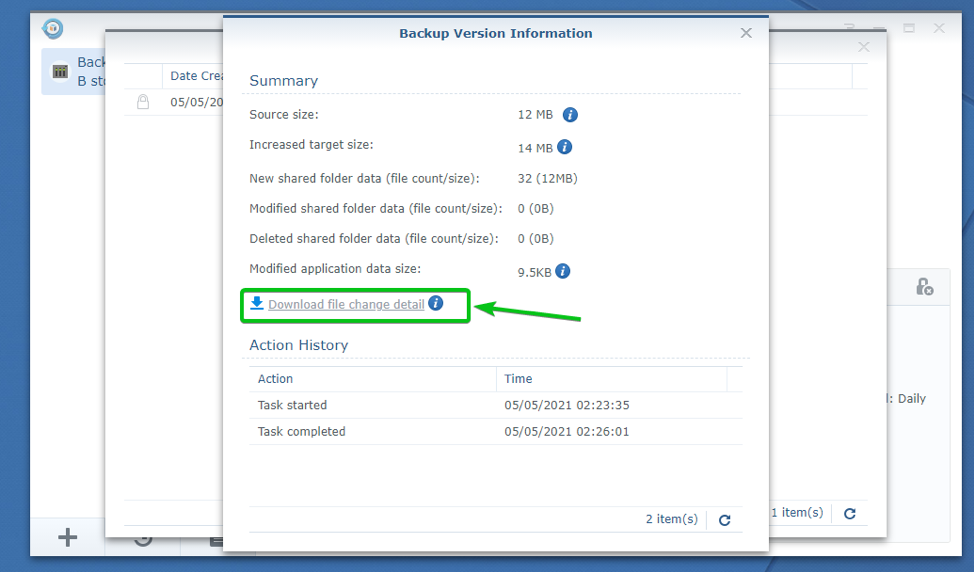
You can click on Download file change detail to download the file change log details.
For this to work, you must check the Enable file change detail log checkbox from the Task Settings of your backup task.
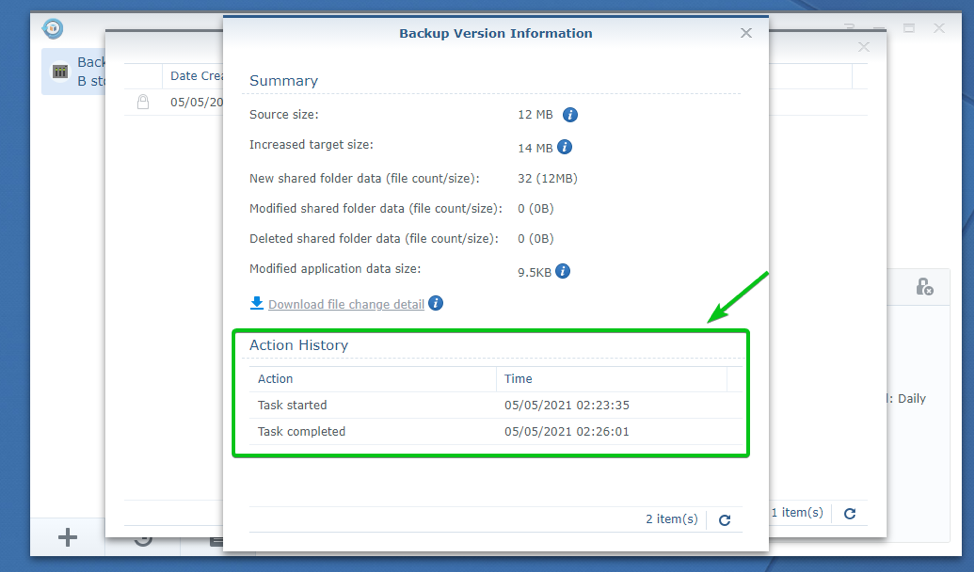
In the Action History section of the Backup Version Information section, you can see when the backup task started and when it was completed.
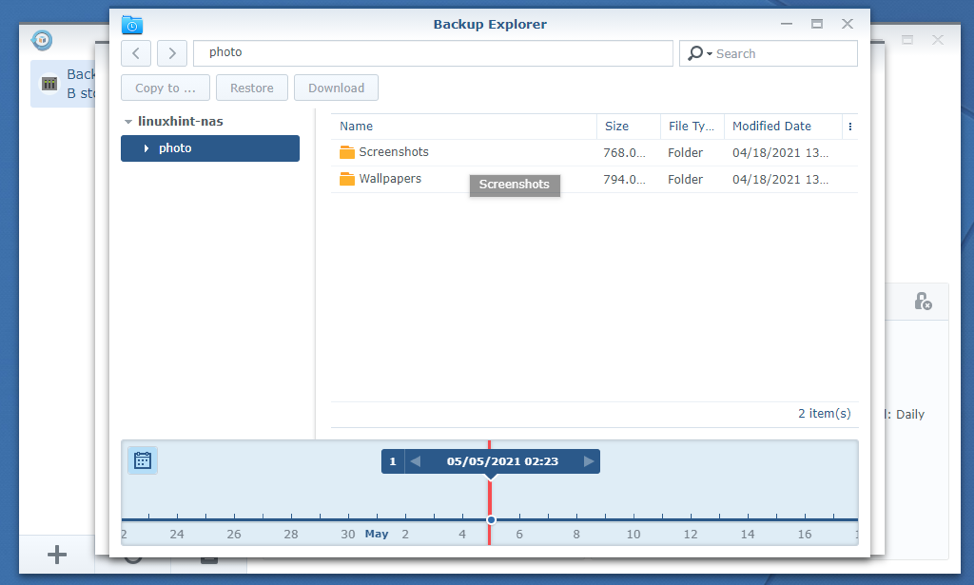
To browse the files/folder from a specific backup version, click on the icon of that backup version as marked in the screenshot below.
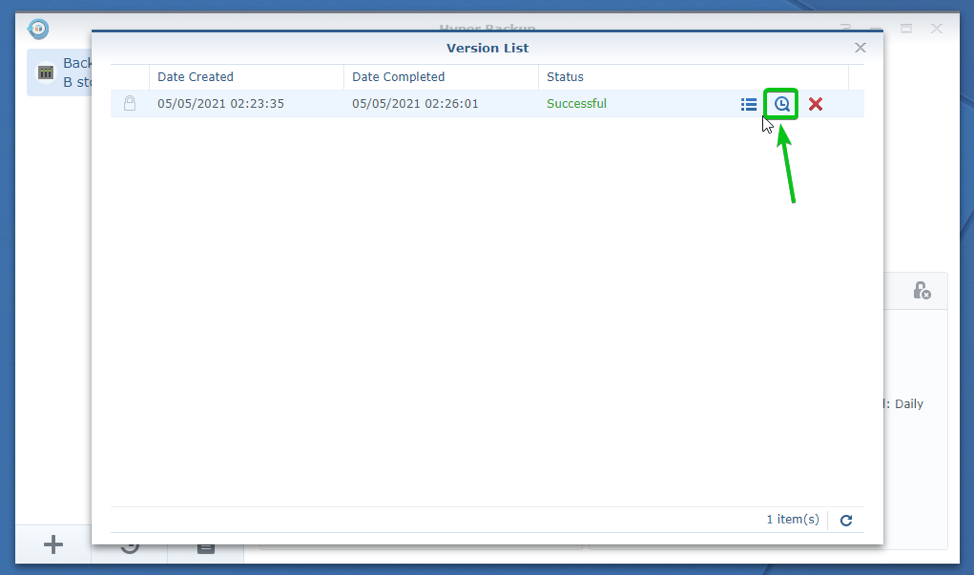
The Backup Explorer should be opened, and you should be able to browse the files/folders of your desired backup version.
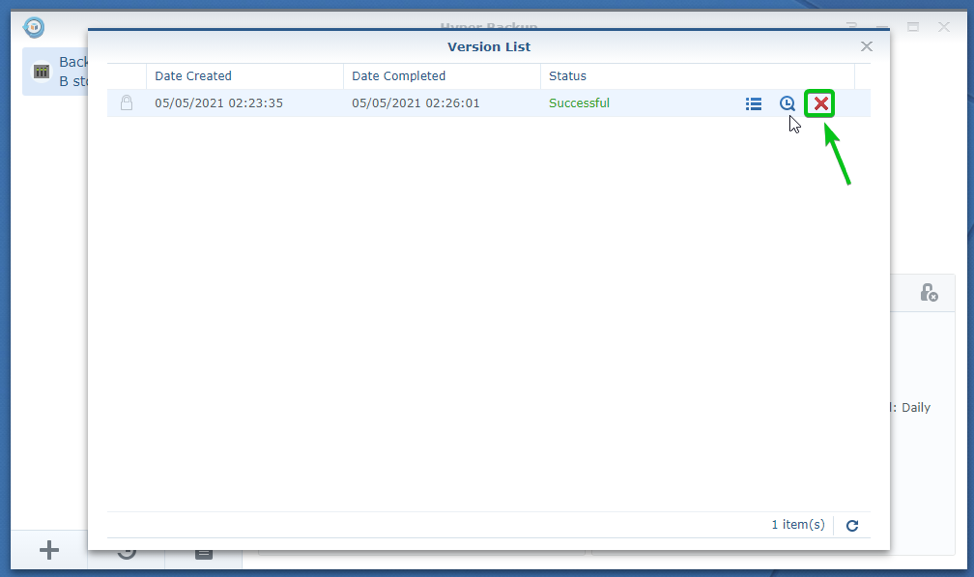
To remove a backup version, click on the icon of that backup version as marked in the screenshot below.
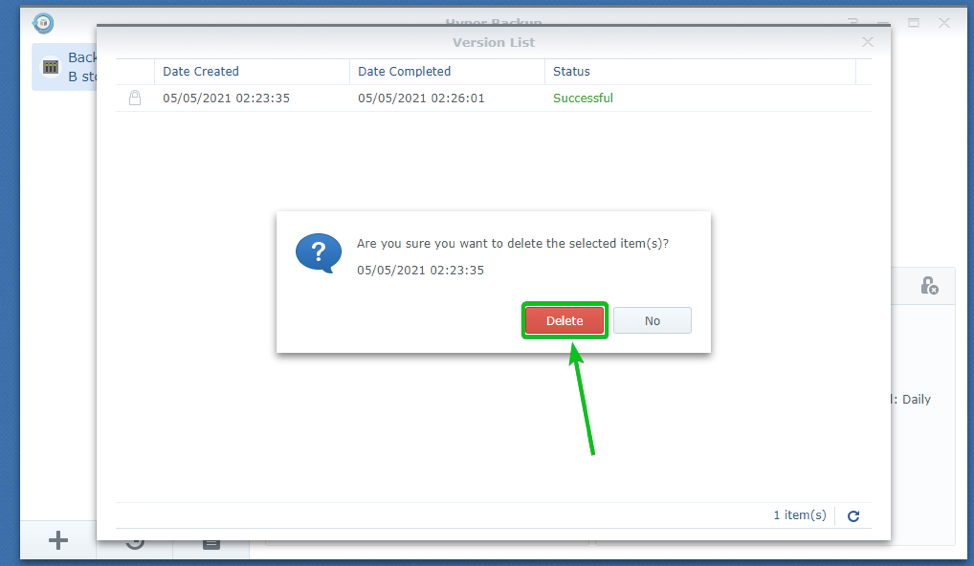
To confirm the removal operation, click on Delete as marked in the screenshot below.
I am not going to remove this backup version. So, I will click on Cancel.
Checking the Integrity of the Backup
Hyper Backup lets you check the integrity of the backup to verify whether the data on your external USB device is not corrupted in any way, and the backup can be used to recover data on your Synology NAS.
Usually, the integrity will be checked automatically depending on your integrity check schedule for the backup task. But, you can also check for backup integrity manually.
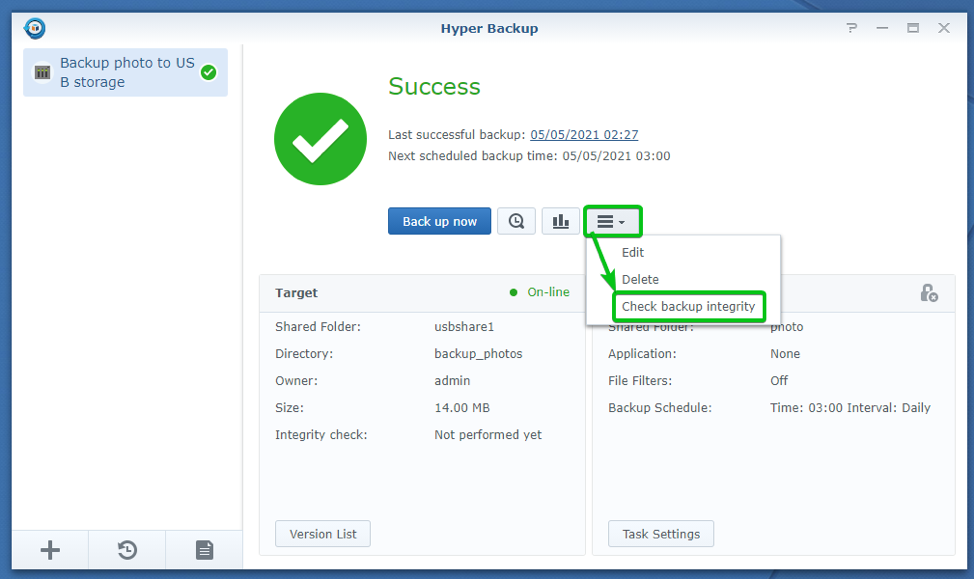
To check the integrity of your backup manually, click on > Check backup integrity as marked in the screenshot below.
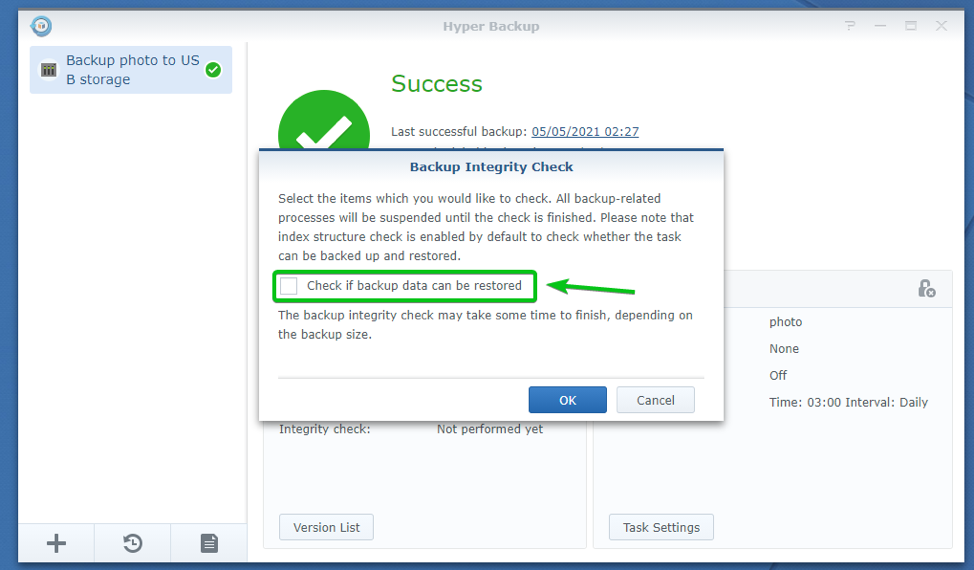
The Backup Integrity Check window should be displayed.
By default, the integrity check will see if the data on your destination (the external USB storage device in this case) is alright.
If you want to verify whether the data on your destination (the external USB storage device in this case) can be used to recover the data on your Synology NAS, check the Check if backup data can be restored checkbox as marked in the screenshot below.
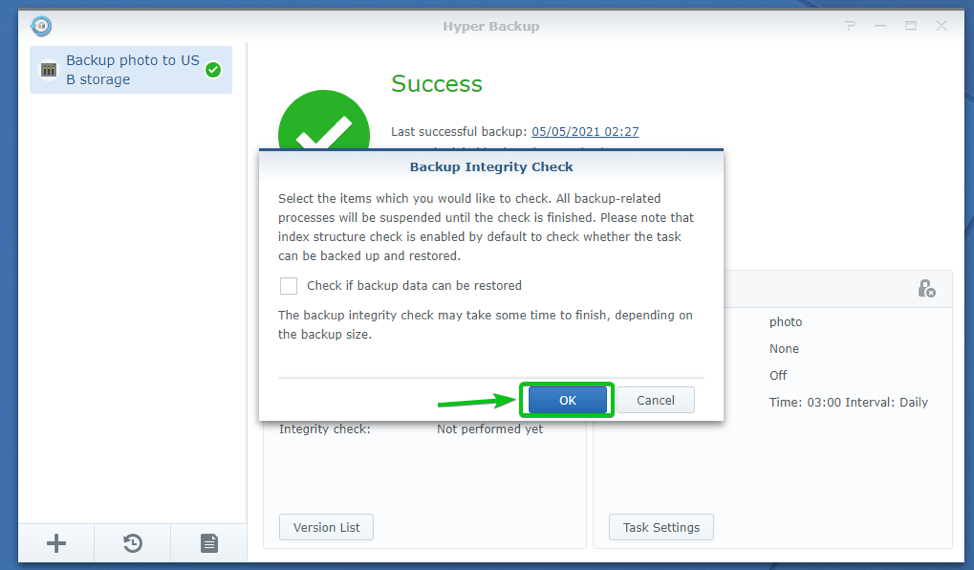
Then, click on OK.
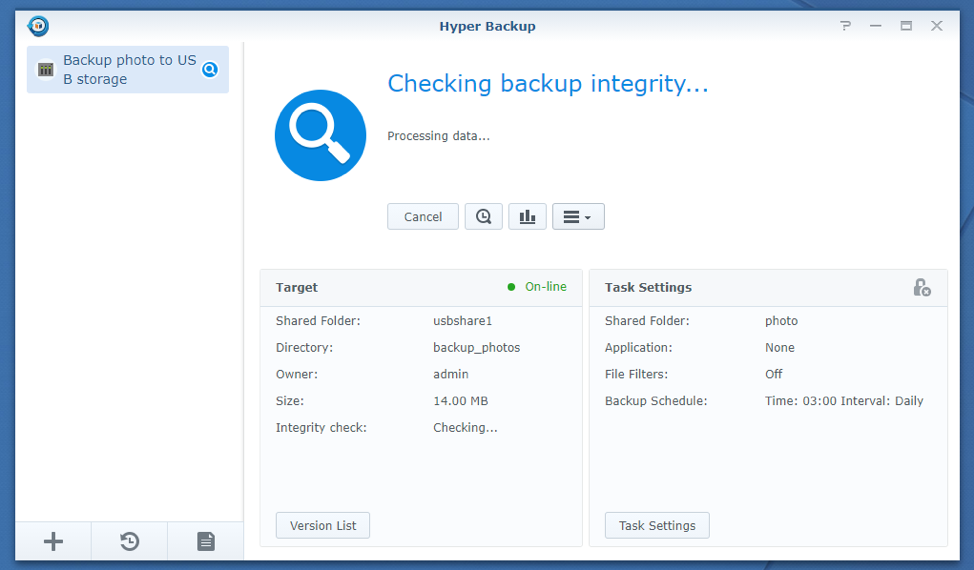
Hyper Backup should start checking the integrity of the backup, as you can see in the screenshot below.
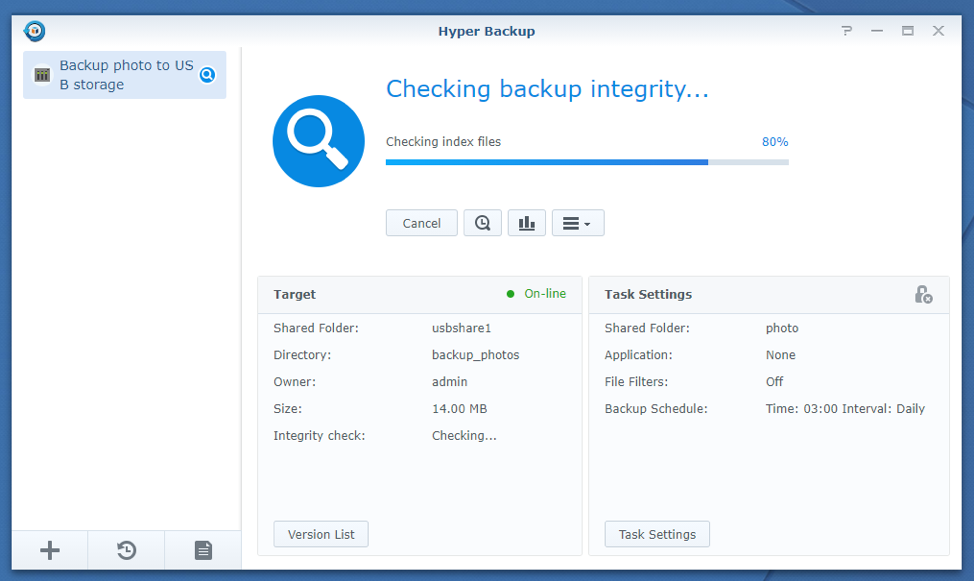
As you can see, the backup integrity is being checked. It may take a while to complete.
At this point, the backup integrity check is successful.
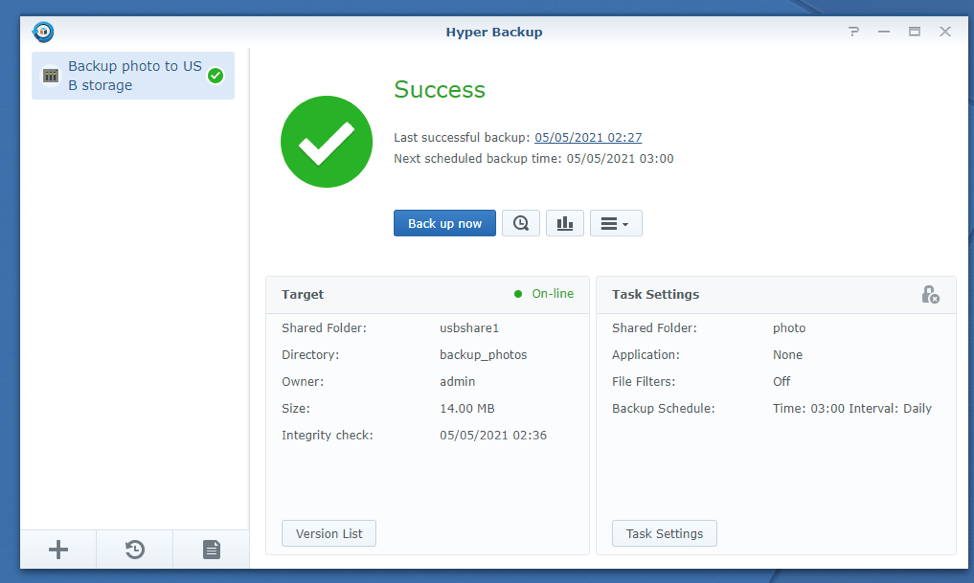
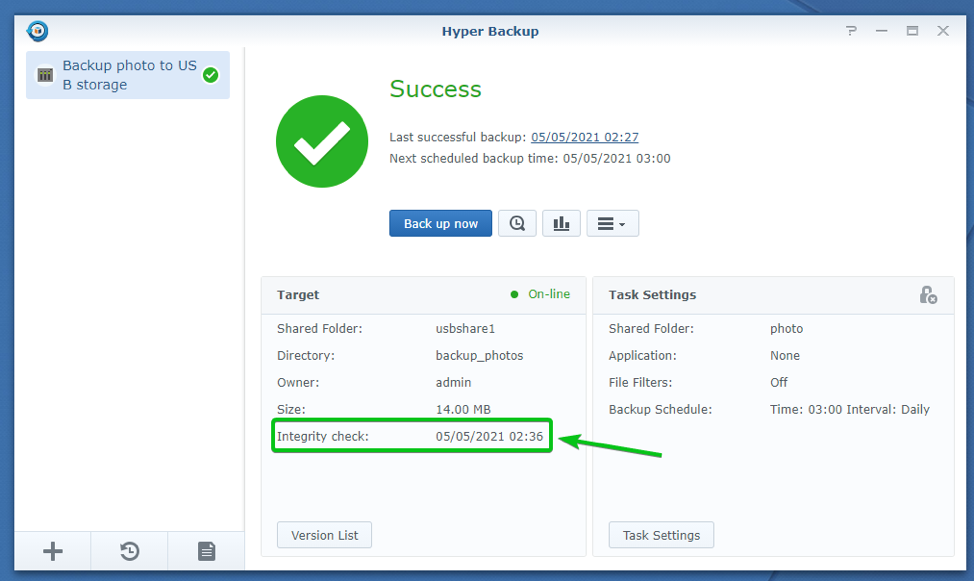
Hyper Backup should also show you when the last integrity check was performed in the Integrity check section of your backup task, as you can see in the screenshot below.
Modifying Existing Backup Tasks
You can modify the settings of your Hyper Backup, backup tasks after they are created.
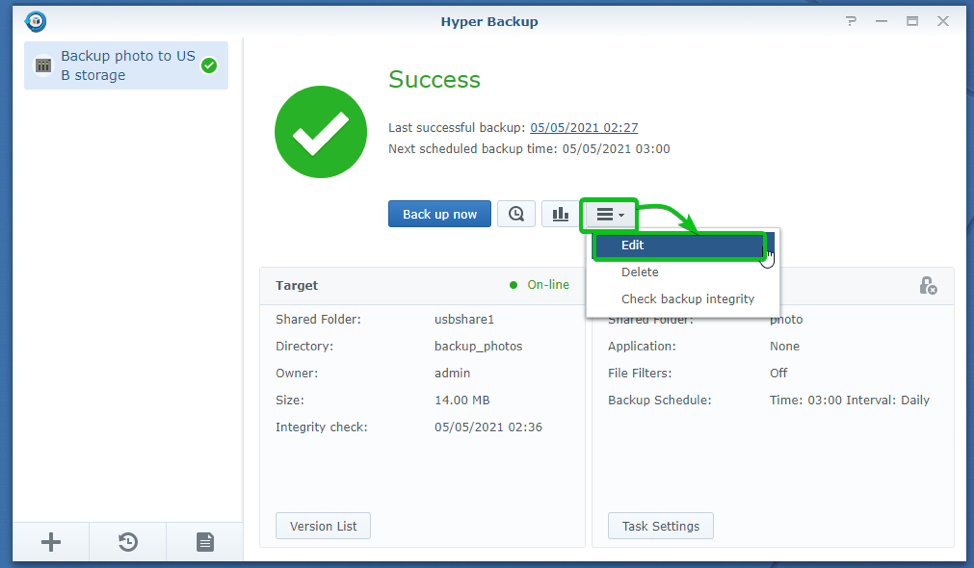
To modify the backup task settings, select it and click on > Edit as marked in the screenshot below.
You can also click on the Task Settings button as marked in the screenshot below to edit the settings of a backup task.
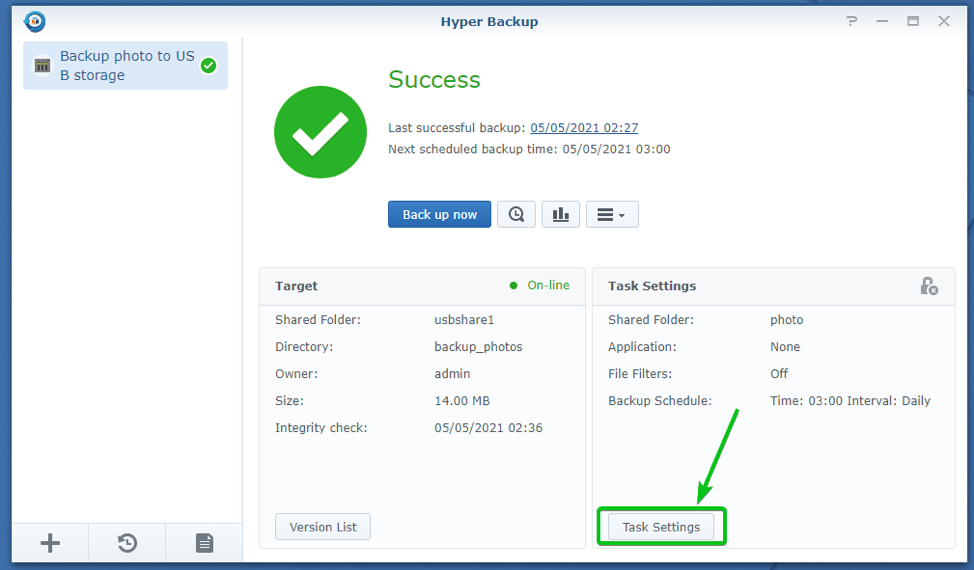
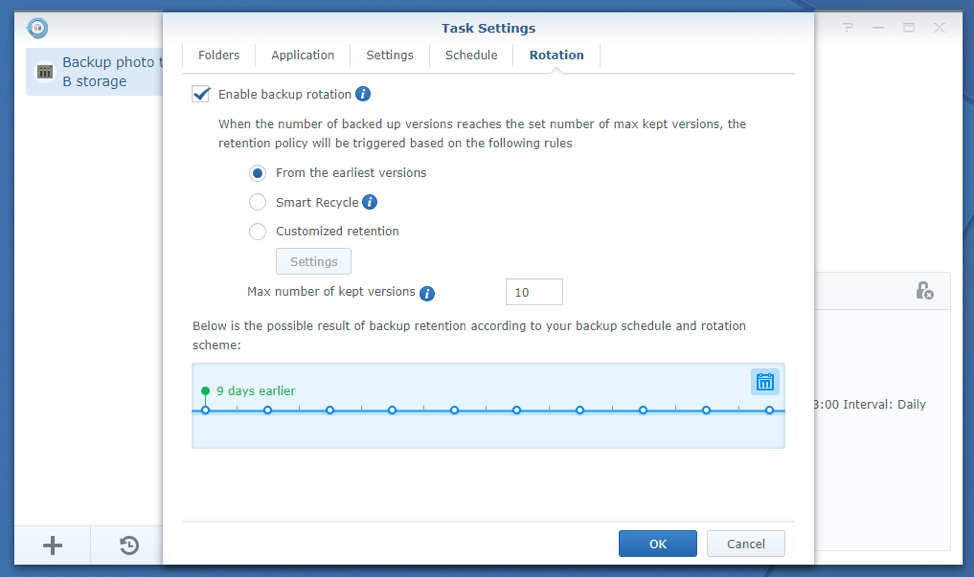
The Task Settings window should be displayed.
All the Task Settings window options are similar to the ones you’ve seen while creating the task.
From the Folders tab of the Task Settings window, you can choose what to backup and create file filters.
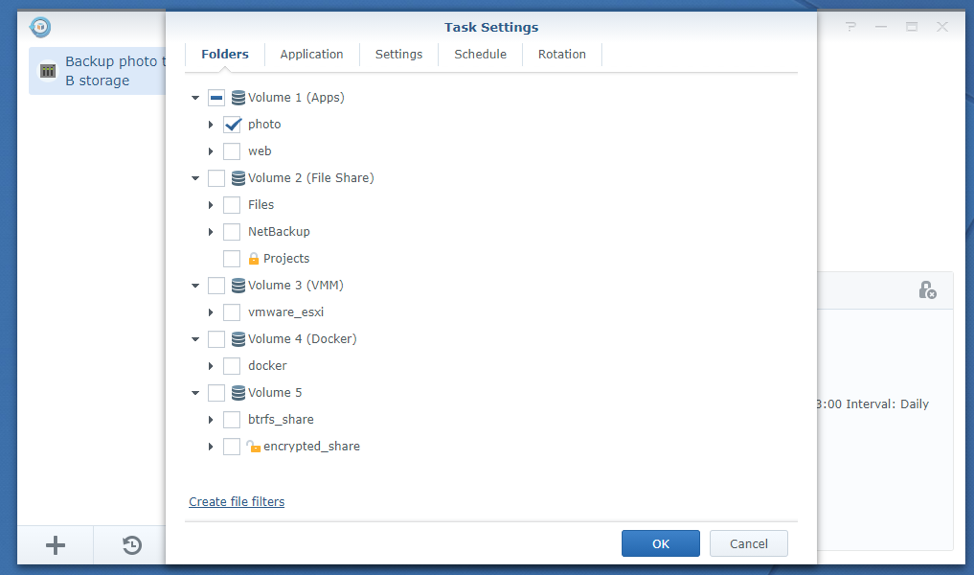
From the Application tab of the Task Settings window, you can choose the apps that you want to backup.
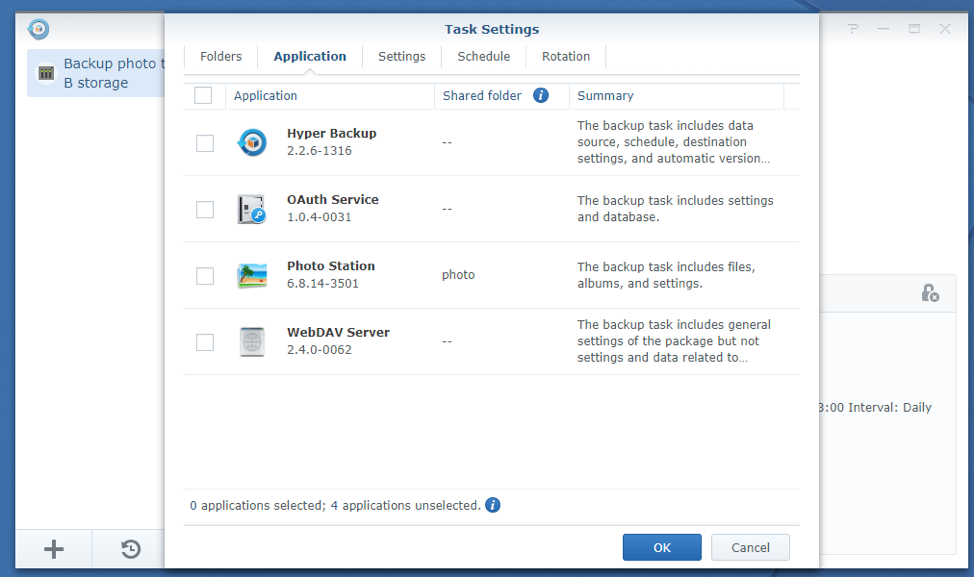
From the Settings tab of the Task Settings window, you can enable task notification, enable file change detail log, configure Hyper Backup to remove the external destination device when the backup is successful and download the encryption key if you’ve enabled client-side encryption when you’ve created the task.
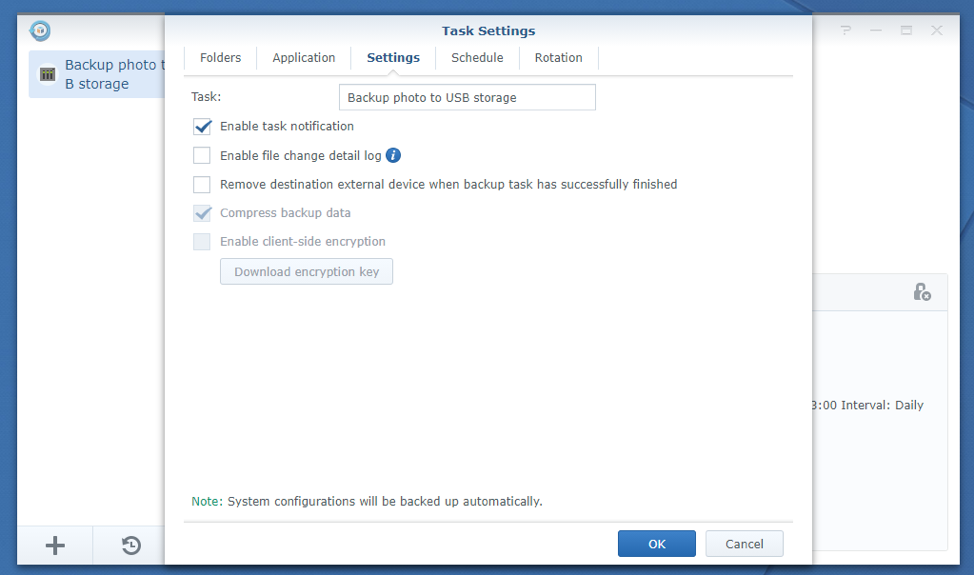
You can configure the backup schedule and backup integrity check settings from the Schedule tab of the Task Settings window.
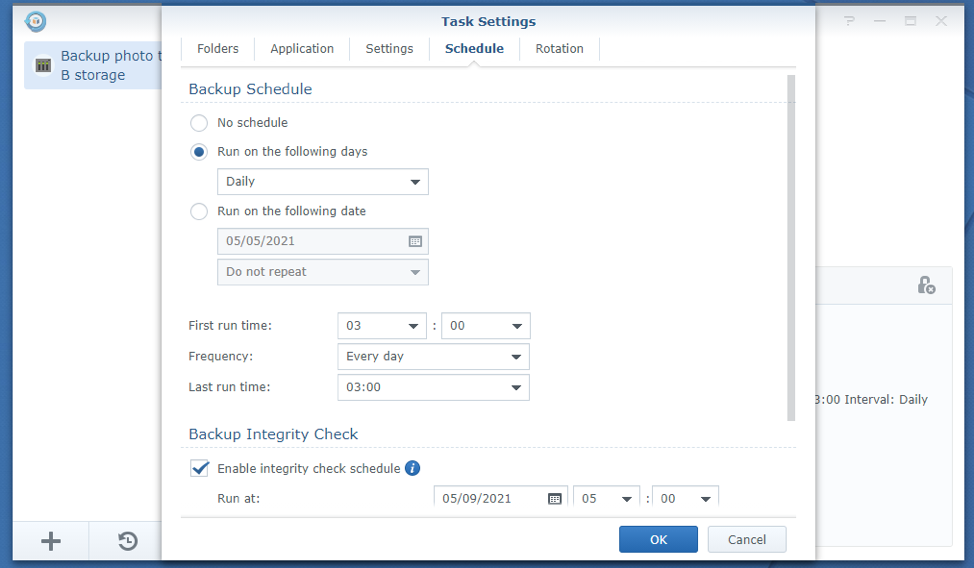
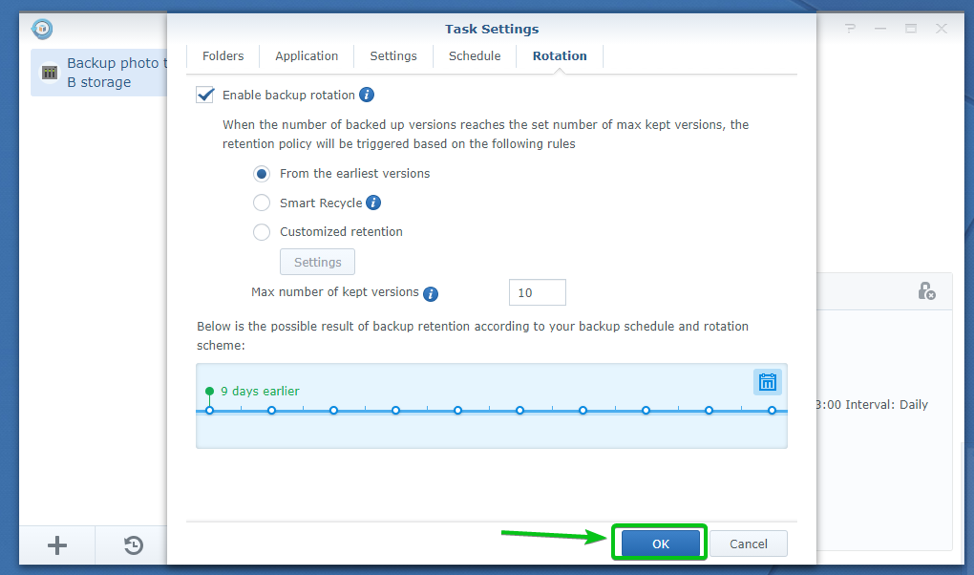
From the Rotation tab of the Task Settings window, you can change the rotation policy and the number of backup versions you want to keep.
Once you’ve modified the task settings, click on OK to save the changes.
Restoring Data from Backup
You can restore specific files/folders from the backup with Hyper Backup. You can also restore all the files/folders from the backup.
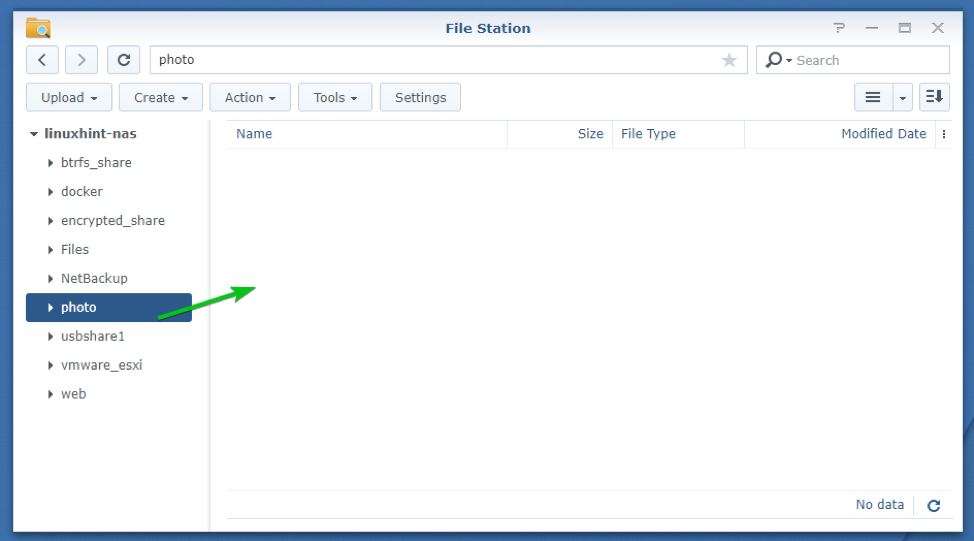
To demonstrate how that works, I have deleted all the files/folders from the photo shared folder, which I have backed up to my external USB storage device, as you can see in the screenshot below.
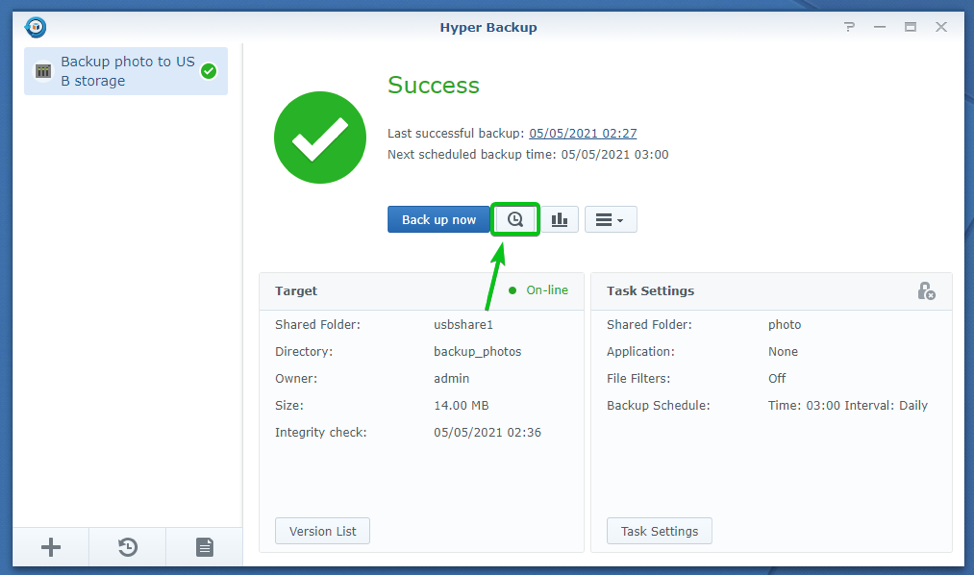
To restore one or more files/folders from the backup, select the backup task and click on the icon as marked in the screenshot below.
The Backup Explorer window should be displayed.
You can select the backup version from where you want to restore files/folders from the backup timeline, as marked in the screenshot below.
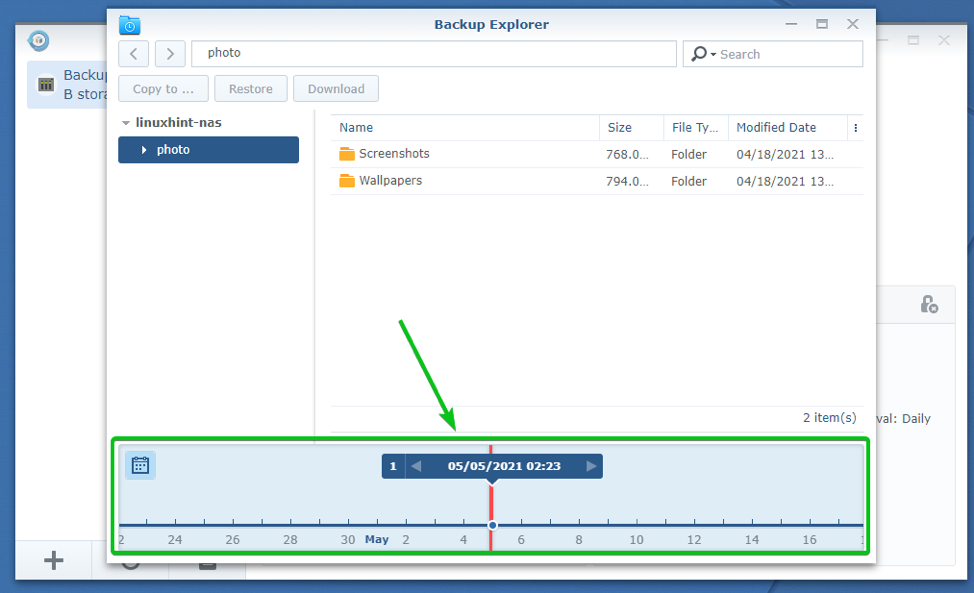
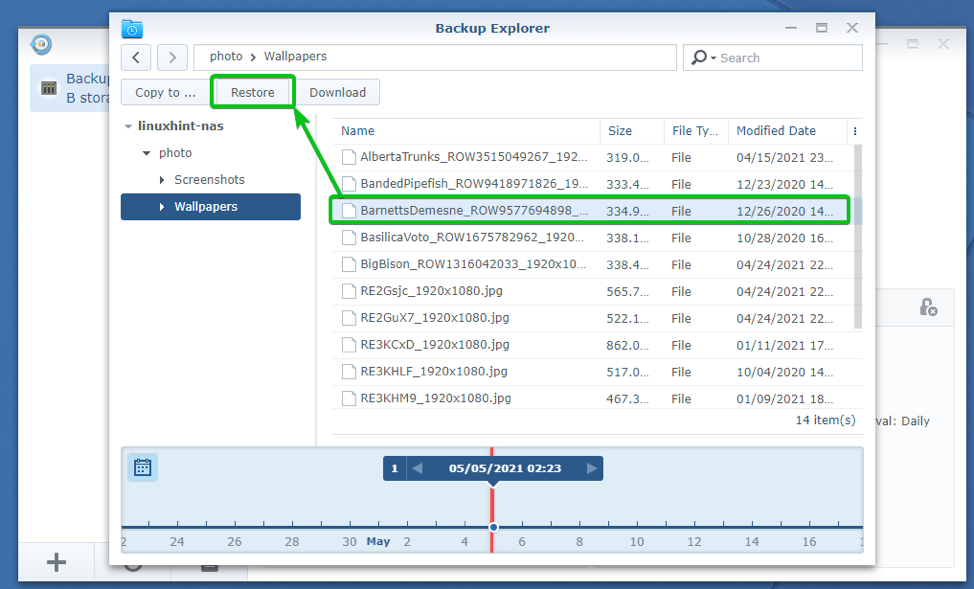
Then, select the files/folders you want to restore and click on Restore as marked in the screenshot below.
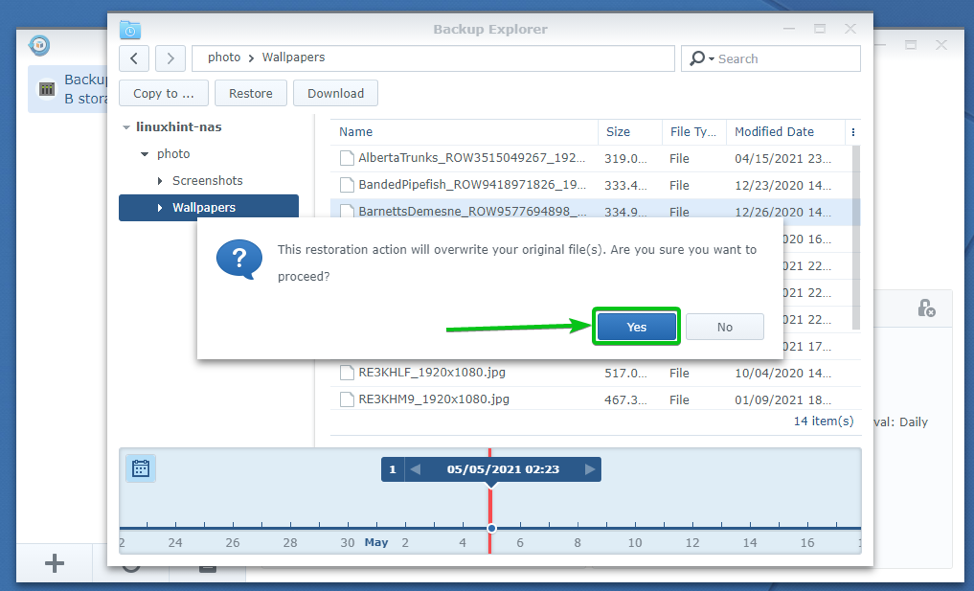
To confirm the restoration operation, click on Yes.
Hyper Backup should start restoring the selected files/folders from the backup. Depending on the size of the data you’re trying to restore from the backup, it may take a while.
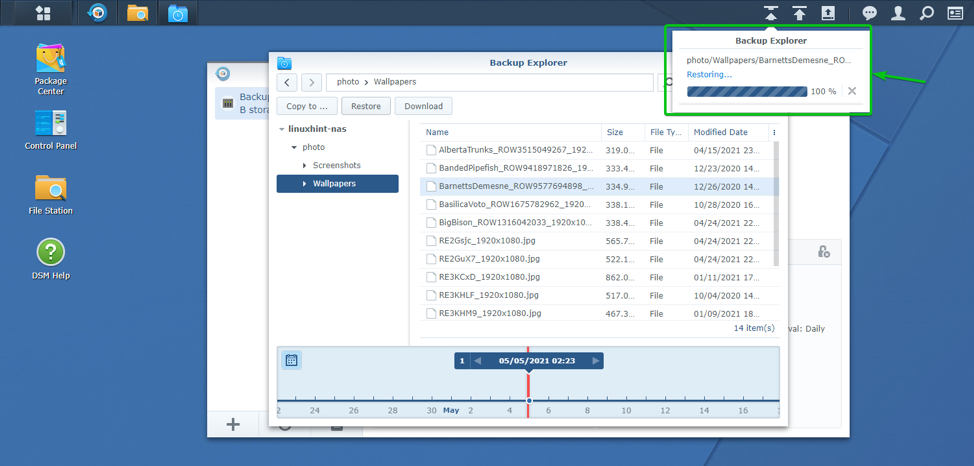
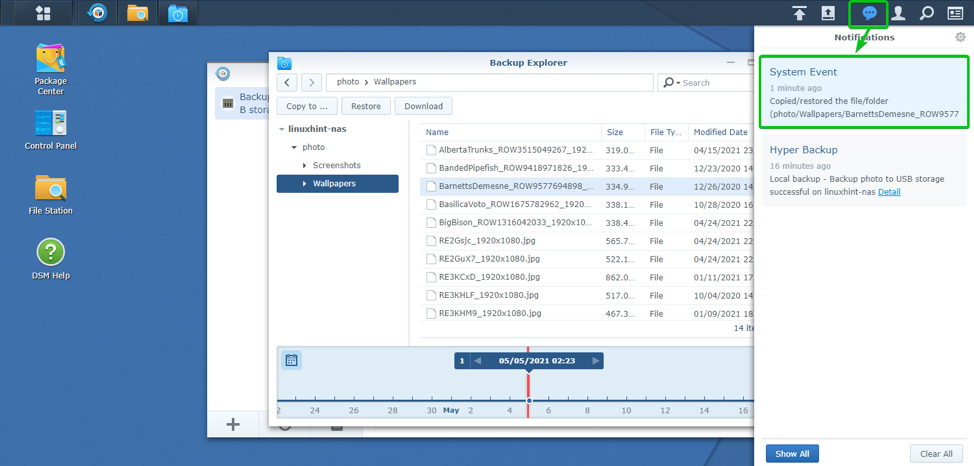
Once the files/folders are restored from the backup, you should be notified, as you can see in the screenshot below.
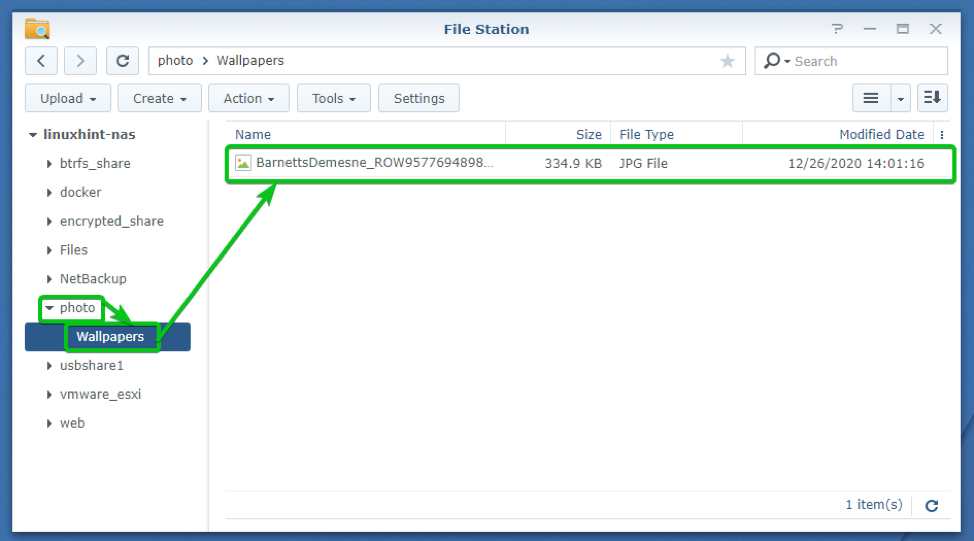
As you can see, the file that I have restored from the backup is back. The required directory structure is also restored.
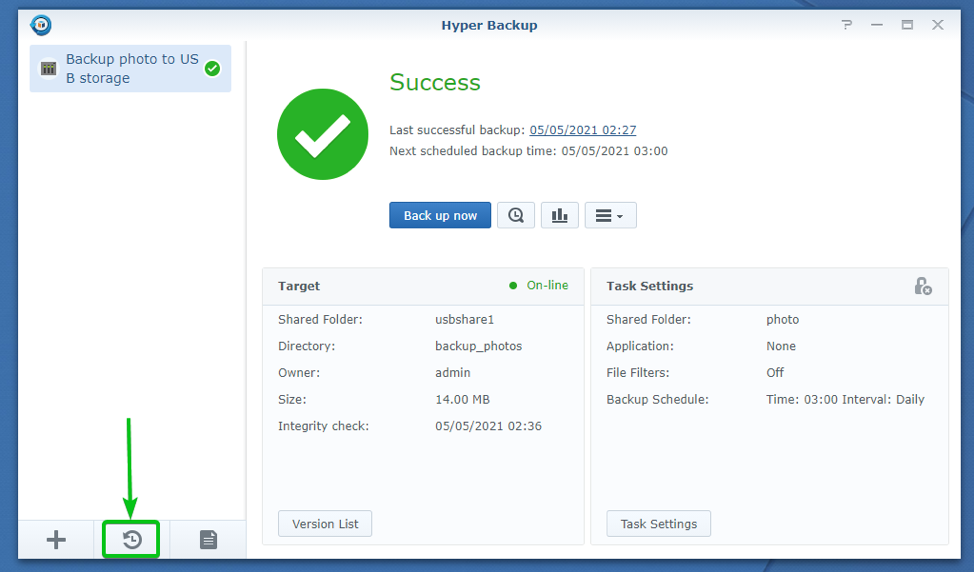
To restore all the files from the backup, click on the icon as marked in the screenshot below.
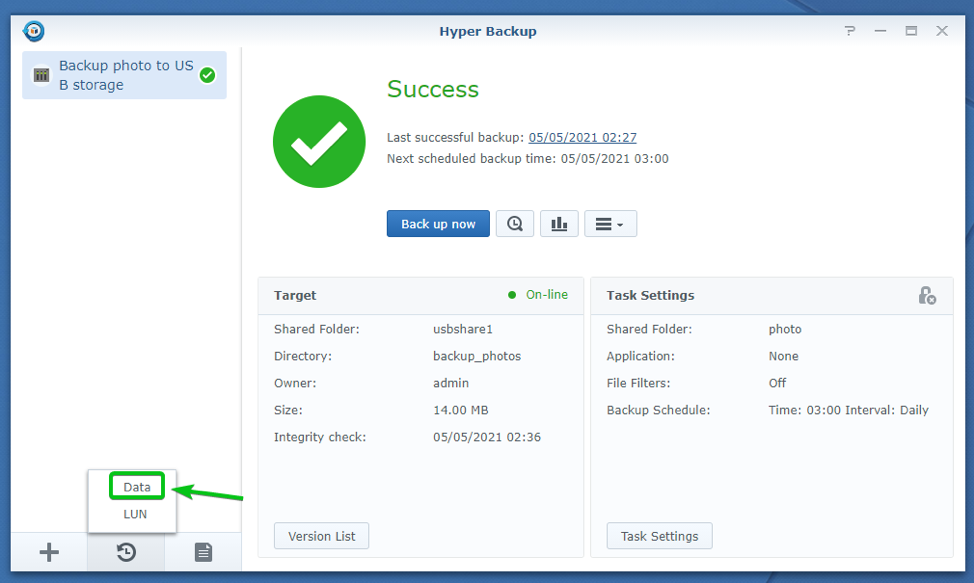
Click on Data.
All the backup tasks that you’ve created should be listed.
Select the backup task that you want to use to restore and click on Next.
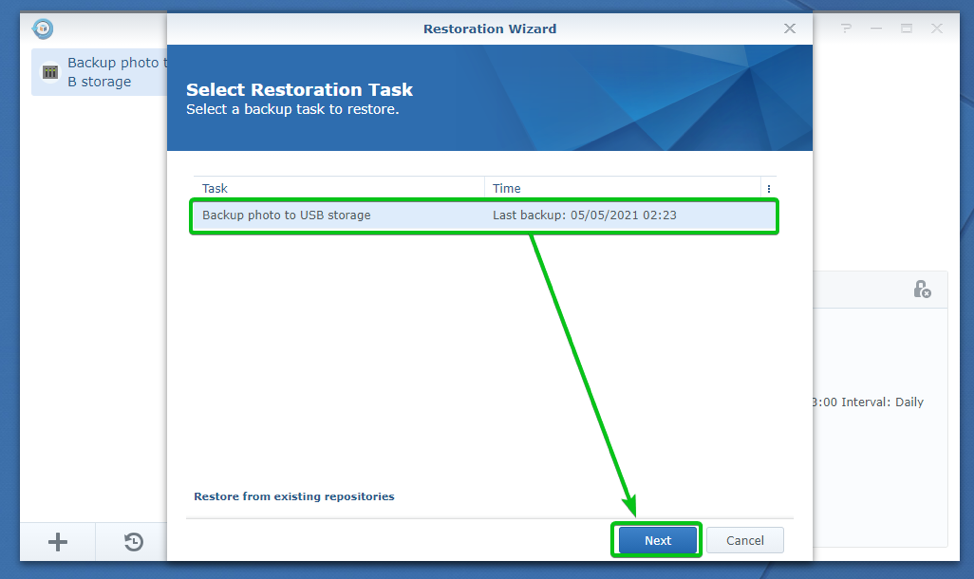
Click on Next.
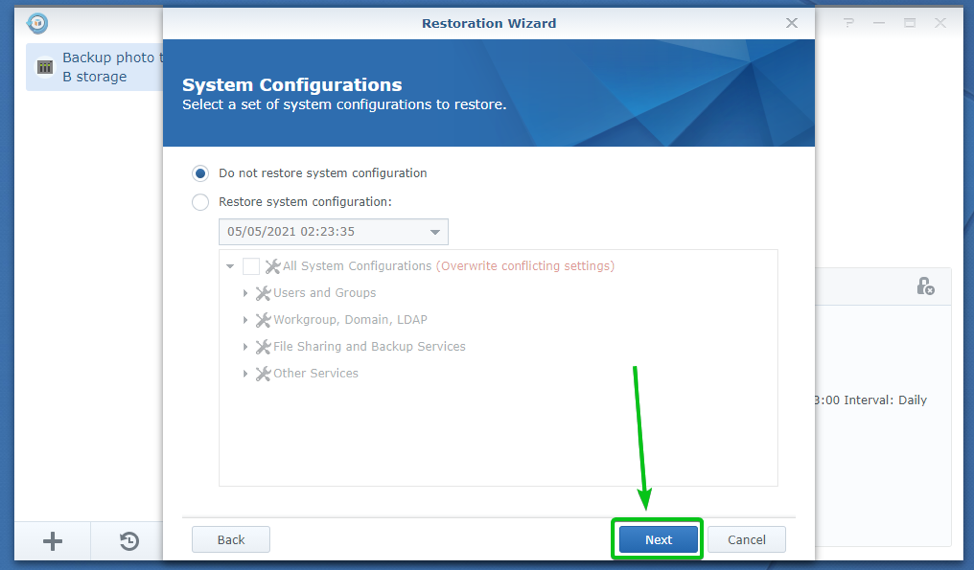
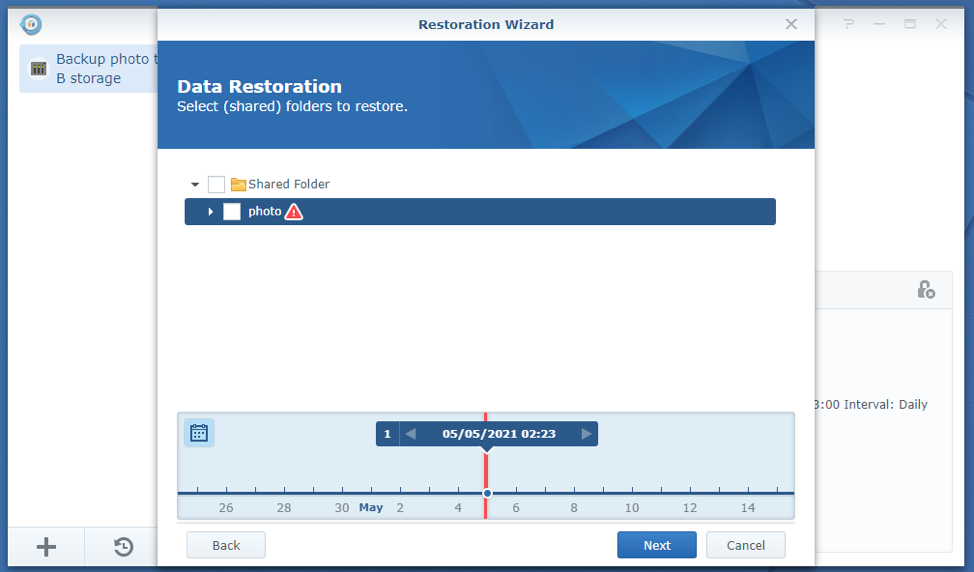
Select a backup version that you want to restore from the timeline, and then select the shared folders you want to restore from your selected backup version.
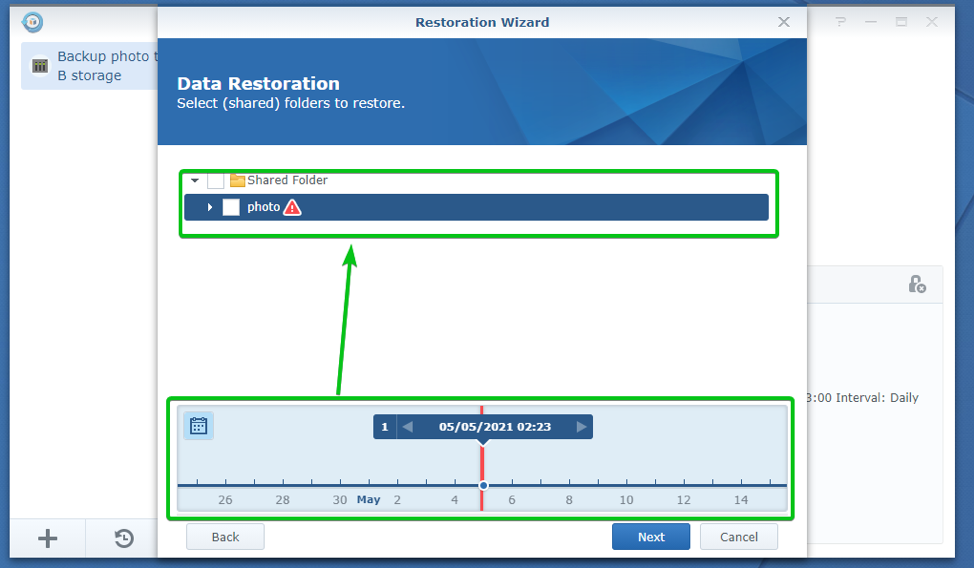
I will restore the photo shared folder from the backup. So, I have selected it, as you can see in the screenshot below.
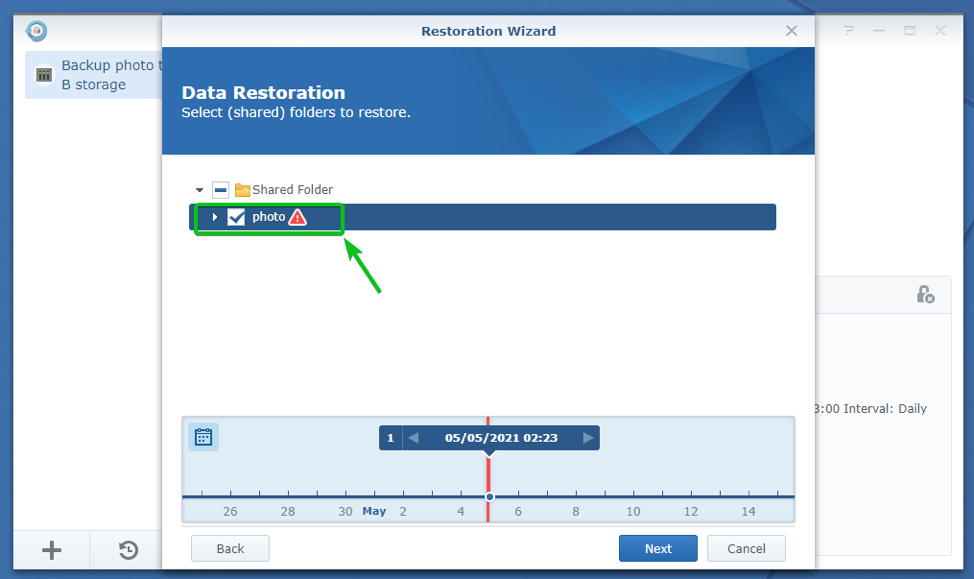
Once you’re done, click on Next.
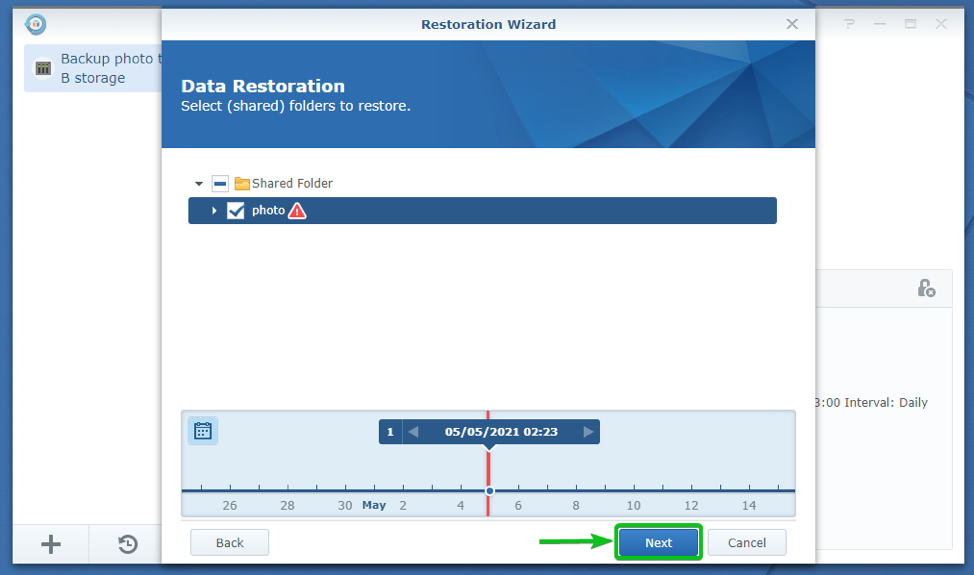
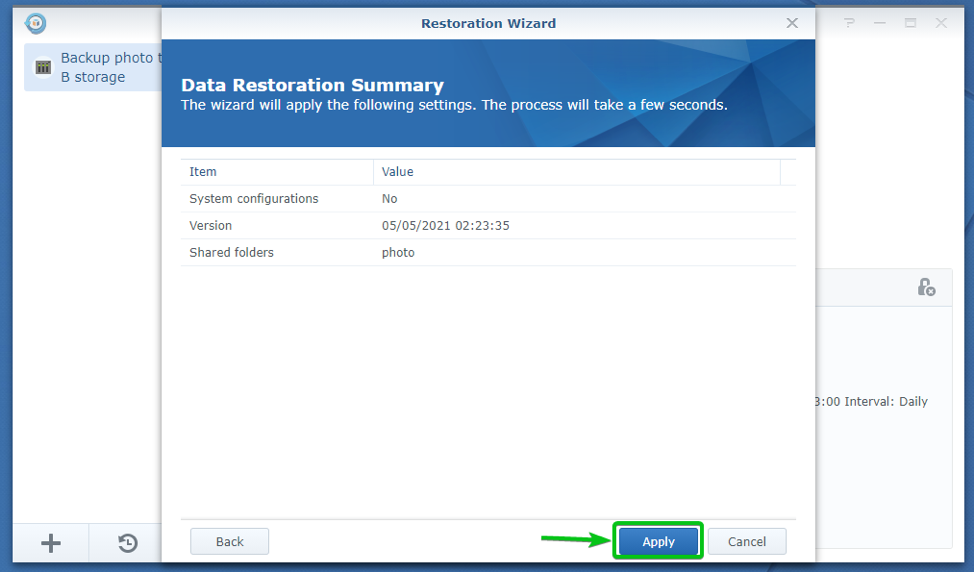
A summary of the restore operation should be displayed. Read the summary carefully to make sure that you’ve selected everything correctly, and click on Next.
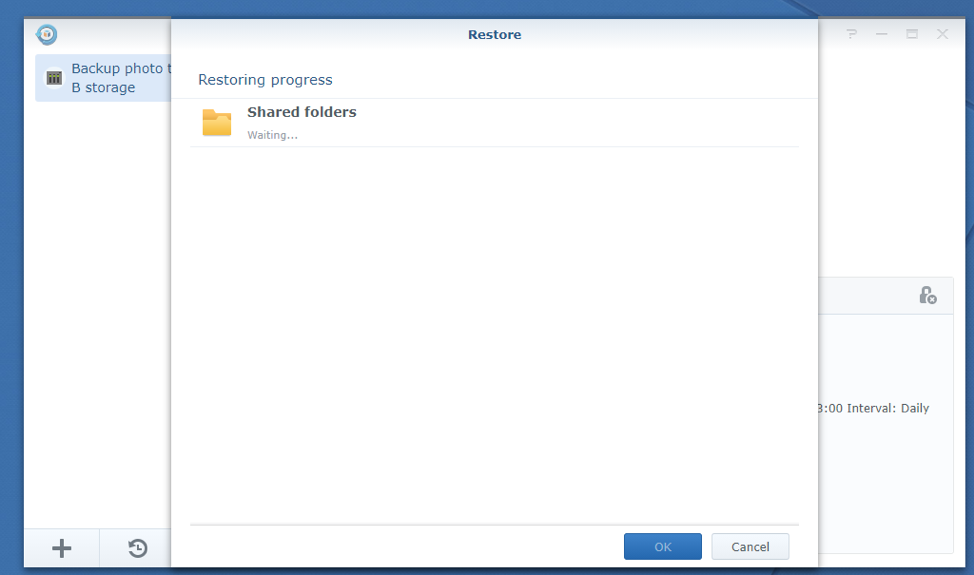
The shared folders you’ve selected are being restored from your selected backup version. It may take a while to complete.
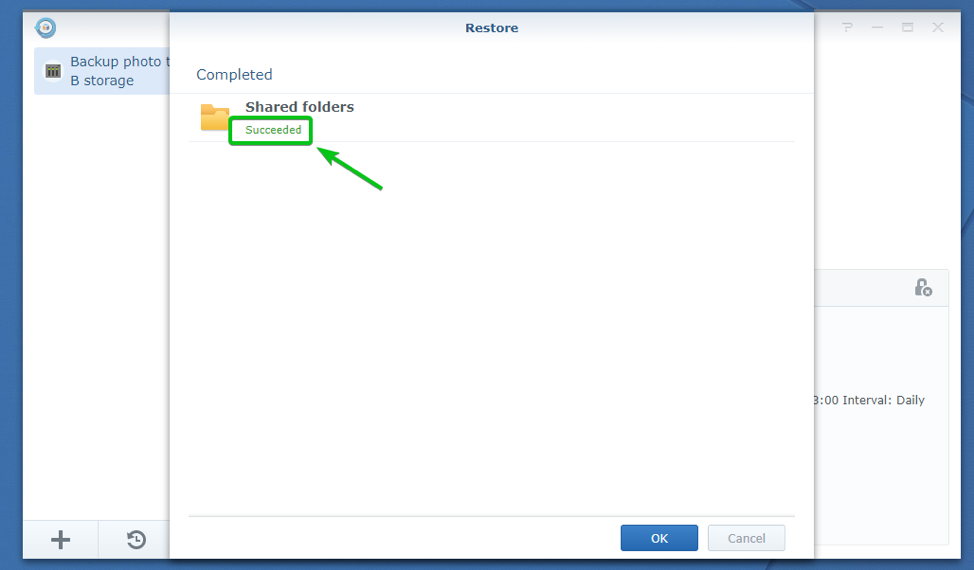
Once your selected shared folders are restored from the backup, you should see the Succeeded message as marked in the screenshot below.
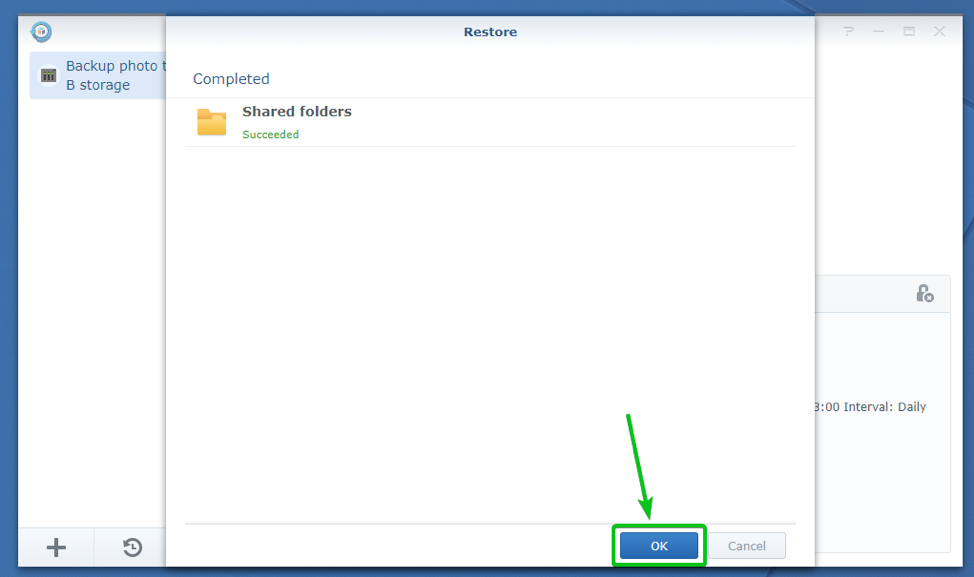
Now, click on OK.
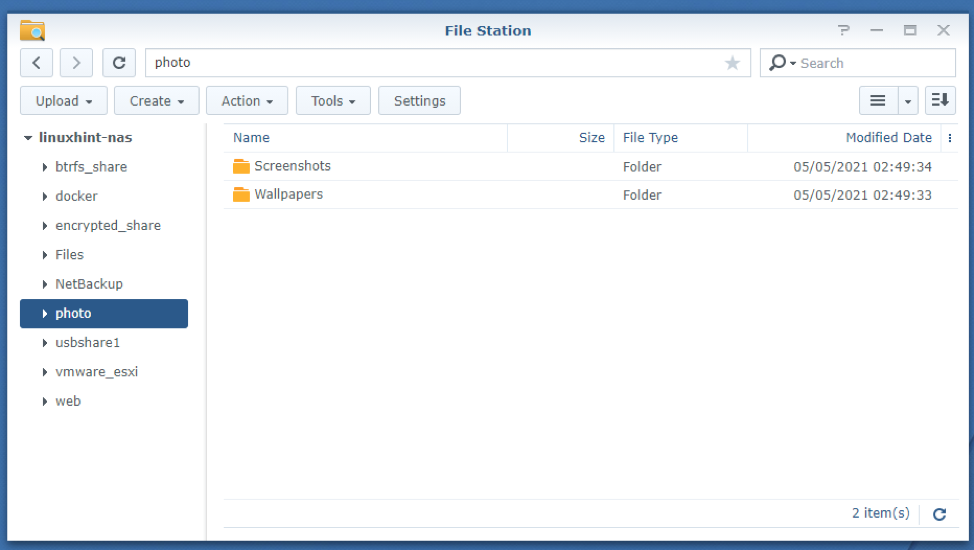
As you can see, my photo shared folder files and folders are restored from the backup.
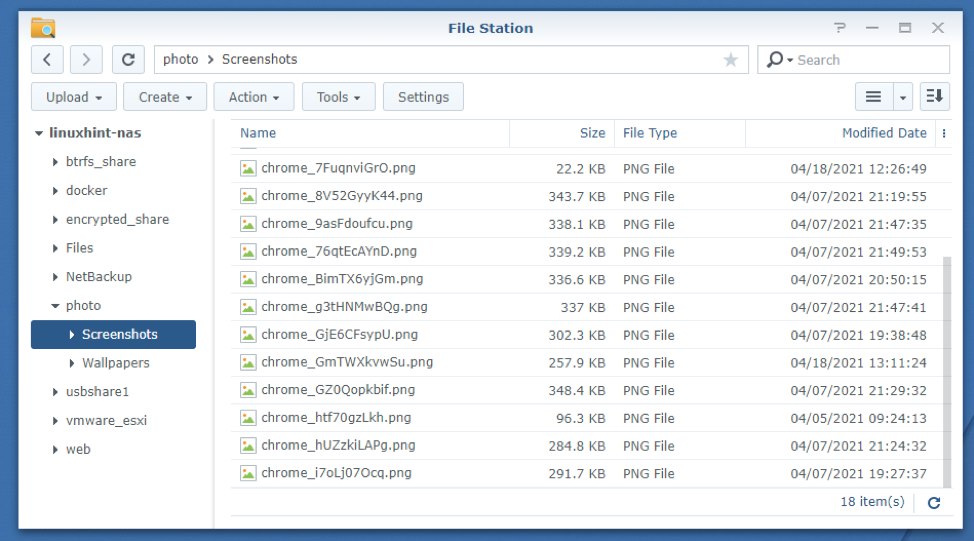
The files in the Screenshot/ folder are restored correctly.
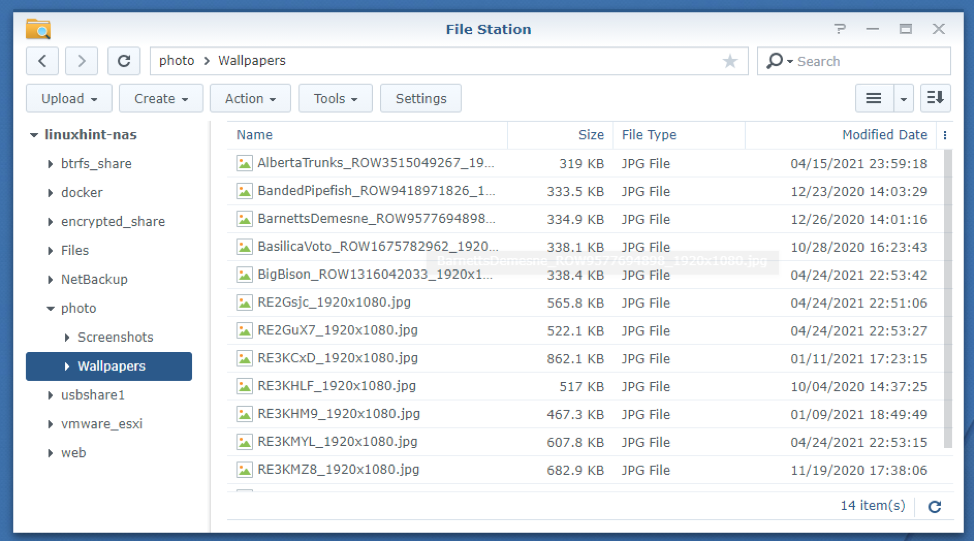
The files in the Wallpapers/ folder are restored correctly as well.
Conclusion
In this article, I have shown you how to install Hyper Backup on your Synology NAS and backup important data from your NAS to an external USB device with Hyper Backup. I have also shown you how to restore files from the backup and different features of the Hyper Backup program like browsing backup versions, checking backup statistics, backup version management, checking the integrity of the backup, etc.
References
[1] Hyper Backup | Synology Inc.
from Linux Hint https://ift.tt/3vEd8yq


0 Comments