Prerequisites:
Before starting the steps of this tutorial, the following steps will be required to complete.
Enable the SSH service on Ubuntu if it is not enabled before.
Generate the SSH Key pairs to execute the commands in the remote server. Run the following command to create the public key and the private key. The private key will be stored in the remote server, and the public keys will be stored in the client securely.
Run the following command to open the sshd_config file using nano editor to add some necessary configurations.
Add the following lines in the file to enable the root login and password-based authentication.
PermitRootLogin yes
Run the following command to restart the SSH service.
Set the keep-alive options in the server configuration file:
One way to increase the SSH connection timeout is to modify the configuration file of the server machine. But this is not a secure way because this setting will be applicable for all client machines that will connect with the server machine. So, the alternative way of increasing the SSH connection is a better option that has been described in the next part of the tutorial. Login to the server machine and open the /etc/ssh/sshd_config file from any editor to set the necessary parameter values for the server-side configuration. The values of the ClientAliveInterval and ClientAliveCountMax parameters are set to increase SSH connection timeout. ClientAliveInterval is used to set the timeout interval in seconds. If no data is passed after the time assigned in this parameter, the server will send a request message to the client through the encrypted channel for the response. The default value of this parameter is 0. ClientAliveCountMax is used to set the number of alive messages from the client. When the value of this parameter is reached, but the server doesn’t get any response from the client, the server disconnects the connection. So, the total timeout value is calculated by the following formula.
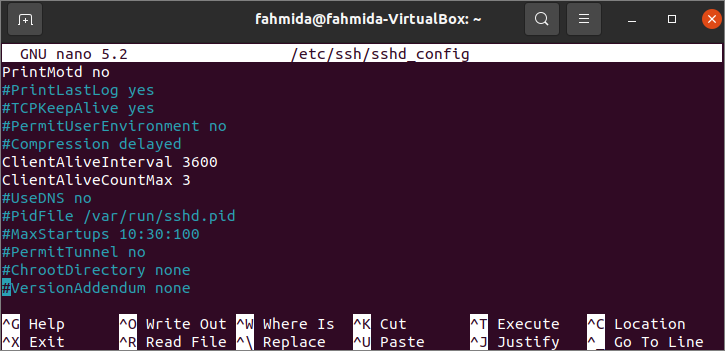
Run the following command to open the file using nano editor and set 3600 seconds for the ClientAliveInterval value and 3 for the ClientAliveCountMax value.
Set the values like the following image. According to the above formula, the server will disconnect the connection after 10800(3600×3) seconds if the client sends no response. So, the server will alive for 10800 seconds or 180 minutes.

Now, run the following command to restart the server.
Set the keep-alive options in the client configuration file:
Another way to increase the SSH connection timeout is to modify the configuration file of the client machine, and it is more secure than the previous option. Login to the client machine and open the /etc/ssh/ssh_config file to set the necessary parameter values to increase the SS connection timeout. ServerAliveInterval and ServerAliveCountMax parameters are set to increase the connection timeout. These parameters work similarly to the server-side configuration parameters. ServerAliveInterval is used to set the timeout interval in seconds, and ServerAliveCountMax is used to set the number of alive messages from the server. The client sends a packet to the server in each interval defined in ServerAliveInterval. If the client doesn’t get any response from the server after trying for the value assigned in ServerAliveCountMax, then the client will disconnect the connection.
Run the following command to open the file by using nano editor and set 180 seconds for the ServerAliveInterval value and 4 for the ServerAliveCountMax value.
Add the following lines at the end of the file. According to the assigned value, the client will send a packet to the in every 180 seconds or 3 minutes 4 times. If the server doesn’t send any response within 720 (180×4) seconds or 12 minutes, then the connection will be disconnected by the client automatically. Here, the host value of the server is ‘fahmida,’ and the IP address of the hostname is 10.0.2.15.
Hostname 10.0.2.15
ServerAliveInterval 180
ServerAliveCountMax 4

Modify the file like the following image.
After using any of the ways mentioned above, log in to the client machine and run ssh command from the terminal to connect with the server. You will require to become inactive for long times on the client machine to check the SSH connection time is increased or not. The server will disconnect the connection if you remain idle for 180 minutes, and the client will disconnect the connection if you remain inactive for 12 minutes.
Conclusion:
Both secure and insecure ways of increasing the SSH connection timeout have been shown in this tutorial to help users keep their SSH connection alive for various purposes.
from Linux Hint https://ift.tt/3wLUfKy


0 Comments