Any device connected to a network gets assigned an IP address that allows other devices in the network to locate and communicate with it. Typically, an IP address gets assigned by the DHCP server on a router.
A DHCP server assigns any available IP address to the connected network. That means the IP address of a device may change from time to time. In certain instances, you may need to set up a static IP for your device. Doing this tells the router to reserve a specific IP for that device and assign it every time it connects to the network.
This tutorial aims to give you the basics of IP addresses, how DHCP works, and show you how to set up a static IP on your Linux machine.
What is an IP Address?
Internet protocol address, commonly known as an IP address, is a unique value used to identify any device connected to a network or a network on a collection of networks. An IP address is unique in a network and allows devices in the same network to share information. The typical expression of IP addresses is in the form of dot-notation with 4 subsets. Each subset in the network ranges from a value of 0 to 255, separated by dots.
An example of an IP address is 192.168.0.20
What is DHCP?
At the most basic level, DHCP or Dynamic Host Configuration Protocol is a network protocol that dynamically assigns IP addresses to hosts connected to a network. DHCP has a server responsible for managing IP addresses, subnet masks, default gateways, etc., on a network.
DHCP is essential in networking as it removes the need for network engineers to assign IP addresses manually to every device.
What is a Static IP?
A static IP address is a fixed or constant IP value assigned to a device in a specific network.
That means instead of your router or ISP providing you with a dynamic IP address (which may change), you have one fixed IP address in the network.
There are advantages and disadvantages to using static IP addresses. For example, it allows you to perform other network settings such as port forwarding and tunneling.
However, it also does not lack its disadvantages; static IP addresses need manual assigning, and you need to keep track of the unassigned IP values. That can be a lot of work, especially on large networks.
How to Configure A Static IP on Debian 10
Let us get into the essence of this guide. First, to set up a static IP on Debian, you need to edit the network interface configuration file.
You will find that located in /etc/network/interfaces.
First, you will need to identify the network interface (name) you wish to set a static IP. Use the command:
This will show you all the network interfaces available in your system, name, and IP address. In the example below, I have the loopback interface and my ethernet interface (eth0).

Now, to set a static IP address for the ethernet interface, edit the /etc/network/interfaces file with your favorite text editor.
In the file, locate an entry as one shown below:
$ iface eth0 inet dhcp
Change the above entry to resemble the following entries:
iface eth0 inet static
address 192.168.0.21
netmask 255.255.255.0
gateway 192.168.0.1
dns-nameserver 1.1.1.1
Be sure to change the name of the interface or set up a DNS server of your choice (in this example, we are using Cloudflare Open DNS).
How to Fix Wired Unmanaged Issue
In some instances, if you set a static IP by editing the interface file, you might encounter a “Wired unmanaged” error caused by the NetworkManager service.
To resolve the issue, edit the /etc/NetworkManager/NetworkManager.conf
Change the entry managed=false to managed=true. Finally, restart the Network Manager service with systemd
How to Configure static IP – GUI
A simpler and quick method to configure static IP on Debian desktop is to use the network manager GUI tool.
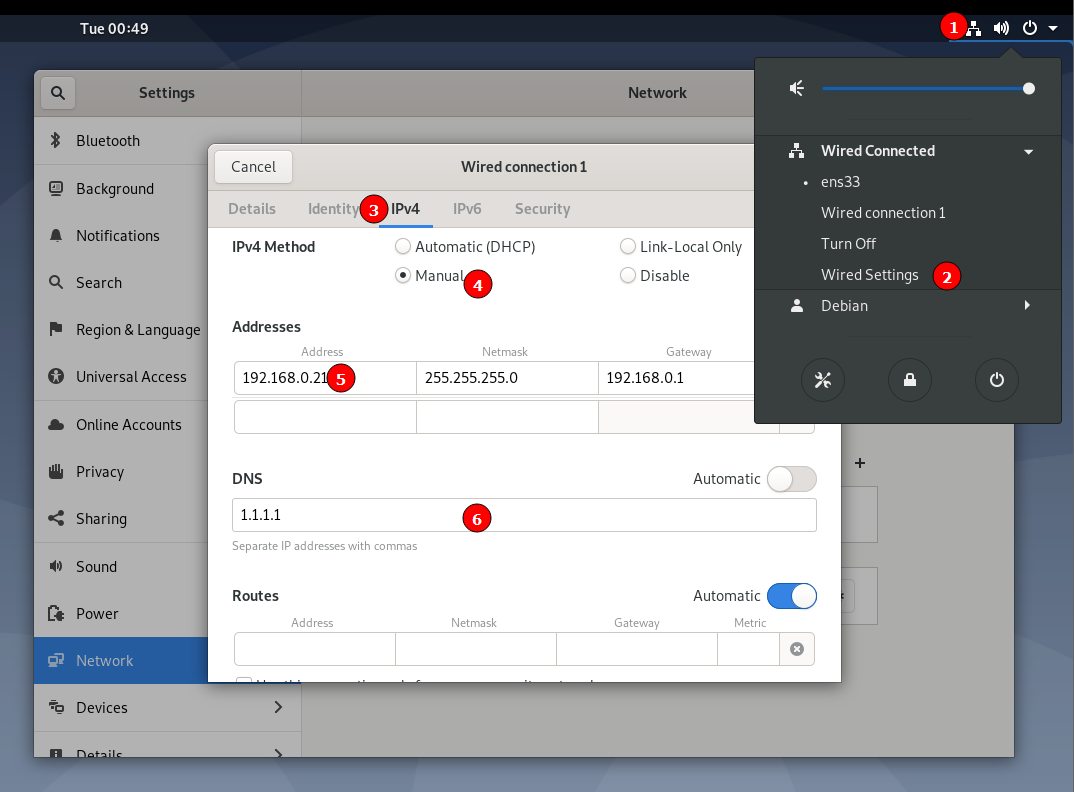
Start by selecting the interface in the top bar, go to Wired settings and select your interface. Next, click on the Settings icon to launch the configuration window.
In the IPv4 tab, select the IPv4 method as manual. Then, add the IP address, Netmask, and Gateway as shown in the image below.
Finally, set DNS manually (optional) in the DNS tab.

Conclusion
In this tutorial, we discussed the basics of IP addresses and DHCP. We also discussed how to set up a static IP address on Debian 10.
Thank you for reading and share if it helped.
from Linux Hint https://ift.tt/3xYRdCV


0 Comments