This tutorial will take you on an in-depth look at the ss command-line utility that allows us to view network connections and other detailed information. Using what you’ll learn from this guide, you should understand and use the ss utility for maximum information and productivity.
Let us get started.
What is ss?
In a nutshell, ss is a command-line utility that allows users to dump network socket information. It is similar to the popular netstat tool, but it offers more features and information than netstat.
Ss allows you to view detailed information on how your machine communicates with other resources such as networks, services, and network connections.
Using ss information, you can clearly understand what is happening, when, and how. It can be very handy during the troubleshooting process.
Basic Command Usage
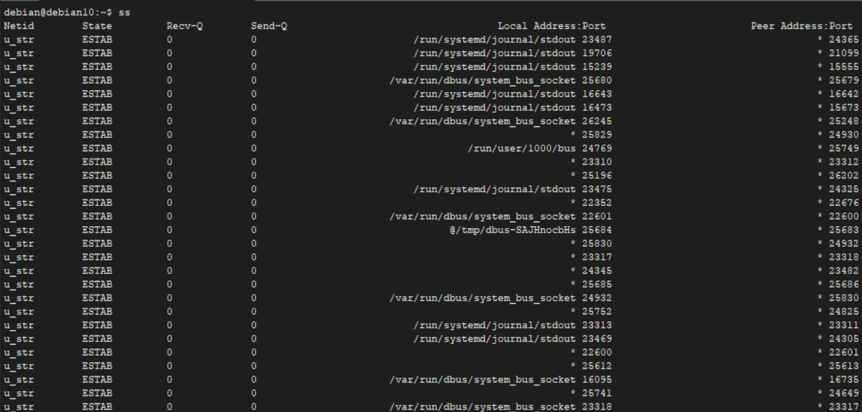
Using the ss command is as easy as typing two letters into a terminal and pressing enter. Although it supports numerous arguments, calling the ss command with no options displays information about all connections, irrespective of their state.

When used with no options, the ss command dumps a lot of information you can reference later. To save the output to a file, you can use the output redirection operator as shown in the command:
NOTE: It is good to note that running the ss command with and without sudo privileges might give different outputs—meaning the ss command lists information based on the user context.
Basic ss Command Options
As mentioned, the ss command supports various options that allow you to control the output and the information displayed. You can view the basic options using the command:
Several basic options supported by the ss command include:
- -V or –version: Allows you to view the installed version of the ss utility.
- -H or –no-header: This flag suppresses the header line. The default header line of the ss command contains the following values: Netid, State, Recv-Q, Send-Q, Local Address:Port, and Peer Address:Port. Suppressing the header is useful when you need to process the ss output using other tools.
- -t or –tcp: Tells ss command to only display the TCP connections.
- -a or –all: Displays both listening and non-listening connections.
- -e or –extended: Displays additional information about a network socket.
- -u or –udp: Tells ss command to show only the UDP connections.
- -s or –summary: Displays a summary of the connection statistics.
- -l or –listening: Shows listening sockets that are not included by default.
- -p or –process: Shows process using a socket.
- -4 or –ipv4: Tells ss command to show only IPv4 connections.
- -6 or –ipv6: Shows IPv6 connections only.
- -m or –memory: Displays socket memory usage.
Although the above are some of the basic arguments you will use when working with ss, it also supports many additional options. Refer to the manual for more information.
Display Listening and Non-Listening Ports
To show information about both listening and non-listening ports, you can use the -a flag as shown in the command below:

You can pipe the output from ss commands for more specific information using tools such as grep.
For example:

Show TCP Connections
Using the -t flag with the ss command, you can filter to show only TCP connections as shown in the command below:
![]()
To get more information, you can specify to show listening TCP connections using the -l and -t flag as shown in the command below:

Show UDP Connections
To display all UDP connections, use the -l flag as shown in the command below:

Understanding the Header Line
As you can see from various outputs provided in the commands above, ss shows a lot of information. It includes the header format unless explicitly specified using the -H flag, which removes the header line.
Understanding the header line can be helpful to show what information is in a particular section. It includes the following rows:
- State: The State row of the header indicates the state of the connection, such as LISTEN, ESTABLISHED, CLOSED, TIME-WAIT, etc. This header row is useful in TCP connections as UDP does not keep track of the state of the packets, making it a stateless protocol.
- Recv-Q: This shows the total number of bytes not copied by the program connected to the specific socket.
- Send-Q: The count of bytes that is not ACK by the remote host.
- Local Address:Port: This shows the local socket and the port number bound to the connection
- Peer Address:Port: Remote socket and port number bound for the connection.
Show Processes
To get the process using the specific socket, you can use the -p flag as shown in the command below:
![]()
As shown in the output above, you can see the TCP connections of the process using the socket, including its PID.
Filtering by Connection (TCP) State
As you know, TCP supports various states that we will not discuss in this tutorial. However, you can filter the ss output to get only the connections with the supported TCP states.

You will notice the output in the image shown above does not include the state in the header because we filtered the output using the specified state. Thus, only the listening connections are displayed.
Conclusion
In this tutorial, we discussed how to use and understand the ss command utility. It is a powerful tool when you need to look beyond the listing processes. To understand how it works, you can learn more from the official manual.
Consider the following resource:
from Linux Hint https://ift.tt/3f2tY4e


0 Comments