


End-users can use SAML SSO to authenticate to one or more AWS accounts and gain access to particular positions thanks to Okta’s integration with AWS. Okta administrators can download roles into Okta from one or more AWS and allocate them to users. Moreover, Okta administrators may also set the length of the authenticated user session using Okta. AWS screens containing a list of AWS user roles are provided to the end-users. They may pick a login role to assume, which will determine their permissions for the length of that authenticated session.
To add a single AWS account to Okta, follow these instructions given below :
Configuring Okta as Identity Provider:
First of all, you have to configure Okta as an Identity Provider and establish a SAML connection. Login to your AWS console and select the “Identity and Access Management” option from the drop-down menu. From the menu bar, open “Identity Providers” and create a new instance for identity providers by clicking on “Add Provider.” A new screen will appear, known as Configure Provider screen.
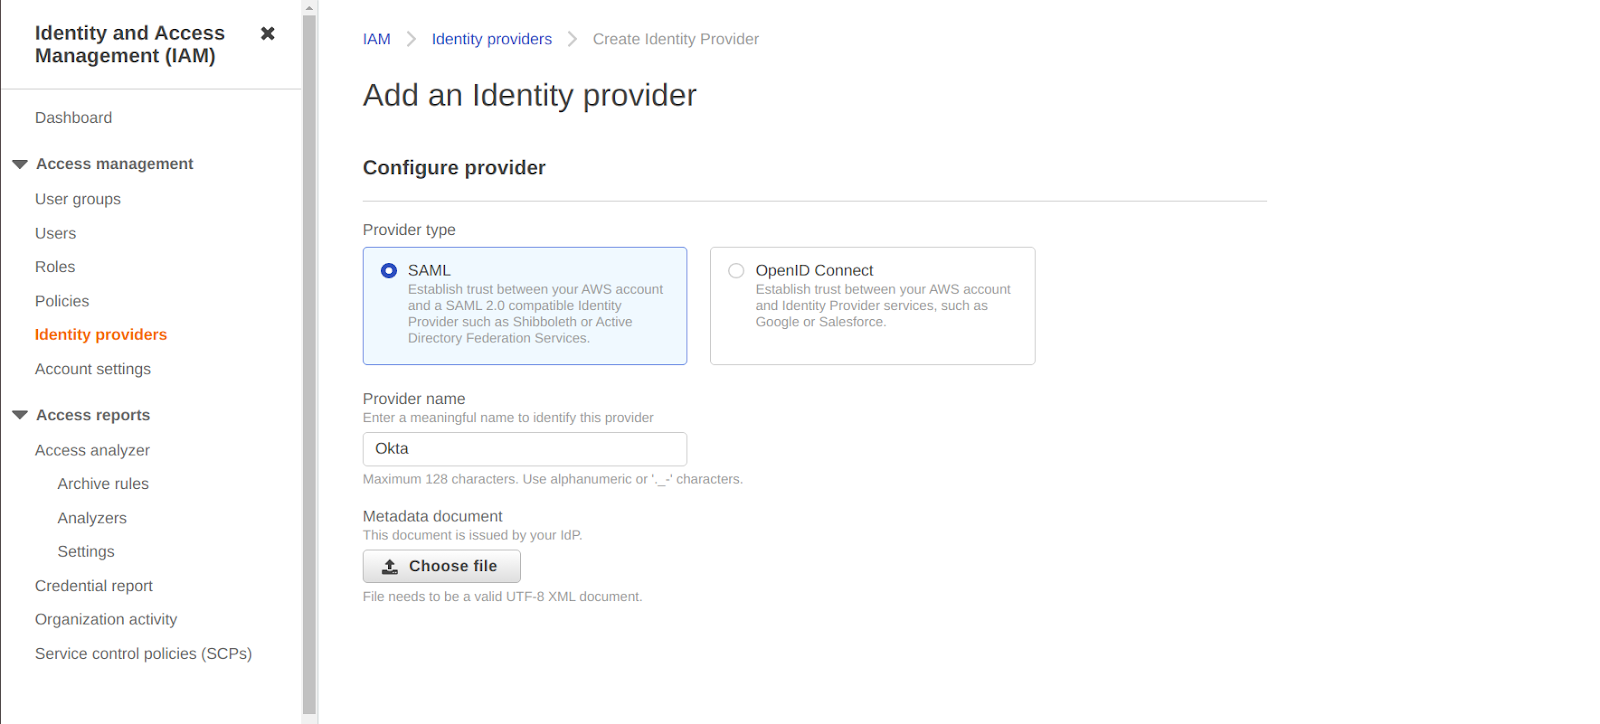
Here select “SAML” as the “Provider Type,” enter “Okta” as “Provider name,” and upload the Metadata Document containing the following line :

After you’ve finished configuring the Identity Provider, go to the Identity Providers list and copy the “Provider ARN” value for the Identity Provider you just developed.
Adding Identity Provider as Trusted Source:
After configuring Okta as the Identity Provider that Okta can retrieve and allocate to users, you can build or update existing IAM positions. Okta SSO can only offer your users roles configured to grant access to the previously installed Okta SAML Identity Provider.
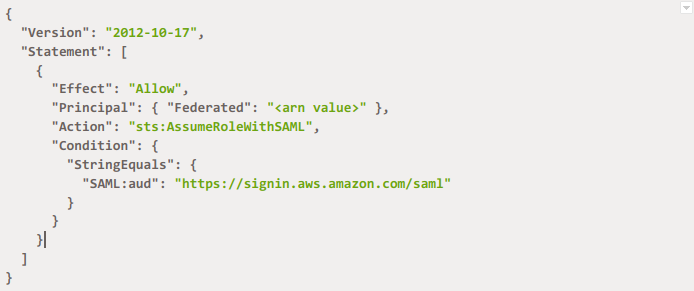
To give access to already present roles in the account, first pick the role you want Okta SSO to use from the “Roles” option from the menu bar. Edit the “Trust Relationship” for that role from the text relationship tab. To allow SSO in Okta to use the SAML Identity Provider that you configured previously, you need to change the IAM trust relationship policy. If your policy is empty, write the following code and overwrite <arn value> with the value that you copied while configuring Okta:
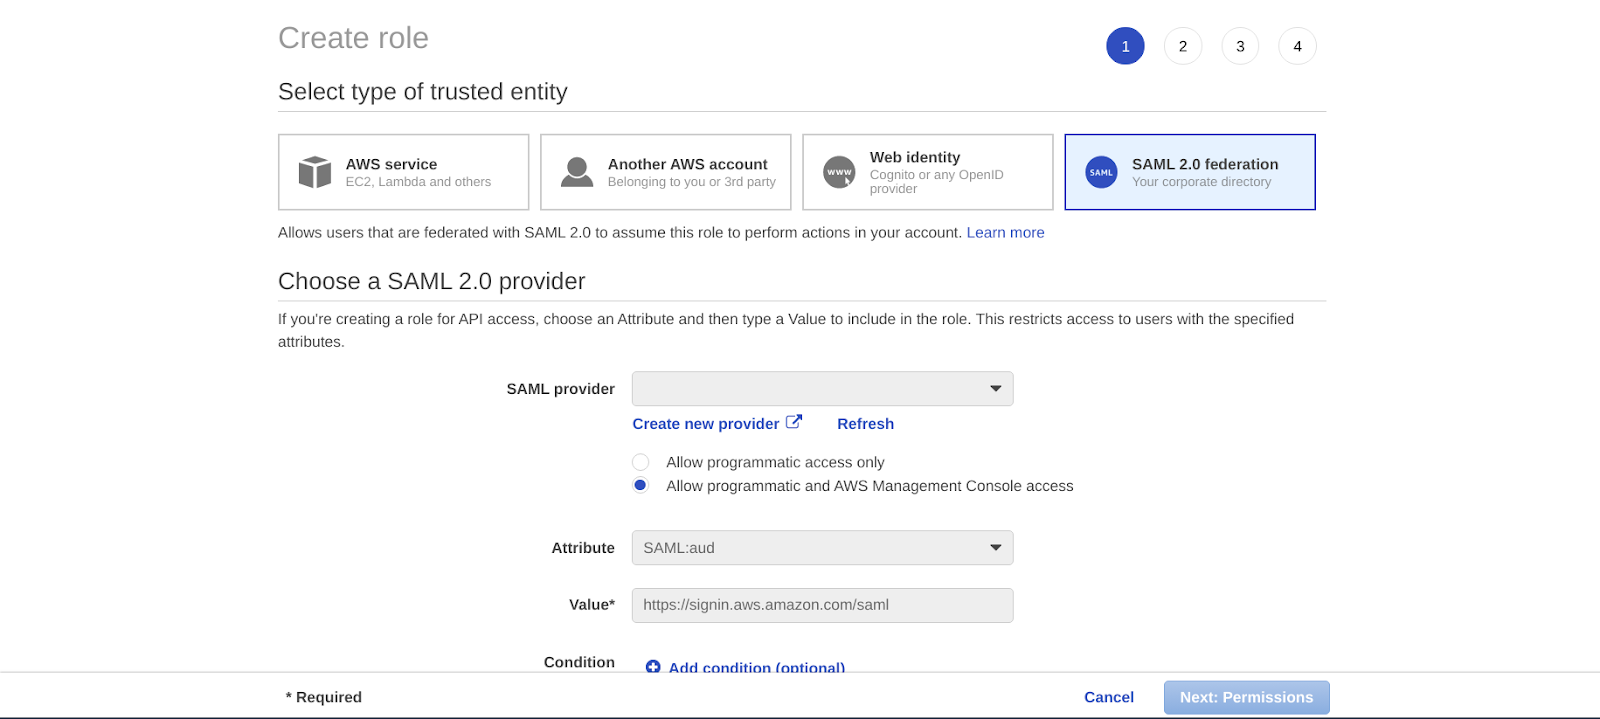
Otherwise, just edit the already written document. In case that you want to give access to a new role, go to Create Role from the Roles tab. For the type of trusted entity, use SAML 2.0 federation. Proceed to permission after selecting the name of IDP as SAML provider, i.e., Okta, and allowing management and programmatic control access. Select the policy to be assigned to that new role and finish the configuration.
Generating the API Access key for Okta for downloading roles:
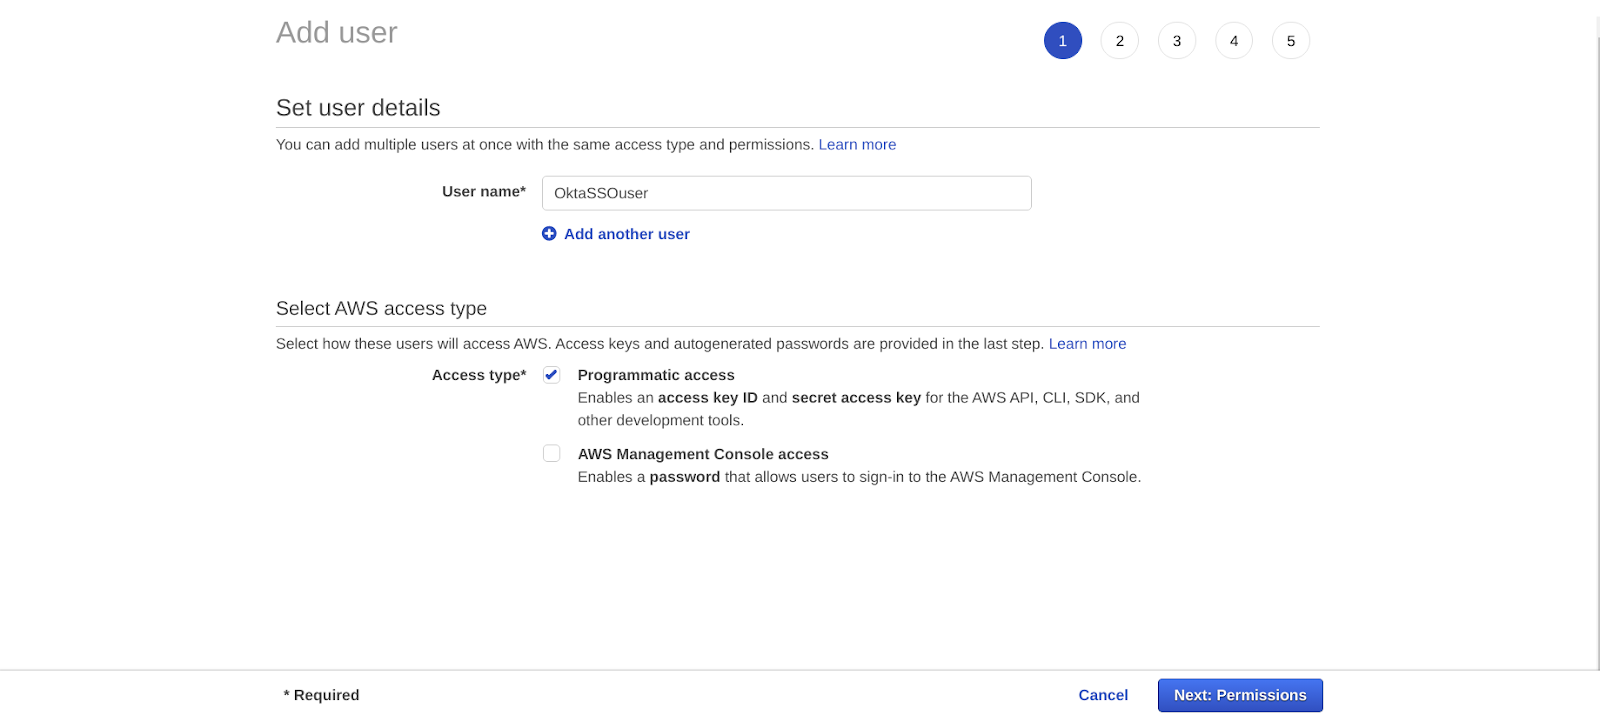
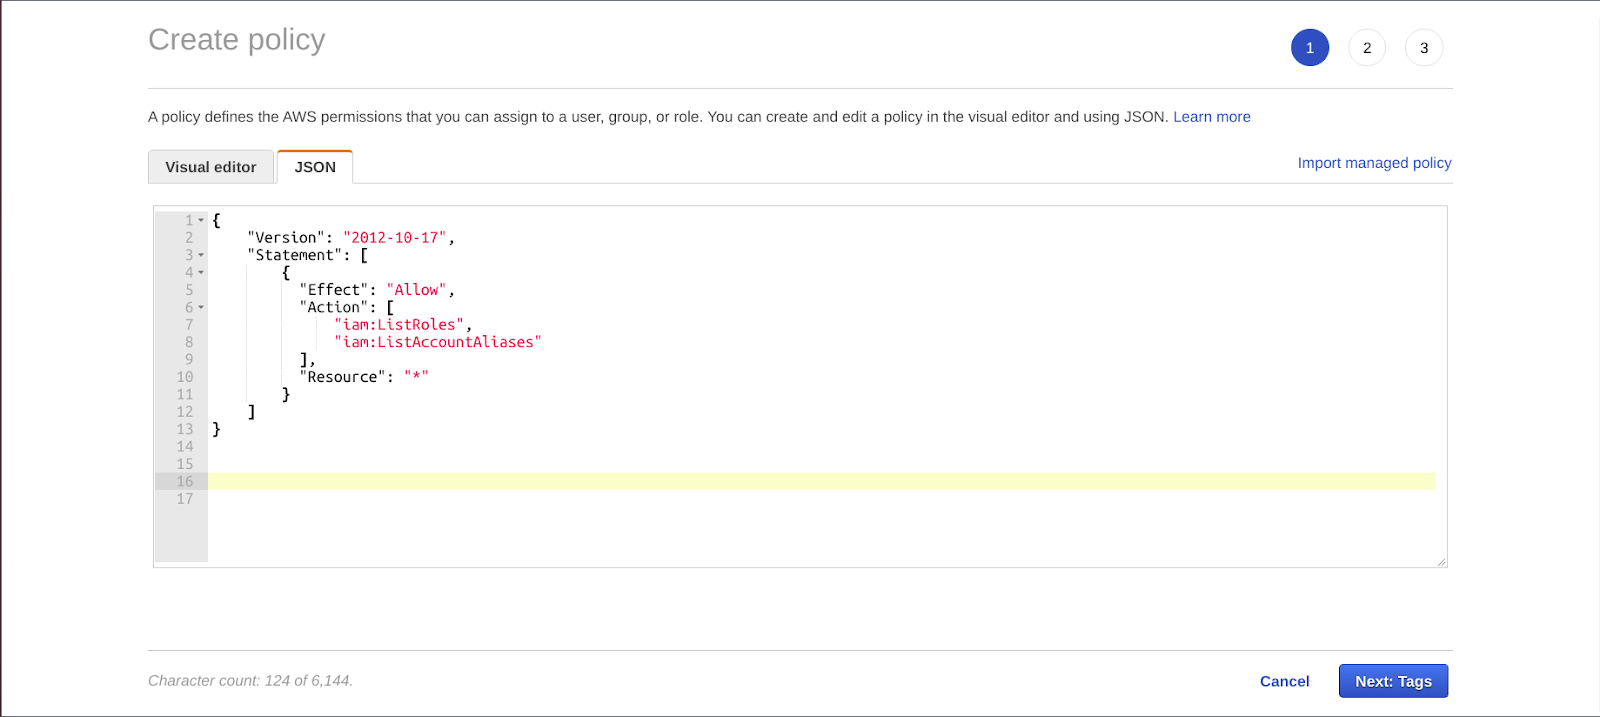
For Okta to automatically import a list of possible roles from your account, create an AWS user with unique permissions. This makes it quick and safe for the administrators to delegate users and groups to particular AWS roles. To do this, firstly select IAM from the console. In that list, click on Users and Add User from that panel.
Click on Permissions after adding user name and giving the programmatic access. Create Policy after selecting the “Attach policies” directly option and click on “Create policy.” Add the code given below, and your Policy Document will look like this :
For details, refer to AWS documentation if needed. Enter the preferred name of your policy. Go back to your Add User tab and attach the recently created policy to it. Search for and choose the policy you have just created. Now save the keys displayed, i.e., Access Key Id and Secret Access Key.
Configuring the AWS account Federation:
After Completing all of the above steps, open the AWS account federation App and change some default settings in Okta. In the Sign On tab, edit your environment type. ACS URL can be set in the ACS URL area. Generally, the ACS URL area is optional; you do not need to insert it if your environment type is already specified. Enter the Provider ARN value of the identity provider you have created while configuring Okta and specify the session duration too. Merge all the available roles assigned to anyone by clicking on the Join All Roles option.
After saving all these changes, please choose the next tab, i.e., Provisioning tab, and edit its specifications. The AWS Account Federation app integration does not support provisioning. Provide API access to Okta for downloading the list of AWS roles used during the user assignment by enabling the API integration. Enter the keys values that you have saved after generating the access keys in the respective fields. Provide IDs of all of your connected accounts and verify the API credentials by clicking on the Test API credentials option.
Create Users and Change Account Attributes to update all functions and permissions. Now, select a test user from the Assign People screen who will test the SAML connection. Select all the rules you want to assign to that test user from the SAML User roles found in the User Assignment Screen. After completing the assignment process, the test Okta’s dashboard displays an AWS icon. Click on that option after signing in to the test user account. You’ll see a screen of all the tasks allocated to you.
Conclusion:
SAML allows users to use one set of credentials authorized and connect with other SAML-enabled web apps and services without further sign-ins. AWS SSO makes it simple to halfway oversee federated access to various AWS records, services, and applications and gives clients single sign-on experience to all their assigned records, services, and applications from one spot. AWS SSO works with an Identity Provider of one’s own choice, i.e., Okta or Azure via SAML protocol.
from Linux Hint https://ift.tt/39vB2mJ
![How two Build a House in Minecraft [Step by Step]](https://lh3.googleusercontent.com/blogger_img_proxy/AEn0k_sMfFGYXVWjamDhocUmkaS-ajhcGracehAV7ieqEagulYcntd0KrVRDSgMdTnsa3ZgJVXnvzADjo0rLLBzcHtOWO0zKTR56zBtjF1h4S3GxrxHF5IOJDoI8ERq-VNcuy54gQCUr79U-yAwRuM1m1GPN0p9zWVhtFkhTlnQSQg=w100)


0 Comments