


Note: We will be sharing with you this Beginners Tutorial on Git by running it on a Debian 10 system.
Getting Started with Git in Debian 10
First, we will explain to you the method of Git installation on Debian 10, followed by creating a test repository in it. Then we will describe to you the staging, committing, and modification processes. We will also explain to you the methods of checking the Git log and Git status. The exact sequence of steps is as follows:
Step 1: Install Git on Debian 10
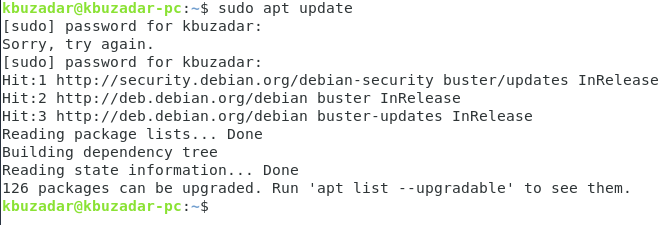
We need to update our Debian 10 system with the following command:
![]()
All the packages and dependencies that need to be updated will be updated immediately with this command while displaying the output shown in the image below:
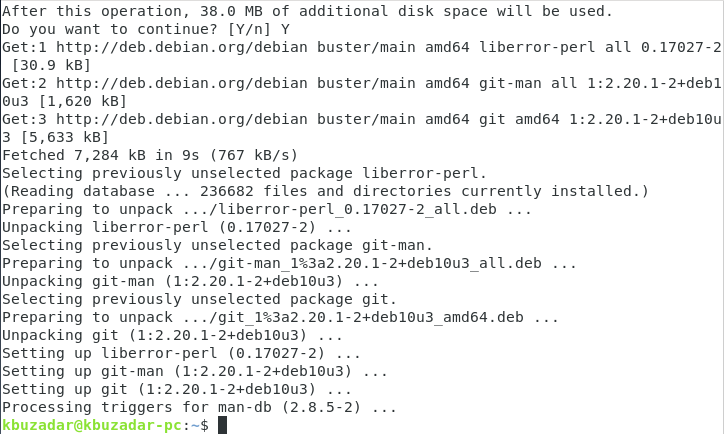
Now when we have executed the “update” command on our Debian 10 system, we will install Git on it with the following command:
![]()
Once Git has been installed on our Debian 10 system, we will receive the output messages shown in the image below on our terminal:
Step 2: Check the Installed Version of Git in Debian 10
When Git has been installed successfully on our Debian 10 system, we will check its version by running the following command:
![]()
The installed version of Git on our Debian 10 system is 2.20.1, which is shown in the image below:

Step 3: Configure Git for your Debian 10 System
Now we will configure Git for our Debian 10 system before using it formally. For that, we need to set up Git with our Email ID and username. We can set up the respective Email ID to be used with Git with the following command:
Here, you have to replace your Email ID with your respective Email ID.
![]()
Once your Email account has been successfully set up with Git, you will not receive any output messages as shown in the image below:

Then, we can set up the respective username to be used with Git with the following command:
Here, you have to replace username with your respective username.
![]()
Once your username has been successfully set up with Git, you will not receive any output messages as shown in the image below:
![]()
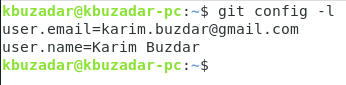
You can also check your recently set up Git credentials by executing the following command:
![]()
Our Git credentials are shown in the image below:
Step 4: Create your First Git Project Repository in Debian 10
Now we will create our first Git project repository to which we will add all those files with which we want to work while using Git in Debian 10. A new project repository in Git can be created with the following command:
Here, you have to replace SampleProject with whatever name you want for your sample project repository. We have named it as MyFirstGitProject.
![]()
Once a sample test repository is created successfully, you will see an output similar to the one shown in the image below:

Step 5: Create a Test File in your Git Project Repository in Debian 10
Now we can create a test file in our newly created Git project repository in Debian 10. But before doing that, we need to navigate to our test project repository with the help of the following command:
Here, you have to replace PathToYourNewlyCreatedGitProjectRepository with the exact path of your newly created repository.
![]()
Once the default path of your terminal has been changed, you can create a new file in your project repository with the command shown below:
Here, you have to replace SampleFile with the name of the file that you want to create in your Git project repository. We wanted to create a “C” file. That is why we have named it Test.c. However, you can have any name of your preference with any desired extension.
![]()
Step 6: Stage your Newly Created File in Debian 10
Staging is a process to prepare your files that need to be committed next. This can be done with the help of the “add” command in the following manner:
![]()
After running this command, you will not be able to see any output messages on the screen if it is executed successfully.
Step 7: Commit your Newly Created File in Debian 10
Now our test file is all set to be committed. We can commit it by running the command shown below in Debian 10:
Here, we have used the “-m” flag with this command to display an optional message with our commit. This message will help us in tracking the changes that we will make in the future once we check our Git log.
![]()
After the successful execution of this command, you will be able to see that your test file has been created or, in other words, it has been committed as highlighted in the following image:

Step 8: Make Some Changes to your Created File in Debian 10
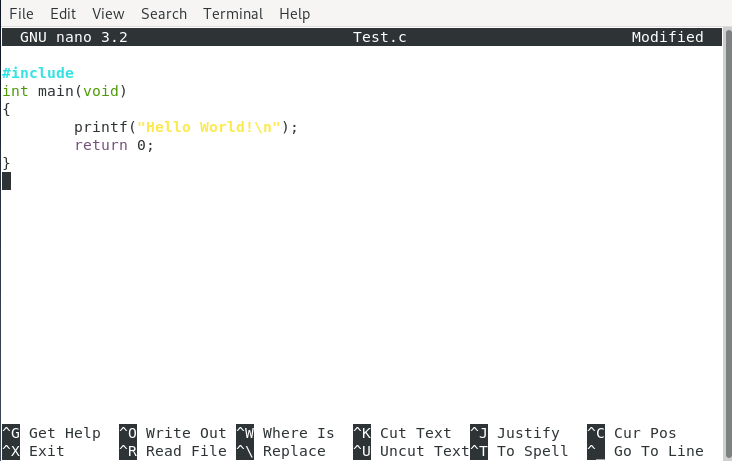
Now we will modify our test file a little, for which we will have to open it first with any text editor in the manner shown below:
Here, you have to replace SampleFile with the name of the file that you have created in your Git project repository.
![]()
Once this file has been opened with the text editor of your choice, you can add any piece of code to it. We have written a simple hello world program for this file, as shown in the following image. After that, we have simply saved and closed our file.
Step 9: Check the Status of Git in Debian 10
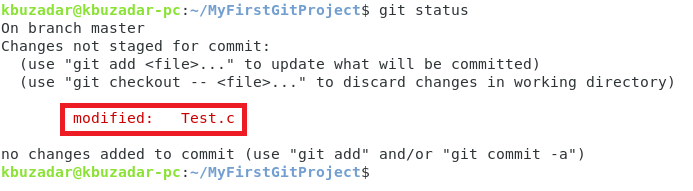
Now when we have made some modifications to an already committed file, we can check the status of Git by running the command shown below:
![]()
This status will reveal the names of the files that have been modified since the last commit as highlighted in the following image:
Step 10: Stage your Modified File in Debian 10
After checking the Git status, we will stage the modified file by running the command shown below:
Here, you have to replace NameOfTheFileToBeStaged with the actual name of the file that you have just modified. In our case, it was Test.c. However, if you have multiple files that you have modified and you want to stage them all at once, then instead of mentioning their names, you can execute the “git add .” command for an added simplicity.
![]()
Step 11: Commit your Recently Modified File in Debian 10
After staging our modified file in Debian 10, we will commit it using the following command:
![]()
After the successful execution of this command, you will be able to see that your test file has been modified or, in other words, its change has been committed as highlighted in the image shown below:

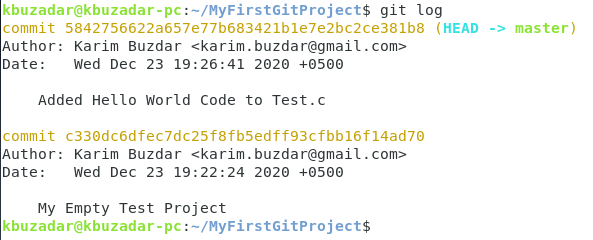
Step 12: Check Git Log in Debian 10
Now when we have made some reasonable changes to our Git project repository that can be tracked, we can easily check the Git log in Debian 10 to see the commit history. The Git log can be checked with the following command:
![]()
You can easily see from the Git log shown in the image below that our test file was committed twice, i.e., once after the time of creation and once after modification.
Remove Git from your Debian 10 System
After working with this version control system in Debian 10 system, you can also remove it quite easily by going through the following steps:
Step 1: Uninstall Git along with its Configuration Files
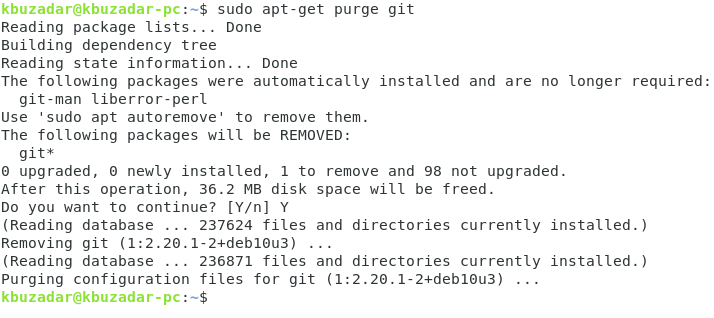
First, you have to uninstall Git and all of its configuration files by running the command shown below:
![]()
Once Git and its configuration files have been removed from your Debian 10 system, these messages will be displayed on your terminal:
Step 2: Remove the Irrelevant Packages and Dependencies
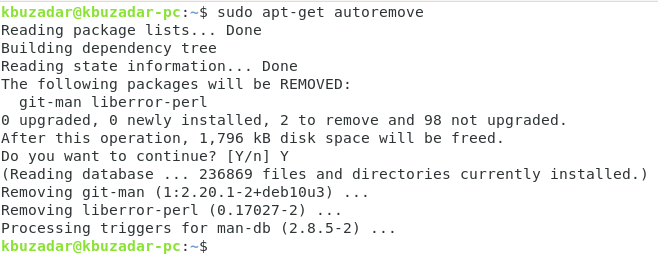
Now we can even remove those additional packages and dependencies that got installed with Git by running the following command:
![]()
When all the irrelevant packages and dependencies have been removed from your Debian 10 system, it will display this kind of messages on your terminal:
Conclusion
This article presents to you a very useful guide for beginners on the installation and usage of Git while working with a Debian 10 system. Apart from its usage, it also explains to you how you can get rid of Git once you do not need it any longer on your Debian 10 system.
from Linux Hint https://ift.tt/3qkaURW


0 Comments