Unfortunately, even after taking crucial security measures, security vulnerabilities still find their way into secure systems. One way to manage and protect your system is by limiting the damage possible once an attack occurs.
In this tutorial, we’ll discuss the process of using chroot jail to manage system damages in the event of an attack. We’ll look at how to isolate processes and subprocesses to a particular environment with false root privileges. Doing this will limit the process to a specific directory and deny access to other system areas.
A Brief Introduction To chroot jail
A chroot jail is a method of isolating processes and their subprocess from the main system using false root privileges.
As mentioned, isolating a particular process using fake root privileges limits damages in the case of a malicious attack. Chrooted services are limited to the directories and files within their directories and are non-persistent upon service restart.
Why use chroot jail
The main purpose of chroot jail is as a security measure. Chroot is also useful when recovering lost passwords by mounting devices from live media.
There are various advantages and disadvantages of setting chroot jail. These include:
Advantages
- Limits access: In case of security compromise, the only damaged only directories are those within the chroot jail.
- Command limits: Users or processes get limited to commands allowed in the jail.
Disadvantages
- It can be challenging to setup.
- It requires a lot of work—If you need an extra command than the ones allowed by default, you have to include it manually.
How to Create a Basic Chroot Jail
In this process, we will create a basic chroot jail with 3 commands limited to that folder. This will help illustrate how to create a jail and assigning various commands.
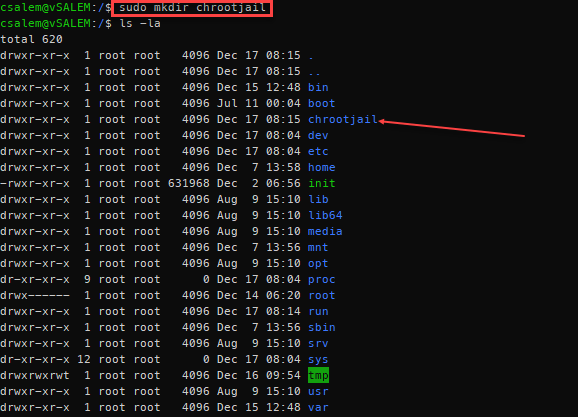
Start by creating a main folder. You can think of this folder as the / folder in the main system. The name of the folder can be anything. In our case, we call it /chrootjail
We will use this directory as the fake root containing the commands we will assign to it. With the commands we’ll use, we will require the bin directory (contains the command executables) and the, etc., directory (containing configuration files for the commands).

Inside the /chrootjail folder, create these two folders:

The next step is to create directories for dynamically linked libraries for the commands we want to include in the jail. For this example, we will use bash, ls, and grep commands.
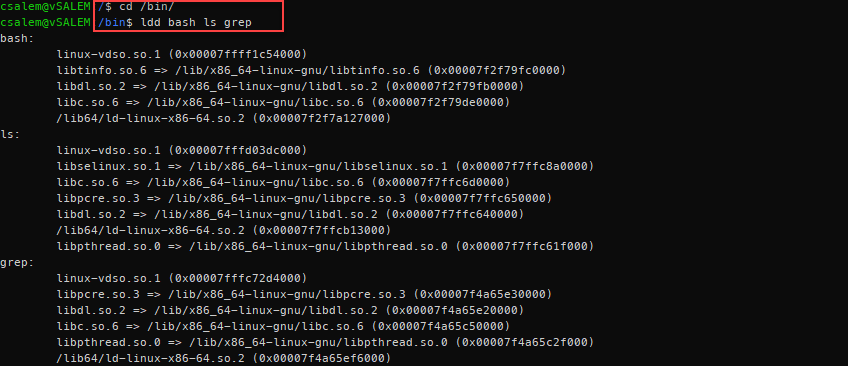
Use the ldd command to list the dependencies of these commands, as shown below:

If you are not inside the bin folder, you need to pass the full path for the commands you wish to use. For example, ldd /bin/bash or ldd /bin/grep
From the ldd output above, we need the lib64 and /lib/x86_64-linux-gnu directories. Inside the jail directory, create these folders.
Once we have the dynamic library directories created, we can list them using a tree, as shown below:

As we progress, you will start to get a clear image of what a chroot jail means.
We are creating an environment similar to a normal root directory of a Linux system. The difference is, inside this environment, only specific commands are allowed, and access is limited.
Now that we’ve created the bin. etc., lib, and lib64, we can add the required files inside their respective directories.
Let us start with the binaries.

Having copied the binaries for the commands we need, we require the libraries for each command. You can use the ldd command to view the files to copy.
Let us start with bash. For bash, we require the following libraries:
/lib/x86_64-linux-gnu/libdl.so.2
/lib/x86_64-linux-gnu/libc.so.6
/lib64/ld-linux-x86-64.so.2
Instead of copying all these files one by one, we can use a simple for loop to copy each library in all the libraries to /chrootjail/lib/x86_64-linux-gnu

Let us repeat this process for both ls and grep command:
For ls command:

For grep command:

Next, inside the lib64 directory, we have one shared library across all the binaries. We can simply copy it using a simple cp command:

Next, let us edit the main bash login file (located in /etc/bash.bashrc in Debian) so that we can tweak the bash prompt to our liking. Using a simple echo and tee commands as shown:
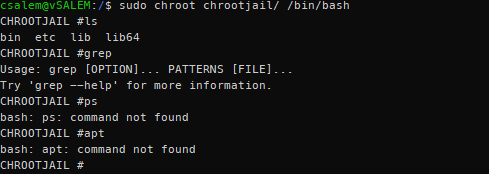
Once we have completed all the steps above, we can log in to the jail environment using the chroot command as shown.
You will get root privileges with the prompt similar to those created in the echo and tee command above.
Once you log in, you will see that you only have access to the commands you included when you created the jail. If you require more commands, you have to add them manually.

NOTE: Since you have included the bash shell, you will have access to all the bash built-in commands. That allows you to exit the jail using the exit command.
Conclusion
This tutorial covered what chroot jail is and how we can use it to create an isolated environment from the main system. You can use the techniques discussed in the guide can to create isolated environments for critical services.
To practice what you’ve learned, try to create an apache2 jail.
HINT: Start by creating a root directory, add the config files (etc/apache2), add the document root (/var/www/html), add the binary (/usr/sbin/apache2) and finally add the required libraries (ldd /usr/sbin/apache2)
from Linux Hint https://ift.tt/3aPYsVl


0 Comments