Whether you are looking to test Wayland, understand what it is before using it, or learn how to enable and disable it on Ubuntu, this guide will prove valuable in one way or the other.
This guide will discuss what Wayland is, how it works, and how to enable and disable it on your Ubuntu system.
Let’s get started.
What is Wayland
The best way to define Wayland is to call it a protocol used by compositing window managers to communicate with the client and the C library of Wayland protocol.
A compositing window manager, colloquially shortened to a compositor, is a windows manager that provides applications with an off-screen buffer for each window. A compositor can interact with the graphics and the window system creating:
- Transparency in Windows
- Animations
- Drop shadows
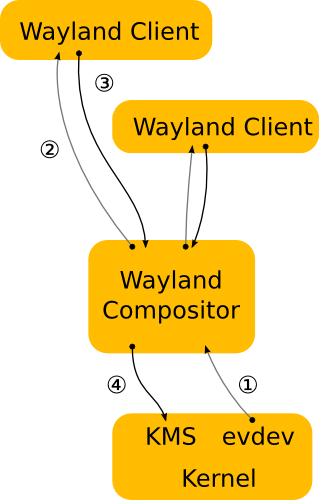
The compositor implemented by Wayland protocol can be a display server running on the Kernel, X application, or a Wayland client such as rootless or fullscreen X servers, other display servers, or basic applications.
The initial team of volunteer-developers who helped develop the Wayland protocol created it as a simpler and faster replacement of X. X11 technology had been the default display server used by most Linux Desktop environments. However, because of various issues in the X11 server, including security vulnerabilities and performance issues, the Kristian Høgsberg-led team developed Wayland as an alternative.
Why Wayland
Compared to other display servers, the Wayland display protocol is secure and fast. Wayland defines every application as a client and a graphic process unit as the server. Unlike X11, Wayland allows each application to use the protocol in a standalone functionality.
Since Wayland handles each application in a standalone session of the protocol, it improves performance because the server does not have to manage all applications at once. Instead, the required applications draw standalone required items.
Wayland’s development has improved, adding more features like the XWayland that allows users to work with X11-based Wayland applications.
The image below shows the Wayland Architecture.

How to Enable and Disable Wayland on Ubuntu
Over the years, thanks in part to an active development team and community, some Linux distributions have adopted Wayland and allow you to enable it during login.
To enable Wayland on Ubuntu, follow the steps below:
For this tutorial, you should have root privileges to edit specific files. The tutorial also assumes you are running GNOME as your default Desktop Environment.
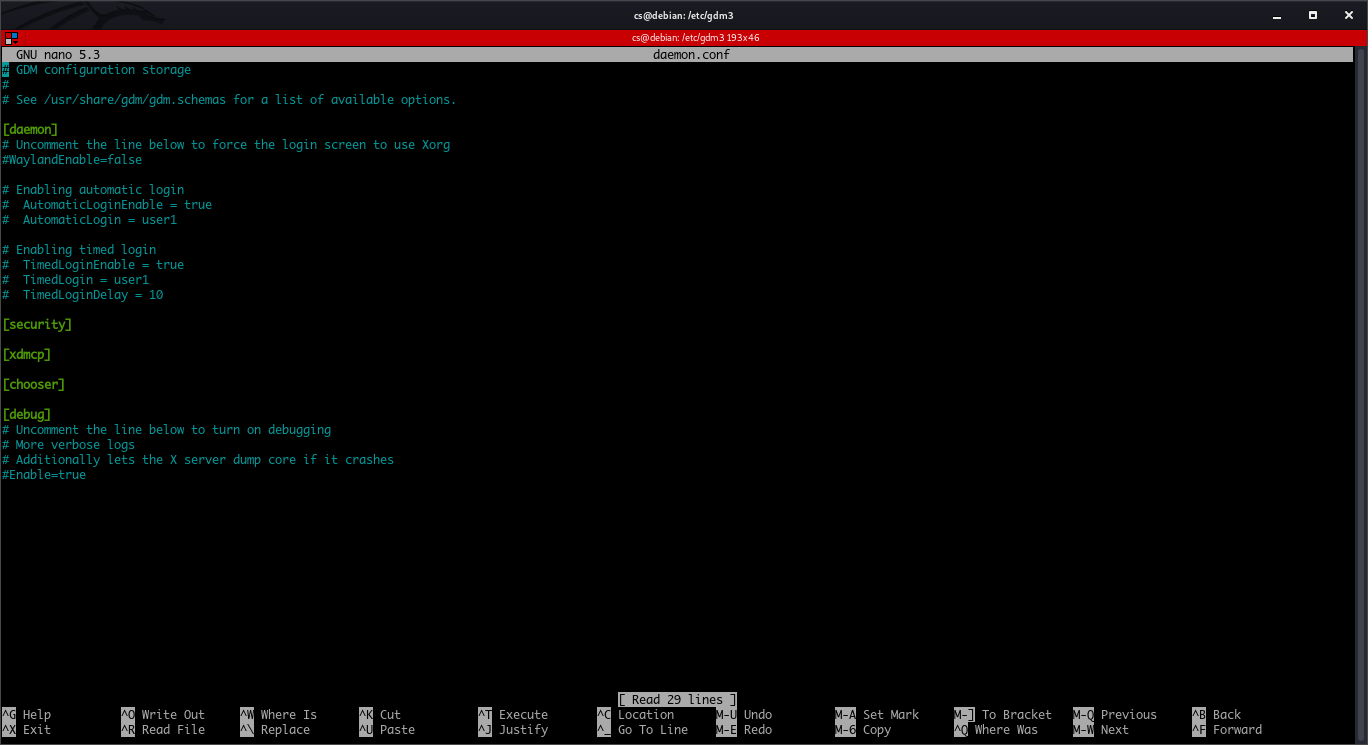
Edit the file /etc/gdm3/daemon.conf
In the file, look for the following entry #WaylandEnable=false
Uncomment the entry to disable Wayland or leave uncommented to enable Wayland.
Close, save the file, and then restart gdm using the command:

You can also apply the changes by rebooting your system.
To use Ubuntu over Wayland, click on the settings icon on the login menu, select “Ubuntu on Wayland,” and then login. Ensure you have enabled Wayland by leaving the line in the above file uncommented.
Conclusion
This tutorial has given you an idea of what the Wayland protocol is, how it works, and how to enable and disable it on Ubuntu.
In parting, keep in mind that this is not a Wayland protocol guide or reference guide. The aim was to introduce you to the Wayland protocol, show you how it works, and how you can enable and disable it on an Ubuntu system.
If you’d like more information, you can check the official documentation:
from Linux Hint https://ift.tt/2KRrIAz


0 Comments