We all know that Linux based systems rely heavily on files. These files are grouped together in the form of multiple file systems, and for accessing a particular file system with an added level of ease, you can attach that file system to any desired location till the time you wish to access that file system. Once you are done, you can simply detach that file system from that location. In this whole process, the attachment of a file system on a specific location is known as “mounting,” whereas the detachment of a file system from a specific location is known as “unmounting.”
Also, the location to which you attach a file system is formally known as a “mount point.” There are multiple file systems available on a Linux operating system. Some of these file systems are mounted by default, and some of them are unmounted, which means that you can easily mount them on your own. In today’s article, we will be teaching you the methods of mounting and unmounting a file system in Linux Mint 20.
Method of Mounting a File System in Linux Mint 20
For mounting a file system in Linux Mint 20, you need to perform the following steps:
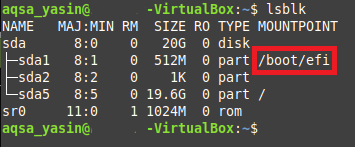
The “lsblk” command in Linux is used to display all the mounted and unmounted file systems. Before mounting a file system in Linux Mint 20, we would like to list down all the file systems by using the “lsblk” command in the manner shown below:
![]()
Running this command will present all the file systems, i.e., the ones that are mounted as well as the ones that are available for mounting in a tree-like structure. From the following image, you can recognize the already mounted file systems by seeing their mount points as highlighted in the image. Rest of all, the file systems, i.e., the ones that do not have any mount point mentioned after their names, are available for mounting.

Now we will try to mount a file system in Linux Mint 20 by running the “mount” command in the manner shown below:
Here, you need to replace NameOfFileSystem with the exact name of the file system that you wish to mount and MountPoint with the location where you want to mount your desired file system. Also, in Linux, you cannot mount a file system without having the root user privileges, and since we were not logged into the root user account, that is why we have used the “sudo” keyword before the “mount” command. Otherwise, this command would have rendered an error message.
![]()
Since in our case, we attempted to mount a file system that was already mounted, i.e. /dev/sda1, that is why our terminal displayed the message that this file system has already been mounted on the specified mount point as shown in the following image. However, if we would have chosen a file system that was not mounted before, such as /dev/sda2, /dev/sda5, etc. then running the “mount” command would have mounted our file system on the specified mount point.

Method of Unmounting a File System in Linux Mint 20
For unmounting a file system in Linux Mint 20, you need to perform the following steps:
Now we will attempt to unmount the same file system that we tried to mount in the method shown above. For that, we need to run the “umount” command in our terminal in the manner shown below:
Here, you need to replace NameOfFileSystem with the exact name of the file system that you wish to unmount, which in our case was /dev/sda1, as shown in the image below:
![]()
Alternatively, we can also use the “umount” command in the following manner:
Here, you need to replace MountPoint with the location from where you wish to unmount a file system, which in our case was /boot/efi, as shown in the image below. Also, if running any of the above two commands render any error message, then it could possibly happen because of missing the “sudo” keyword. Therefore, for being on the safe side, you can try running these commands with the “sudo” keyword for providing root user privileges for unmounting a file system.
![]()
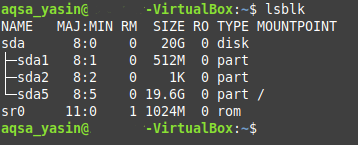
Running either of these commands will simply hand over the control back to you without displaying any output on the terminal. Being a user, you might find yourself in doubt whether your specified file system has been correctly unmounted or not. To verify this, you can try running the “lsblk” command once again. If your specified file system does not have a mount point any longer in the output of this command, then this will imply that our file system has been unmounted successfully. In the example that we demonstrated, we wished to unmount the /dev/sda1 file system from the /boot/efi mount point. The image shown below verifies that the /dev/sda1 file system has been unmounted successfully since its mount point is no longer there in the output of the “lsblk” command, as shown in the image below:

Conclusion
In this article, we walked you through the detailed methods of mounting and unmounting a file system in Linux Mint 20. By following these methods, you can conveniently mount any file system of your choice to any desired location whenever you wish to access that file system or, more precisely, the files within it easily. Similarly, you can also unmount any file system of your choice at any time when you feel like you do not need to access that file system anymore. Both these methods are extremely simple and allow you to get your work done just within a few minutes.
from Linux Hint https://ift.tt/2IxizLU


0 Comments