


Prerequisites
Before beginning this tutorial, first, complete the following tasks:
- Install a fresh Laravel project
- Set up the database connection
- Set up the configuration for sending the emails (You can check the email sending tutorial to send email using SMTP)
Create Table
You must create the jobs table in the database to store all the queues. Run the following command from the terminal to create the migration file for the jobs table.
You can open the migration file from the location database/migrations/. The file contains the following content.
use Illuminate\Database\Migrations\Migration;
use Illuminate\Database\Schema\Blueprint;
use Illuminate\Support\Facades\Schema;
class CreateJobsTable extends Migration
{
/**
* Run the migrations.
*
* @return void
*/
public function up()
{
Schema::create('jobs', function (Blueprint $table) {
$table->bigIncrements('id');
$table->string('queue')->index();
$table->longText('payload');
$table->unsignedTinyInteger('attempts');
$table->unsignedInteger('reserved_at')->nullable();
$table->unsignedInteger('available_at');
$table->unsignedInteger('created_at');
});
}
/**
* Reverse the migrations.
*
* @return void
*/
public function down()
{
Schema::dropIfExists('jobs');
}
}
Run the following command from the terminal to create the job table.
Create Mail Class
You must create a mailable class to send emails from the Laravel application. Run the following command to create the mail class named SendEmail in the location app/Mail.
The content of this class is shown below. The view filename that is used in the build() method will be created in the next part of this tutorial.
namespace App\Mail;
use Illuminate\Bus\Queueable;
use Illuminate\Contracts\Queue\ShouldQueue;
use Illuminate\Mail\Mailable;
use Illuminate\Queue\SerializesModels;
class SendEmail extends Mailable
{
use Queueable, SerializesModels;
/**
* Create a new message instance.
*
* @return void
*/
public function __construct()
{
//
}
/**
* Build the message.
*
* @return $this
*/
public function build()
{
/* Define the view name that will be used for email template */
return $this->view('email');
}
}
Create View
Create the view file named email.blade.php with the following content that will be sent as the email body.
<p>Learn Laravel easily</p>
Create a Job Class
Run the following command to create a job class. The job class filename named SendingEmail.php will be created in the location app/Jobs.
The content of the SendingEmail.php is shown below. You must set a valid email address inside the to() method of the handle() function to test whether the code is working properly. Set the valid email address in place of ‘Receiver Email Adress’ inside the to() method to check whether the queue is working properly.
namespace App\Jobs;
use Illuminate\Bus\Queueable;
use Illuminate\Contracts\Queue\ShouldQueue;
use Illuminate\Foundation\Bus\Dispatchable;
use Illuminate\Queue\InteractsWithQueue;
use Illuminate\Queue\SerializesModels;
/* Added the necessary packages */
use Mail;
use App\Mail\SendEmail;
class SendingEmail implements ShouldQueue
{
use Dispatchable, InteractsWithQueue, Queueable, SerializesModels;
/**
* Create a new job instance.
*
* @return void
*/
public function __construct()
{
//
}
/**
* Execute the job.
*
* @return void
*/
public function handle()
{
/* Create the object of mailable class and send email */
$email = new SendEmail();
/* Set a valid email address */
Mail::to('Receiver Email Address ')->send($email);
}
}
Create Controller
Run the following command to create a controller to handle the queue. When the handleQueue() function of the controller is executed, the queue job will be pushed and the email will send.
SendEmailController.php
namespace App\Http\Controllers;
use Illuminate\Http\Request;
/* Add the necessary packages */
use App\Jobs\SendingEmail;
use Carbon\Carbon;
class SendEmailController extends Controller
{
/**
* Using Laravel Queues
*/
public function handleQueue()
{
/* Push the new job in the job queue */
dispatch(new SendingEmail());
/* Print message after sending email */
echo 'Email has been Sent';
}
}
Add Route
Open the web.php file from the routes folder and add the following route to execute the queue job using the controller.
Run the following URL in the browser to check whether the code is working. Open the receiver email address to check whether a new email has been received.
http://localhost:8000/emailqueue
Add Delay
Open the SendingEmail.php file again and modify the content of the handleQueue() function to add the five-second delay to the queue jobs.
namespace App\Http\Controllers;
use Illuminate\Http\Request;
/* Add the necessary packages */
use App\Jobs\SendingEmail;
use Carbon\Carbon;
class SendEmailController extends Controller
{
/**
* Using Laravel Queues
*/
public function handleQueue()
{
/* Create a new queue object with 5 seconds delay */
$emailJob = (new SendingEmail())->delay(Carbon::now()->addSeconds(5));
/* Push the new job in the job queue */
dispatch($emailJob);
/* Print message after sending email */
echo 'Email Sent after five seconds';
}
}
Again, run the following URL in the browser to check whether the code is working. Here, the email will be sent after five seconds, using the delay() method of five seconds.
http://localhost:8000/emailqueue
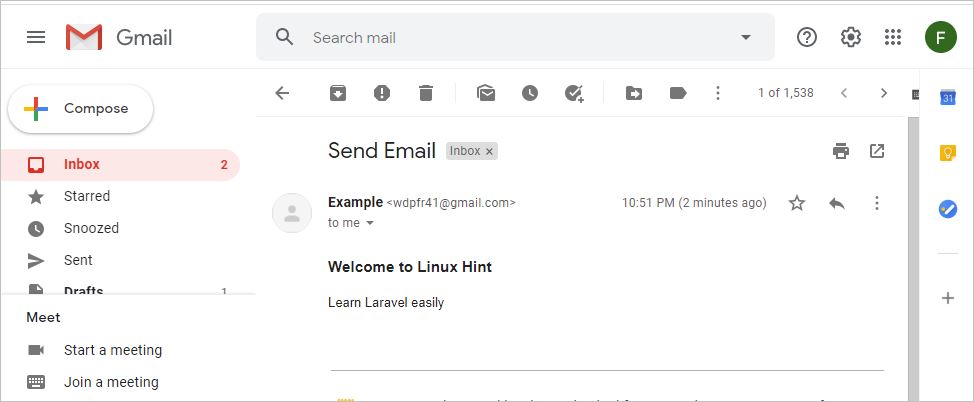
Check the inbox of the receiver email address to find out whether a new email has been received after 5 seconds. An email with the following content will be received if the queue job is working properly.
Conclusion
This tutorial shows very simple usage of the Laravel queue. You can use Laravel queues for various purposes, based on your application requirements. I hope that this tutorial has helped readers to better understand the basic concepts of Laravel queues.
from Linux Hint https://ift.tt/3jSJqA1


0 Comments