


Writing a Simple Bash Script in Linux Mint 20
By successfully performing the following steps, you can write a simple bash script in Linux Mint 20:
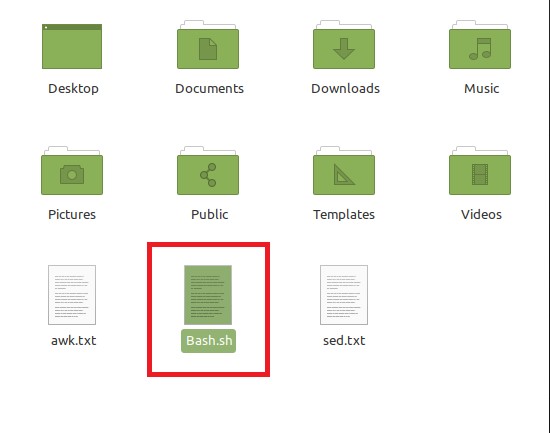
First, create an empty document in the home directory of Linux Mint 20 and give it any name you prefer, followed by the .sh extension. For our scenario, we have named the document ‘Bash.sh,’ as shown in the image below:
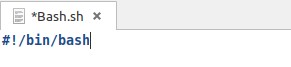
Next, double-click on this file to open it. Once the file is open, type ‘#!/bin/bash’ as the first line of the file. This line is added to every bash file to indicate that the following code will be a bash script. This line is also shown in the following image:
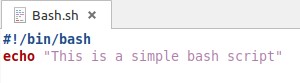
After adding the above line, write a bash script to display a message in the terminal. To do this, simply type the script shown in the image below in the bash file. In this script, the ‘echo’ command is used to print a simple message in the terminal. The message to be displayed is always typed within inverted commas in bash.
Once you have typed this script, just save your bash file and then close it.
Now, you need to execute this bash script. To do so, you will need to launch the terminal, as shown in the following image:

After launching the terminal in Linux Mint 20, execute the newly created bash script with the command shown below:
Here, you must provide whatever name you have given to your bash file to replace the term ‘File.’ We have replaced this name with the name ‘Bash.sh,’ i.e., with the name of the bash file that we have created.
![]()
After you run this command, the output of your bash script will be displayed in the terminal, as shown in the image below:

Now, we will try to make our bash script a little bit more interactive. That is, we will try to make the script capable of taking input from the user. To do this, open the bash file that you have just created and type the script shown in the following image in it.
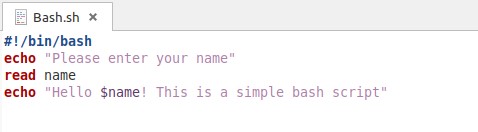
In this script, we want the user to provide his or her name. Once the user enters his name via the terminal, the name is stored in the ‘name’ variable through the ‘read’ command. Then, we want to display a message to the user while addressing the user with the name he or she entered. Here, you can access the value stored in the ‘name’ variable by putting a ‘$’ symbol before it. The usage of the ‘echo’ command has already been explained in depth in the script created above.
Execute your newly modified bash script via the terminal. Because of the modification done above, the terminal will ask you to provide your name, as shown in the image below:

Once you provide your name and hit Enter, the bash script will display a message to you while addressing you with your name, as shown in the following image:

Now, we will try to tweak our bash script a little bit more to demonstrate to you the usage of the ‘date’ command. This command is simply used to determine the current date and time. To achieve this functionality, type the script shown in the image below in your bash file.
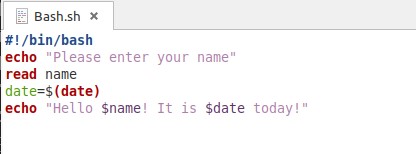
The only difference from the above script is that this time, we have created a new variable, ‘date,’ and have assigned the ‘date’ command as its value. Whenever we want to store a command in a variable in bash, that command is always enclosed within parentheses, and we put a ‘$’ symbol before the command. After storing the value of the ‘date’ command in the ‘date’ variable, we have simply printed it out in the terminal. After making these changes, save the bash file and close it.
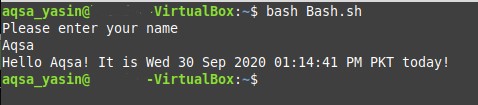
Execute the same bash script again. This time, after entering your name, the terminal will also show you the current date and time while addressing you with your name, as shown in the following image:
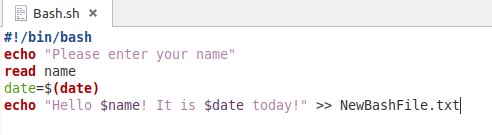
At times, you may not want the output of a bash script to be displayed in the terminal; or rather, you may want the output to be saved in another file. To do this, you will have to modify the bash script yet again. This time, you only have to add the ‘>>’ symbol, followed by the file name where the output is supposed to be stored, after the ‘echo’ command that was initially used to display the output on the terminal. The ‘echo’ command, followed by the ‘>>’ symbol and the file name, is used to store the output of the bash script to the file instead of displaying it in the terminal. In our case, we have named the output file ‘NewBashFile.txt,’ as you can verify in the image shown below:
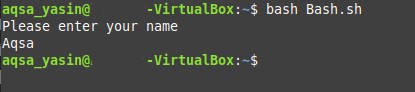
After making these changes, save the file and close it. Execute this bash file from the terminal. The terminal will ask you to enter your name. After entering your name, as soon as you press the Enter key, you will no longer be able to see any output in the terminal, as shown in the following image:
Now, go to your Home directory. Here, you will find a new file named ‘NewBashFile.txt,’ as highlighted in the image below:

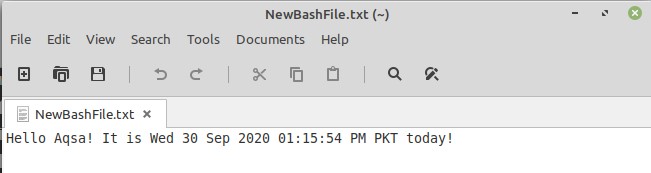
When you double-click on this file to launch it, you will be able to see the output of your bash script as the content of this text file, as shown in the following image:
Alternatively, you can also execute the following command in your terminal to view the contents of this output file:
![]()
When you execute the command shown above, you will be able to see the contents of that file in your terminal:

Conclusion
The different scenarios discussed in the method shown above are enough to provide a jumpstart to those keen to learn bash scripting. With the help of these scenarios, we managed to demonstrate the method of taking an input, displaying the output, using bash commands, and storing the output of a script to a new file. However, bash programming can also be used very conveniently for other complex problems.
from Linux Hint https://ift.tt/3kihtBM


0 Comments