


In any computer system, you have got tons of different files. Some of them are system files that are there since the very beginning, whereas some of them are user files that you create on your own as per your needs. However, when there is a large bulk of files, and you only wish to search for a particular file or set of files for any specific task, then the process of looking for that file or files manually can be extremely tedious as you have to go to each and every directory in search of that file or files that you need. And even then, it is not assured that you will be effectively able to find all those files.
Thankfully, our operating systems these days are efficient enough that they present us with different ways in which we can automate this task and make it more speedy. Like other operating systems, Linux also enables us to search for files automatically via terminal commands. Therefore, today, our discussion will revolve around exploring the different methods of searching for files on Linux from the command line.
Note: The methods explained below have been tested with Linux Mint 20.
There are four different ways of searching for files on Linux from the command line, and we are going to discuss them all one by one:
Method #1: Using the “find” command
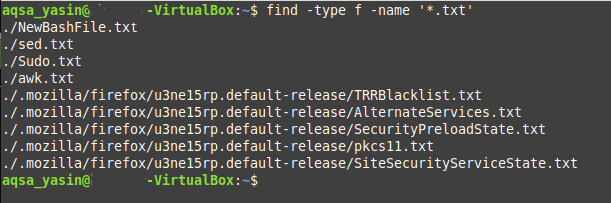
The “find” command with its different options can be used to search for files based on their name, type, date modified, size, etc. on Linux via the command line. In this scenario, we want to use the “find” command to filter out all the text files that are present in our current directory. We will have to proceed as follows to do this:
In your terminal, you need to execute the following command:
Here, the asterisk is used for indicating that the above-mentioned command will return all the text files present in your current working directory.
![]()
When you hit the Enter key to execute this command, you will be able to see all the files with the .txt extension that are located in your current directory, as shown in the image below:
Method #2: Using the “locate” command
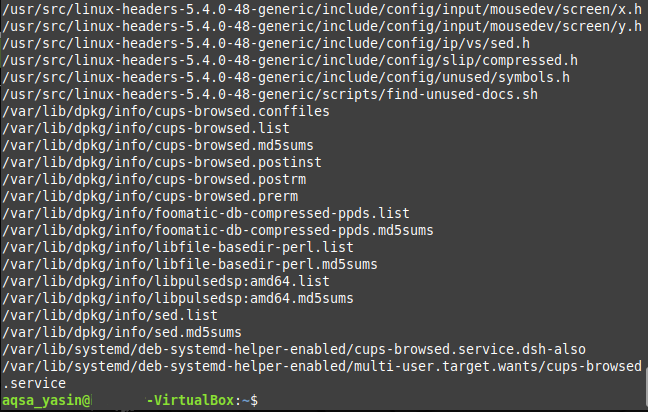
The “locate” command is useful whenever you know the complete name of the file to be searched, or you know the name partially, i.e., just a part for it. This command will essentially fetch all those files for you that contain the complete or partial name that you have specified after this command. For example, In our current directory, we will filter for all the files containing the “sed” string in their names. This can be done by following the steps mentioned below:
You need to execute the command shown below in your terminal:
Here, “sed” can be replaced with any other string that should be contained in the names of the files that you want to search using the “locate” command.
![]()
Once this command executes, you will be able to see all the files that contain the specified string, i.e., “sed” in this case, their names are shown in the following image:
Method #3: Using the “whereis” command
This command is a little bit advanced in a sense that this does not only return the file names that you are looking for rather it also returns the complete path to the binary and source along with the man pages (in case of command) as its output because of which you can exactly locate where all the necessary files of a package or a command reside. To demonstrate the usage of the “whereis” command in Linux Mint 20, we will simply try to look for the man pages, the binary file, and the source file of the “lsusb” command. We can do this by performing the following steps:
We have to execute the command stated below in the terminal:
Here, “lsusb” can be replaced with any other command or package whose binary, source, and man pages you want to search while using the “whereis” command.
![]()
When you run the command shown above in your terminal, you will be able to see the complete path to the binary file, source file, and the man pages of the “lsusb” command as shown in the following image:

Method #4: Using the “which” command
The “which” command can be called as a mini version of the “whereis” command as it only returns the complete path of the executable file of a command or a package. Whenever you are only concerned with searching for the binary file of a particular command or a package, you can conveniently make use of the “which” command. For example, we will try to search for the executable file of the “lsusb” command while making use of the “which” command as explained below:
You simply have to execute the following command in your terminal:
Here, you can replace “lsusb” with any other command or package whose executable file you want to search while using the “which” command.
![]()
After running the above-mentioned command in your terminal, you will immediately be able to see the path to the executable file of the “lsusb” command in your terminal as shown in the image below:

Conclusion
By choosing any of the methods discussed in this article according to your needs, you can look for your desired files on the Linux operating system and hence save yourselves from the hassle of looking for each file manually.
from Linux Hint https://ift.tt/37wmAdU


0 Comments