Sanitization of inputs is the process of cleansing of the inputs, so the data inserted is not used to find or exploit security holes in a website or server.
Vulnerable sites are either unsanitized or very poorly and incompletely sanitized. It is an indirect attack. The payload is indirectly sent to the victim. The malicious code is inserted on the website by the attacker, and then it becomes a part of it. Whenever the user (victim) visits the webpage, the malicious code is moved to the browser. Hence, the user is unaware of anything happening.
With XSS, an attacker can:
- Manipulate, destroy, or even deface a website.
- Expose sensitive user data
- Capture user’s authenticated session cookies
- Upload a Phishing page
- Redirect users to a malicious area
XSS has been in the OWASP Top Ten for the last decade. More than 75% of the surface web is vulnerable to XSS.
There are 4 types of XSS:
- Stored XSS
- Reflected XSS
- DOM-based XSS
- Blind XSS
When checking for XSS in a pentest, one may get weary of finding the injection. Most pentesters use XSS Tools to get the job done. Automating the process not only saves time and effort but, more importantly, gives accurate results.
Today we will discuss some of the tools which are free and helpful. We will also discuss how to install and use them.
XSSer:
XSSer or cross-site scripter is an automatic framework that helps users find and exploit XSS vulnerabilities on websites. It has a pre-installed library of around 1300 vulnerabilities, which helps bypass many WAFs.
Let’s see how we can use it to find XSS vulnerabilities!
Installation:
We need to clone xsser from the following GitHub repo.

Now, xsser is in our system. Traverse into the xsser folder and run setup.py
$ python3 setup.py
It will install any dependencies, which already been installed and will install xsser. Now it’s time to run it.
Run GUI:
A window like this would appear:
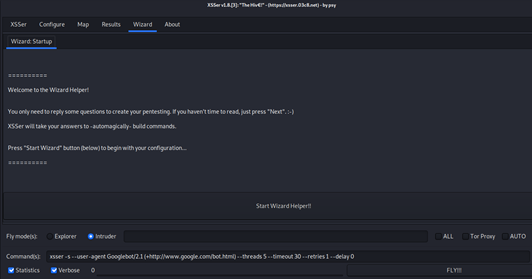
If you are a beginner, go through the wizard. If you are a pro, I will recommend configuring XSSer to your own needs through the configure tab.
Run in Terminal:
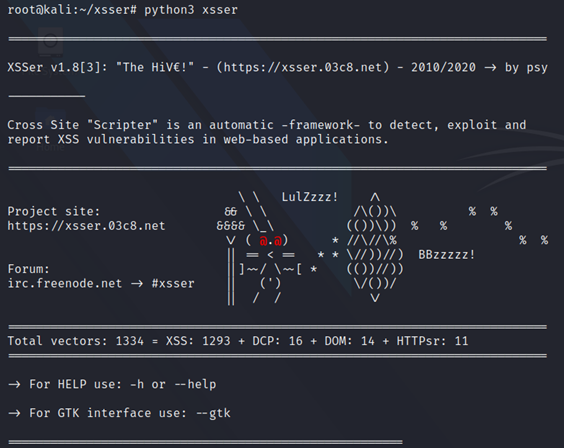
Here is a site that challenges you to exploit XSS. We will find a few vulnerabilities by using xsser. We give the target URL to xsser, and it will start checking for vulnerabilities.
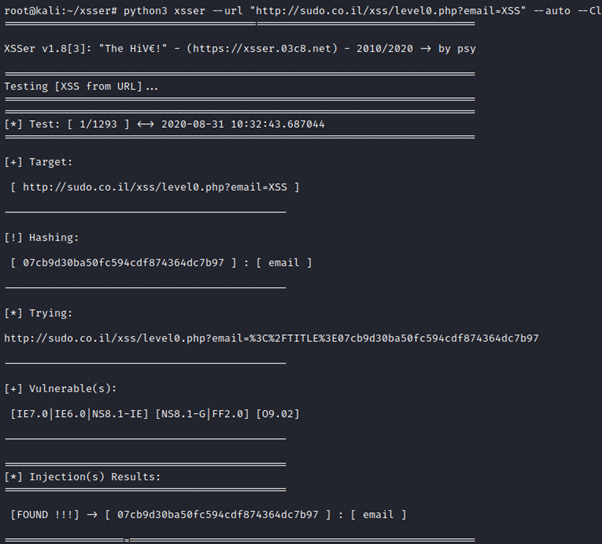
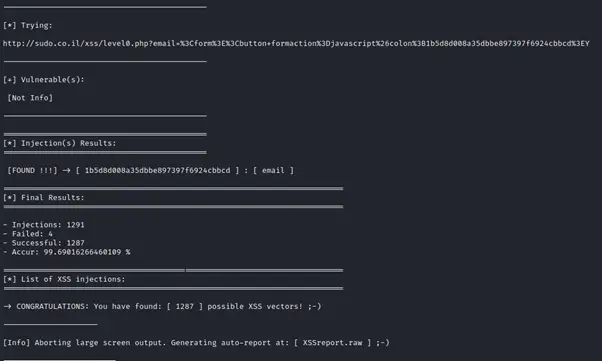
Once it is done, results are saved in a file. Here is an XSSreport.raw. You can always come back to see which of the payloads worked. Since this was a beginner level challenge, most of the vulnerabilities are FOUND here.
XSSniper:
Cross-Site Sniper, also known as XSSniper, is another xss discovery tool with mass scanning functionalities. It scans the target for GET parameters and then injects an XSS payload into them.
Its ability to crawl the target URL for relative links is deemed as another useful feature. Every link found is added to the scan queue and processed, so it is easier to test an entire website.
In the end, this method is not foolproof, but it’s a good heuristic to mass find injection points and test escape strategies. Also, since there is no browser emulation, you have to manually test the discovered injections against various browser’s xss protections.
To install XSSniper:

XSStrike:
This cross-site scripting detection tool is equipped with:
- 4 hand-written parsers
- an intelligent payload generator
- a powerful fuzzing engine
- an incredibly fast crawler
It deals with both reflected and DOM XSS Scanning.
Installation:

$ ls


Usage:
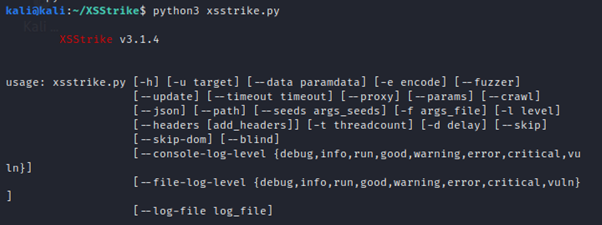
Optional arguments:
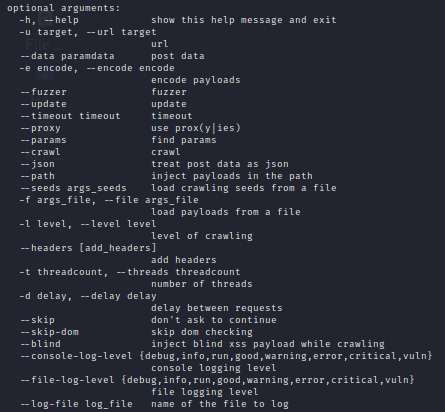
Single URL scan:
Crawling example:
XSS Hunter:
It is a recently launched framework in this field of XSS vulnerabilities, with the perks of easy management, organization & monitorization. It generally works by keeping specific logs through HTML files of web pages. To find any type of cross-site scripting vulnerabilities, including the blind XSS (which is, generally, often missed) as an advantage over common XSS tools.
Installation:
$ git clone https://github.com/mandatoryprogrammer/xsshunter.git
Configuration:
– run the configuration script as:
– now start the API as
$ cd xsshunter/api/
$ virtualenv env
$ . env/bin/activate
$ pip install -r requirements.txt
$ ./apiserver.py
To use GUI server, you need to follow and execute these commands:
$ virtualenv env
$ .env/bin/activate
$ pip install -r requirements.txt
$ ./guiserver.py
W3af:
Another open-source vulnerability testing tool which mainly uses JS to test specific webpages for vulnerabilities. The major requirement is configuring the tool according to your demand. Once done, it will efficiently do its work and identify XSS vulnerabilities. It is a plugin-based toolwhich is mainly divided into three sections:
- Core (for basic functioning and providing libraries for plugins)
- UI
- Plugins
Installation:
To install w3af onto your Linux system, just follow-through the steps below:
Clone the GitHub repo.
Install the version you want to use.
>If you like to use the GUI version:
If you prefer to use the console version:
Both of them will require installing dependencies if not already installed.
A script is created at /tmp/script.sh, which will install all the dependencies for you.
The GUI version of w3af is given as follows:
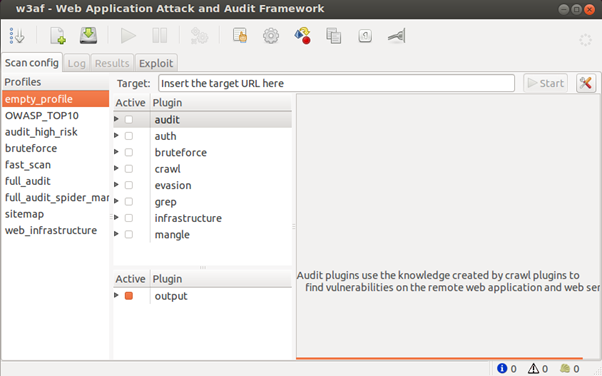
Meanwhile, the console version is the traditional terminal (CLI)-look tool.
Usage
1. Configure target
In target, menu run command set target TARGET_URL.

2. Config audit profile
W3af comes with some profile that already has properly configured plugins to run an audit. To use profile, run command, use PROFILE_NAME.
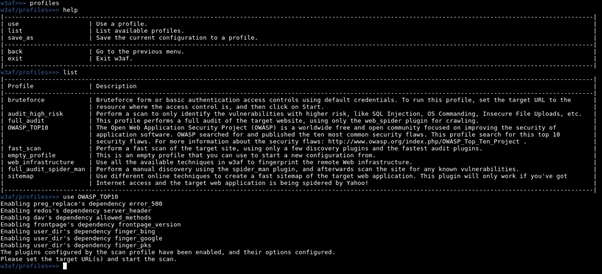
3. Config plugin
4. Config HTTP
5. Run audit
For more information, go to http://w3af.org/:
Cessation:
These tools are just a drop in the ocean as the internet is full of amazing tools. Tools like Burp and webscarab can also be used to detect XSS. Also, hats-off to the wonderful open-source community, which comes up with exciting solutions for every new and unique problem.
from Linux Hint https://ift.tt/31vbcLt


0 Comments