Features of Constructor
- The name of the constructor must be the same as the class name.
- The return type is void.
- The constructor cannot be static, abstract, and final.
Types of Constructor
- Default
- Parameter-less
- Parameterized
1. Default Constructor
The default constructor is created by the Java compiler when the coder does not declare any constructor for the class and this constructor does not contain any argument. The Java file does not contain any code for the default constructor. The default constructor code is created at the time of compilation of Java code and is stored in the .class file.
2. Parameter-less Constructor
When a constructor is declared without any parameter or argument, then it is called a parameter-less constructor. A parameter-less constructor works like a default constructor and this constructor can contain statements, or it can be empty.
3. Parameterized Constructor
When any constructor is declared with one or more parameters, then it is called a parameterized constructor. The parameter values of the constructor are passed at the time of object creation.
Example 1: Creating a Parameter-Less Constructor
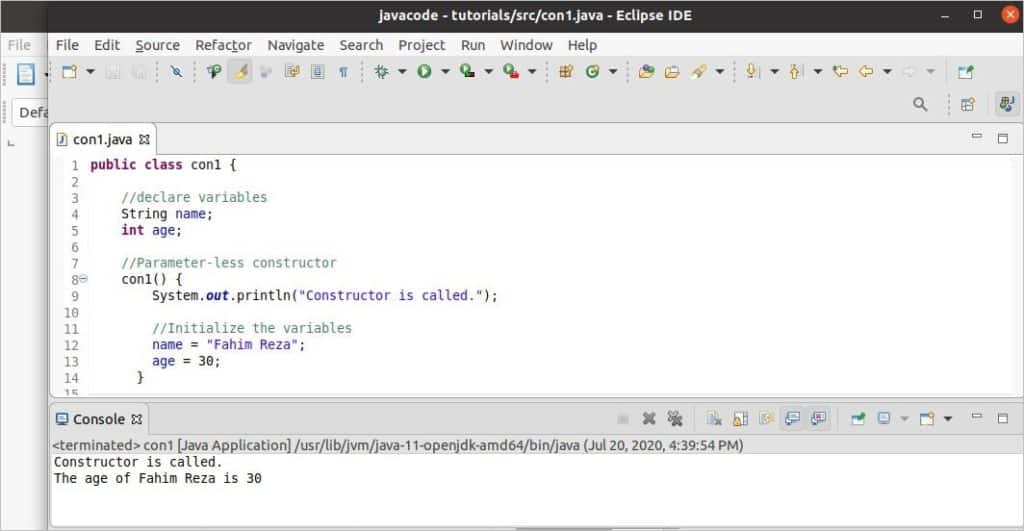
The following code shows how to use a parameter-less constructor. It was mentioned before that the constructor method name will be the same as the class name. Here, the class name is ‘con1,’ so the parameter-less constructor name is ‘con1().’ Two class variables, ‘name’ and ‘age,’ are declared here. At the time of declaring the object variable ‘obj,’ the constructor will be called and a particular message will be printed. After that, two values are assigned in the class variables and are printed later using the ‘obj’ object.
//declare variables
String name;
int age;
//Parameter-less constructor
con1() {
System.out.println("Constructor is called.");
//Initialize the variables
name = "Fahim Reza";
age = 30;
}
//main() method
public static void main(String[] args) {
//Create an object
con1 obj = new con1();
//Print the values of the object properties
System.out.print("The age of " + obj.name + " is " + obj.age);
}
}
Output:
The following image shows the output of the code. The constructor is called at the time of object creation and the message “Constructor is called” is printed. The values of ‘name’ and ‘age’ are assigned inside of the constructor. The values of these variables are printed later.
Example 2: Create a Parameterized Constructor
The following code will calculate the total salary of an employee based on the basic salary and print the other information of that employee alongside the calculated salary. Here, seven class variables are declared. The constructor, named ‘con2(),’ has three parameters. The first two parameters will take the string values in the ‘name’ and ‘post’ parameters, and the third parameter will take the numeric value in the ‘basic’ parameter. The values of these parameters will be passed at the time of object creation. The constructor will initialize the class variables with these values and calculate the other values based on the value of the ‘basic’ parameter. Next, the name, post, and salary of the employee will be printed.
//Declare variables
String name;
String post;
int Basic;
double HouseRent;
double Medical;
double Transport;
double Salary;
//Parameterized constructor
con2(String name, String post, int basic) {
this.name = name;
this.post = post;
this.Basic = basic;
this.HouseRent = basic*0.3;
this.Medical = basic*0.2;
this.Transport = basic*0.1;
Salary = basic + HouseRent + Medical + Transport;
}
//main() method
public static void main(String[] args) {
//Create an object
con2 obj = new con2("Mir Sabbir","Accountant",65000);
//Print the values of the object properties
System.out.print("Employee Name: " + obj.name + "\n" + "Post: "+ obj.post +
"\n" + "Salary: TK "+ obj.Salary);
}
}
Output:
The following image shows the output of the code. Here, the employee’s name, post, and basic salary are given in the statement of object creation. The total salary, name, and post are printed here.
Example 3: Create Constructor Chaining
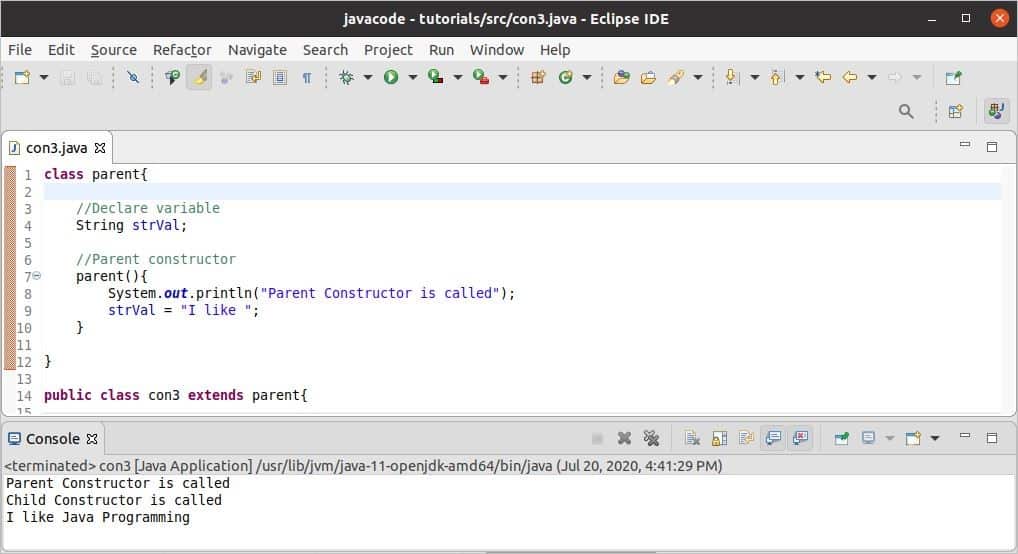
It is important to know about the inheritance feature of object-oriented programming to understand the concept of constructor chaining. When a new class is created by inheriting another class, it is called inheritance. In this case, all properties of the parent or base class are accessible from the child or derived class. When an object of the child class is created, it automatically calls the constructor of the parent class before calling its own constructor. The ‘super()’ method is used in other languages to call the parent constructor, but the Java compiler calls this method automatically. Using constructors in this way is called constructor chaining, and this process is shown in this example. Here, the parent class name is ‘parent’ and the child class name is ‘con3.’ There is another method named ‘combine()’ in the child class that combines the values assigned in the parent and child constructors.
//Declare variable
String strVal;
//Parent constructor
parent(){
System.out.println("Parent Constructor is called");
strVal = "I like ";
}
}
public class con3 extends parent{
//Declare variable
String childStrVal;
//Child Constructor
con3(){
System.out.println("Child Constructor is called");
childStrVal = strVal + "Java Programming";
}
//Another method to combine strings
String combine()
{
return this.childStrVal;
}
//main() method
public static void main(String[] args) {
//Create an object
con3 obj = new con3();
//Print the values of the object properties
System.out.print(obj.combine());
}
}
Output:
The following image shows the output of the code. The first message is printed from the parent constructor, while the second message is printed from the child constructor. The last message is printed by calling the ‘combine()’ method.
Conclusion
The concept of the constructor and the uses of different constructors are explained in this tutorial by using easy Java code examples for that novice users can follow. Hopefully, these examples have helped you to understand the basics of Java constructor.
from Linux Hint https://ift.tt/31bV4xJ


0 Comments