


One of these is the ability to securely wipe the data off your USBs and SD Cards. This comes handy when a user is in need of freeing up space on their external device or wanting to wipe some sensitive data that cannot be recovered by any means. With privacy issues becoming so common these days, it has become even more important to have information regarding steps to protect your data. Therefore, today we’ll be looking at different ways on how one can wipe their data from external storage devices securely on Ubuntu.
Wiping Data using the Disk Manager
One of the most straightforward and easiest ways for wiping data on Ubuntu is by using the built-in Disk Manager. Since this is preinstalled in almost all the Ubuntu releases, there is no need of having to use any installation methods to install it which further makes our work easier. Let us now look at how one can wipe their data using the Disk Manager
Step 1:
First of all, plugin your USB drive or SD Card into your PC and let it completely connect to your system. Open your Files folder and you will see a new icon on the left sidebar of the folder.

Step 2:
Next open your Ubuntu Dash and search for Disks. After seeing the Disks icon, click on it and launch it.

Step 3:
After launching the Disks utility, select the external device that you want to wipe.

Step 4:
Now click on the Settings icon which is present under the Volumes section next to the minus sign. You will see a number of options available under the step-down menu. Click on the Format Partition option. This can also be accessed by entering the following keyboard shortcut: Shift+Ctrl+F.

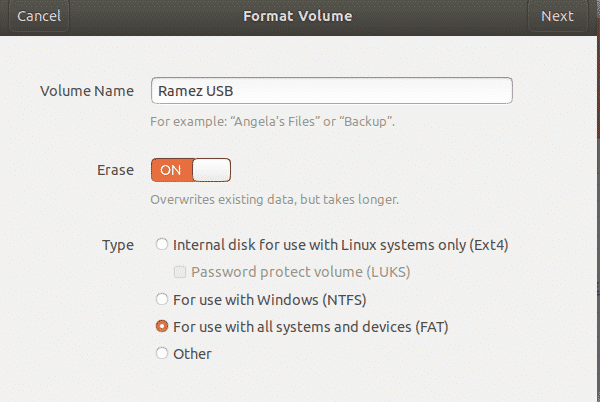
Step 5:
You will be prompted with a Format Window pop-up which will ask you to set up the Volume Name and Type of File System that you want your USB or SD Card to use after being formatted. For the type, it is usually better to go with the default option.
Also, it is important that you click on the Erase button. Once it says ON, click on Next found on the top right corner.
Step 6:
Finally, a Confirm Details window will pop-up which will confirm whether you want to format your external device or not. Click on the Format Button on the top right to go ahead with the formatting process.

Depending on the size of your external device, this will process will take time. Once it is completed, eject your device and connect it again. You will see that your device has been completely formatted.
Wiping Data using Command Line
Ubuntu has one of the most powerful command line tools out there. For many Users, Linux is all about using the terminal and learning its many commands. The Command Line itself has several tools that allows users to wipe their data from their USBs. Thus, let us now also look at one of these Command Line methods of wiping data from your external devices.
Step 1:
Firstly, open the terminal through either Ubuntu Dash or Ctrl+Alt+T shortcut. Now check if your Ubuntu version already has parted installed, which is a preinstalled tool for manipulating partitions. This can be done by running the following command:

In case your Ubuntu system does not has parted installed, you can install it by running the following commands:
$ sudo apt install parted
It is to be noted the above command is only for Debian based systems like Ubuntu. For CentOS and Fedora users, parted can be installed by entering the following command in the terminal:
Step 2:
Next plugin your USB drive or SD Card into your PC and let it completely connect to your system. Enter the following command into the terminal to get the name of your device:
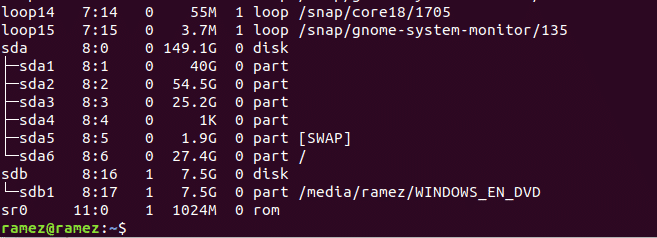
Over here, all the external devices connected will be shown. Closely examine each one and carefully choose the device that you want to wipe. In my case, the device is /dev/sdb.
Step 3:
Next unmount the device by entering the following command into the terminal:
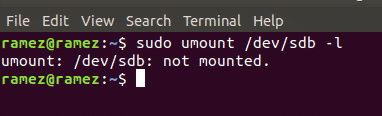
Here you have to insert your own device name in place of /dev/sdb.
Step 4:
Now we can finally wipe the data off our external devices. This can be done by executing the following command:
What this does is that it completely overwrites all your data with zeros. Depending on the size of the device, it will take some time to complete.
Step 5:
Once this is done, now we have to use the parted program to create a partition. First of all, eject your USB device or SD card and reinsert it. Then enter the following command into the terminal to create a partition:
Here you have to insert your own device name in place of /dev/sdb.
Step 6:
Then you need to create an empty primary partition which will hold the Fat file system of our external device later. This can be done by running the following command:
Here you have to insert your own device name in place of /dev/sdb. This newly created partition will have the id /dev/sdb1.
Step 7:
Finally enter the following command to create a Fat file system partition on the /dev/sdb1 partition we created in Step 6:
Here we are creating a fat filesystem on the /dev/sdb1 partition.
Voila, our USB and SD Card has now been completely wiped clean.
Conclusion
Ubuntu offers users a very straightforward way of wiping data from external devices. It offers a GUI method through the Disk Manager and a Command Line method using the parted and dd commands. Both methods are relatively easy to use and efficiently clean your USB and SD Cards.
from Linux Hint https://ift.tt/3ar3ZOe


0 Comments