Why establish a remote connection to Linux from Windows?
Suppose you are running a business, and you have a meeting with board members in about 10 minutes. All of a sudden, you remember that your presentation file is on your home system; remote access can potentially save the day.
Or you are running a windows system in one location and your Linux system in another room, and you want to run some commands on your Linux or retrieve some files from your Linux, and your Linux is inaccessible, or you are just too lazy. Either way, in all cases, remote access provides great convenience and saves much time.
Linux Ubuntu:
Now out of all the popular Linux distros, Ubuntu is by far the most popular one. All of the other Linux distros combined make up a total of a mere 35% of Ubuntu (google search trends). Upon searching Linux, 161 million results appear, while the next most popular Linux distros i.e., the Debian Linux, has a mere 65.9 million search results, so keeping in mind the above stats, I will be using Ubuntu for this tutorial. To establish the connection, you would need to access the Ubuntu machine physically. But don’t worry, this is a one-time thing.
There are many methods through which you can remotely access your Linux from windows. Here I will be sharing three ways through which you can access remotely control Linux Systems from Windows.
- SSH
- RDP connection
- VNC connection
Find the IP address:
Regardless of what method you use, finding the IP address of your system is required almost in every case. Following is an easy way to find the IP of your Linux system.
Go to the terminal in your Linux machine and type the following command:
Now enter the following command:
After writing the above command, your terminal window will look like this
You will find your IP address next to “inet” in the first section. In this case, as you can see from the above screenshot, the IP address is “10.0.2.15”
If the method mentioned above doesn’t work for you, you can try the following ways:
In the terminal, write the following command. Remember, this works for some of the Linux versions like Ubuntu.
Method 1:Remote Access using SSH (Secure Shell)
For this method, you should install the PuTTY software, as it’s better than using windows default SSH function. PuTTY establishes an SSH connection between your Linux and your Windows desktop, which gives you access to the Linux terminal.
After Installing the PuTTY software write the name of your Linux system, or it’s IP address under the “Host Name (or IP address)” label. Make sure to set the connection to SSH if it isn’t. Now click open. And voila, you now have access to the Linux command line.
Note: This will give only you access to the terminal, i.e., there will be no mouse control. Still, this is useful to install software using Terminal commands
Method 2:Using RDP (Remote Desktop Protocol)
RDP is the easiest method so far. The RDP tool is already installed in the windows. So the windows system doesn’t require any work (software-wise). However, this is not the case for your Linux system. On your Linux system, you will need to install XRDP tool. For this open the terminal (Ctrl+ Alt+ T) and type the following command
Press “y” and hit enter. It will then continue to install.
Followed by
The first command will install the XRDP tool. The second command will allow the auto-enable on startup option. In other words, the xrdp tool will automatically start when the Linux boots. After this process completes. Go to your windows system and in search bar type “RDP.” Click on the “Remote Desktop App.”
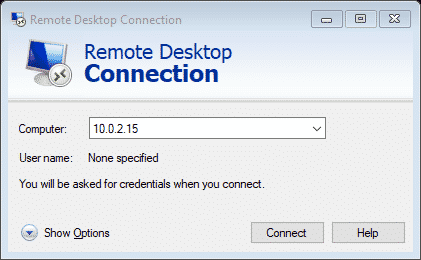
Type the IP address of your Linux system adjacent to the “Computer ” label, and click connect
Enter the Username and the Password of your Linux system.
TroubleShooting: Although connecting through RDP is the easiest method for remote connecting, some problems occur during connecting with Ubuntu. This started happening after the Ubuntu 18.4 LTS release. Linux doesn’t like it when it is accessed remotely when the user is logged in. So a simple solution is to try RDP after logging out of your Linux
Method 3:Setting up a connection using Virtual Network Connection (VNC)
You can also connect using VNC. As mention above, SSH provides access to the terminal (no mouse control). VNC provides access to the Linux desktop (full mouse control). However, there is some prerequisite for connecting using this method, i.e., you have to install some VNC software.
Go to your Linux system and type the following command to make sure it’s up to date
Now input the following command
now run it
Now create a password for your connection. You will be given a desktop number, mostly 1. Remember this number.
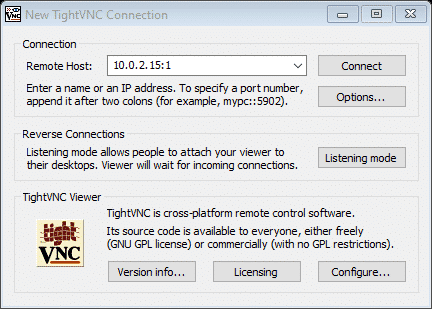
After this, install the VNC client on windows. These TightVNC tools are installed in bundles, so once installed, go to the windows search bar and search “TightVNC Viewer. “ Launch the app and enter the IP address of the Linux device.
Now enter the IP of your Linux system followed by the desktop number, as shown in the above screenshot.
Conclusion:
Now that you know these methods, you should know which way is best for your use.
- RDP uses xrdp which is open source
- SSH can be used to remote access the terminal
- VNC can be used instead of RDP, but it’s a little less secure
It is recommended to set up SSH regardless of what method you use as it makes the installation for the other two methods much more easier.
Ubuntu has a built-in remote desktop tool, which is VNC-compatible.
from Linux Hint https://ift.tt/2H30bXr


0 Comments