Time plays an important role in Linux servers specially when they are used in banking, stock markets and other financial sectors. If we want all our Linux servers should have the correct time, then we must configure some NTP client which will fetch correct time always from remote NTP Servers and if needed makes the required adjustments for syncing the time.
In this article we will demonstrate how we can sync time with NTP servers in Linux Server using Chrony (NTP Client).
Install Chrony on CentOS / RHEL / Fedora System
To Install Chrony on CentOS, RHEL and Fedora System, execute the following yum or dnf commad
~]# yum install chrony -y
Or
~]# dnf install chrony -y
Install Chrony on Debian / Ubuntu System
To install Chrony on Debian and Ubuntu Systems, run the following apt command,
~]$ sudo apt install chrony -y
Once the chrony is installed on Linux server then it offers two programs,
- chronyc : It is command line interface of chrony
- chronyd : It is daemon for chrony which start and enable chrony service across the reboot.
Configuration File of Chrony
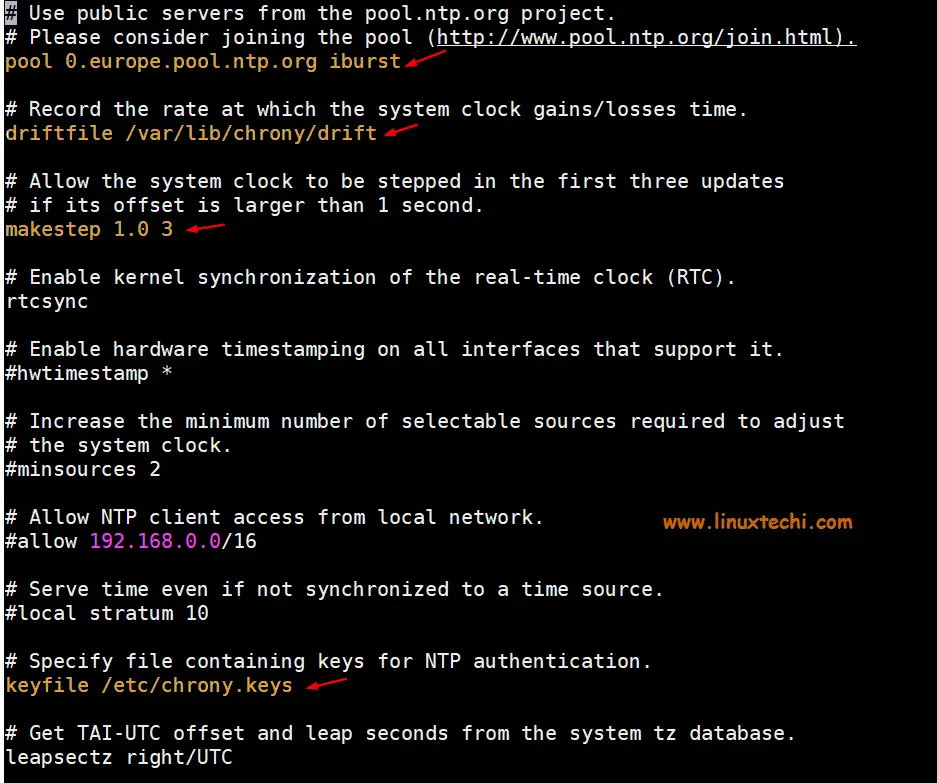
Configuration file for Chrony is “/etc/chrony.conf” , sample chrony.conf file is listed below,
~]# cat /etc/chrony.conf
Where:
- pool 0.europe.pool.ntp.org iburst is the remote NTP server from where chrony will fetch the time.
- driftfile /var/lib/chrony/drift is the drift file which contains drift data
- makestep 1.0 3 is the parameter which will step system clock (speedup or slow down) if adjustment is larger than 1 second but only for first 3 clock updates
- keyfile /etc/chrony.keys as the name suggest this file contains keys for NTP authentication.
- logdir /var/log/chrony , it is the log file which logs of Chrony.
Testing Chrony
Just like ntpdate command in NTP distribution, we can use chronyd to sync time of our Linux server with remote NTP server manually,
Syntax: # chronyd -q ‘server {ntp_server_name} iburst’
Example:
~]# chronyd -q 'server 0.europe.pool.ntp.org iburst'
As we can see in above output, chrony has corrected the system time, before running the chronyd command system time was almost 2 hours behind from accurate time.
Start and Enabled Chronyd Service
Run the following commands to start and enable chronyd daemon so that it will be available across the reboots.
~]# systemctl start chronyd
~]# systemctl enable chronyd
Run the beneath command to verify the chronys service status
~]# systemctl enable chronyd
Verify and Track Chrony Synchronization
To verify whether your system’s time is synchronized using chrony, issue the following command,
[root@ceph-admin ~]# chronyc tracking
Reference ID    : 904C13DD (its.no-fun.de)
Stratum         : 3
Ref time (UTC)  : Sun Jan 12 06:23:26 2020
System time     : 0.000174314 seconds slow of NTP time
Last offset     : -0.000199483 seconds
RMS offset      : 0.000199483 seconds
Frequency       : 0.301 ppm fast
Residual freq   : -40.403 ppm
Skew            : 0.541 ppm
Root delay      : 0.172664896 seconds
Root dispersion : 0.047364954 seconds
Update interval : 64.8 seconds
Leap status     : Normal
[root@ceph-admin ~]#
Where:
- Reference ID is the ID and name of server to which your system’s time currently synced.
- Stratum , it indicates the number of hops away from the server with an attached reference clock we are.
Check Chrony Sources
To list information about the current time sources that the chronyd is using, run the following command,
~]# chronyc sources
To list more detailed information about sources then run the following command
~]# chronyc sources -v
Check Chrony Source Statistics
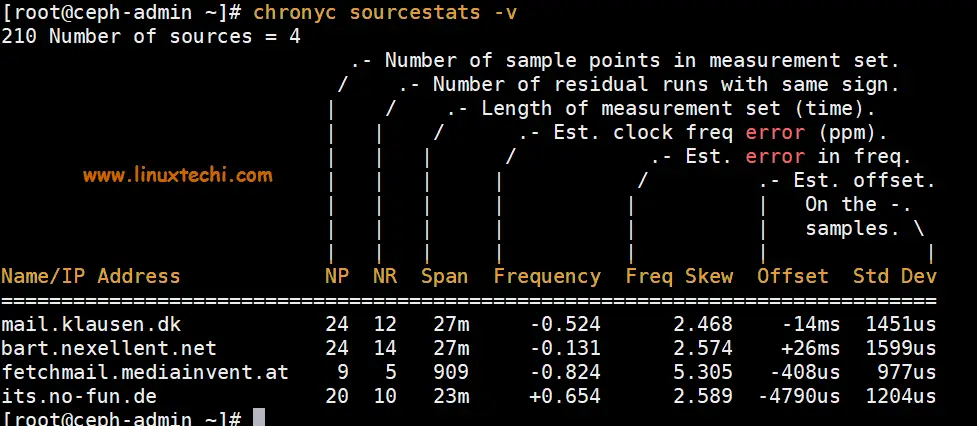
To list the information about drift speed and offset estimation of each source that the chronyd is using, run the following command
~]# chronyc sourcestats -v
Configure Chrony NTP Server
Let’s assume you want to configure your Linux Server as a Chrony NTP server for all internal systems. To accomplish this, we need to uncomment two lines from configuration file “/etc/chrony.conf”
- local stratum 10
- allow 192.168.0.0/16
Execute the following commands
~]# sed -i "s/#local stratum 10/local stratum 10/g" /etc/chrony.conf
~]# sed -i "s/#allow 192.168.0.0\/16/allow 192.168.0.0\/16/" /etc/chrony.conf
When we uncomment the line “local stratum 10″ then makes our Linux Server as chrony NTP server and continue to work normally even if it is disconnected from network. Whereas “allow 192.168.0.0/26” indicates that clients from this network is allowed to make connection to our Chrony NTP server for time syncing.
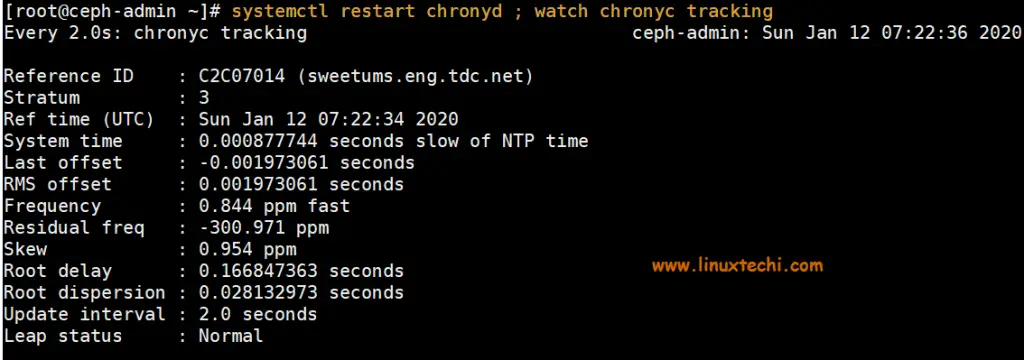
After making changes restart chrony service and track chrony
~]# systemctl restart chronyd ; watch chronyc tracking
Allow NTP Service in firewall using following command,
~]# firewall-cmd --add-service=ntp –permanent
~]# firewall-cmd --reload
That’s all from this article, I hope you get an idea how we can sync our linux system’s time with NTP server using chrony service and apart from this we have also learned how we can configure our own Chrony NTP server. Please do share your valuable feedback and comments.
from Linuxtechi https://ift.tt/2Ntzwq4


0 Comments