What is Video Cropping?
Cropping a video is often confused with trimming or cutting a video. A video cutter reduces the play time of video by cutting it at various timestamps. For example, a ten second video can be cut to six seconds by cutting it at two seconds and eight seconds.
On the other hand, cropping refers to reducing the visible area of a video by removing fixed sized chunks from all four or some sides of the video rectangle. It works very similar to cropping of an image or screenshot. Note that it is not possible to crop video in place, all apps mentioned below will re-encode the video so make sure to use your desired format and specifications. Explaining every encoding feature of these apps is out of scope of this article.
Let’s get started with our list.
HandBrake
HandBrake is a free and open source cross-platform tool for converting videos into various formats. It can be used to crop videos in Linux.
To install handbrake in Ubuntu, run command:
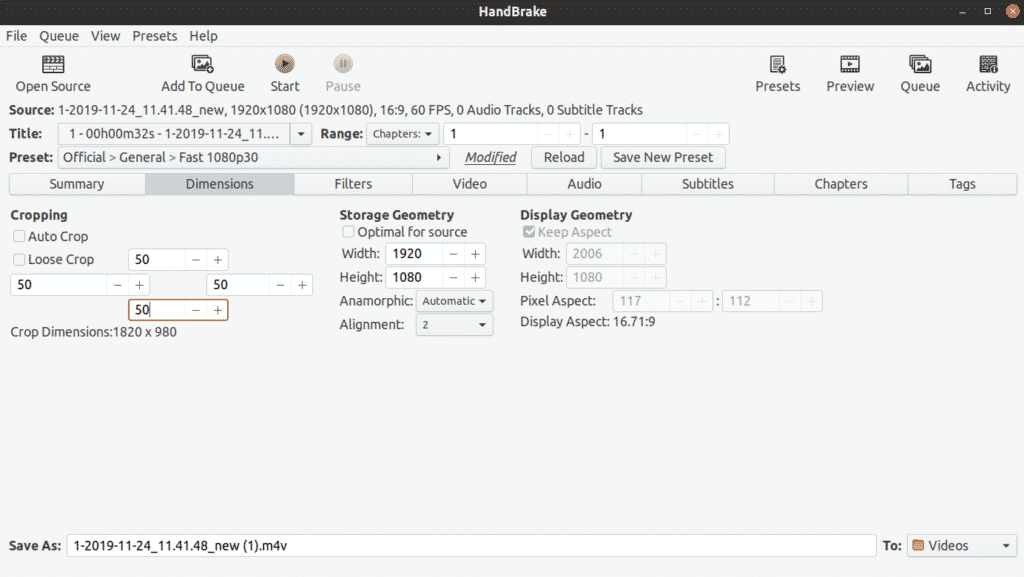
To start cropping a video, open a new video file in Handbrake, then go to “Dimensions” tab. On the left side, you will see “Cropping” option with input boxes to enter dimensions for all four sides of the video. For unconstrained cropping, you may have to uncheck “Auto Crop”, “Optimal for source” and “Keep Aspect” options. Enter your desired values in these four input boxes.
You can preview how your custom crop looks by going to “Summary” tab. When you are satisfied with the results, click on “Start” button at the top to start re-encoding the video.
FFmpeg
FFmpeg is a command line utility to convert video and audio files. It comes with many filters to customize and re-encode video in various formats.
To install FFmpeg in Ubuntu, run the command below:
To crop a video using FFmpeg, you have to use the built-in crop filter. The command to crop a video looks like this:
Where:
- “in.mp4” refers to the input file to be converted
- “out.mp4” is the name of the output file to be saved after conversion
- out_w is the width of your desired output rectangle to which the original video’s width will be reduced
- out_h is the height of your output rectangle to which the original video’s height will be reduced
- x and y are the position coordinates for the top left corner of your desired output rectangle
If you want to crop a 1280×720 rectangle from a 1920×1080 resolution video with a starting rectangle position of 10, 10; your command would be:
VLC
VLC is a free and open source cross-platform multimedia player that allows you to play, stream and convert audio and video files.
VLC can be installed in Ubuntu by running the following command:
To crop a video in VLC, first go to “Tools” and then click on “Preferences”, as shown in the screenshot below:
Select “All” under “Show settings”:
In the search bar, type “croppadd”, then click on “Croppadd” as shown in the screenshot below. On the right side you will see input boxes to enter dimensions. Click on “Save” when you are done entering values.
We have only customized the crop filter so far, now to actually crop a video, click on “Convert / Save…” option in the “Media” dropdown menu:
On the next screen, click on “Add…” button to add the video you want to be cropped.
Then click on the dropdown arrow next to “Convert / Save” button, followed by a Click on “Convert” button:
Click on the wrench icon to edit the selected profile:
On the next window, click on “Video codec” tab followed by a click on “Filters” tab. Select “Video cropping filter” checkbox and then click on “Save”:
Select a destination file for the cropped video, then click on “Start”:
Wait for VLC to re-encode the video. You have now successfully cropped the video using VLC.
Avidemux
Avidemux is a free and open source video editor that can be used for simple cutting, filtering and encoding. Linux packages for Avidemux can be downloaded from here.
To start cropping a video, first press <CTRL+O> to open a new file. To crop a video, you will have to use one of the filters available in Avidemux. Note that filter option is sometimes greyed out and unselectable. To fix it, you have to change “Video Output” from “Copy” to any other format as shown in the screenshot below:
Once you followed the above steps, click on “Video” and then click on “Filters”.
Double click on the “Crop” filter on the next window.
On the next screen enter the dimensions to be cut on all four sides of the video. Avidemux will show a preview of cropped video where any green coloured region will be excluded from the final video. Click on “OK” when you are done.
 To save changes and re-encode the video, press <CTRL+S>.
WinFF
WinFF is a graphical user interface for FFmpeg command line app. It can convert almost any video file that FFmpeg supports and it can use most of the FFmpeg filters as well.
To start cropping a video in WinFF, click on the “Options” button to enable the “Crop” filter at the bottom. Add a video by clicking on the “Add” button.
Input the dimensions of area you want to clipped away from four sides of the video, then click on “Convert” button. Your video re-encoding will start and you will see some output in a terminal. Wait for the terminal to deliver a success message.
To conclude, these are the easiest and most convenient ways to quickly crop videos in Linux. Most of the utilities mentioned above are available by default in the repositories of all the major Linux distributions for a pain free installation.
from Linux Hint https://ift.tt/2RtDgL7


0 Comments