Selenium Installation
Before using SELENIUM module in python, we have to install it. Run the following command in the terminal to install it.
OR
This will install SELENIUM module and now it is ready to use.
Web Drivers
Before automating web browser using SELENIUM module, web driver of chosen browser is required. In order to automate Chrome Browser we must have Chrome web driver. The path, where web driver file is placed, is passed as argument. Web driver interacts with the web browser through a protocol. Go to the following link to download Web drivers of different browsers.
https://www.seleniumhq.org/download/
Getting Started
After installing the required modules, you can open python CLI and start playing with your browser. So let’s import webdriver and other modules first, these modules and classes will let your Python program to send keystrokes and other info to your browser.
Python 3.6.4 (v3.6.4:d48eceb, Dec 19 2017, 06:54:40) [MSC v.1900 64 bit (AMD64)] on win32
Type "help", "copyright", "credits" or "license" for more information.
>>> from selenium import webdriver
>>> from selenium.webdriver.common.keys import Keys
//path to your chrome drivers
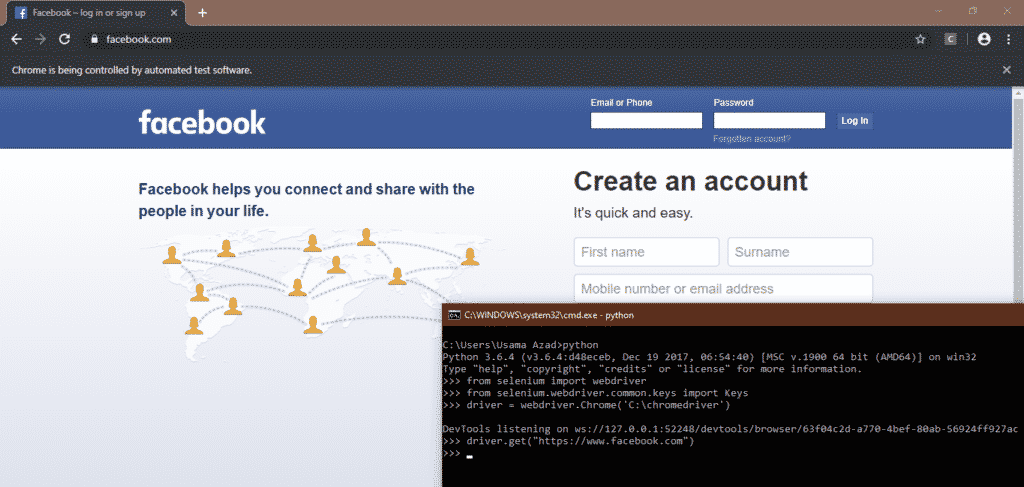
>>> driver = webdriver.Chrome('C:\chromedriver')
This will open up a new Chrome browser window for you. Now you can get selenium to go to any website using .get() method. This method opens the website and will wait for it to load, then you can enter your next command.
How to Find Elements in a Web Page
We can find specific element on a web page by following method.
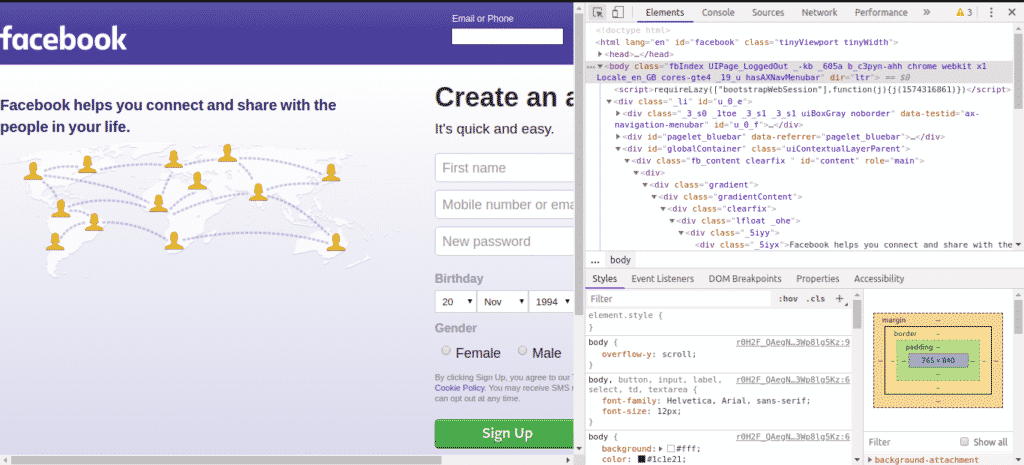
- First of all, press the F12 A source page opens in the right side of the window as displayed below

- Now press ‘Ctrl+Shift+C’ or click on symbol present on the top left corner of the source page.
- Move the arrow on ‘Email or Phone’ field and click. This element will by selected and source code of this element is highlighted on source page as displayed below.
 It can be seen that, we have the following attributes for selected element
- name= “email”
- class= “inputtext login_form_input_box”
- id= “email”
We can locate ‘Email or Phone’ element by using any one of the above attributes.
- If we do not have any one of the above mentioned attributes then we can also select element using ‘XPath’. To copy XPath, right click on highlighted source code on source page. Then go to ‘Copy > Copy XPath’.
Locating Elements using Selenium
In order to locate elements on a web page we use ‘find_element’ method. Following are the ‘find_element’ methods available in SELENIUM.
- find_element_by_class_name(name)
- find_element_by_tag_name(name)
- find_element_by_link_text(text)
- find_element_by_css_selector(selector)
- find_element_by_name(name)
- find_element_by_id(id)
- find_element_by_xpath(XPath)
By using the above methods, we can locate an element on a web page and use it in our automation code.
Clicking on different web page Elements
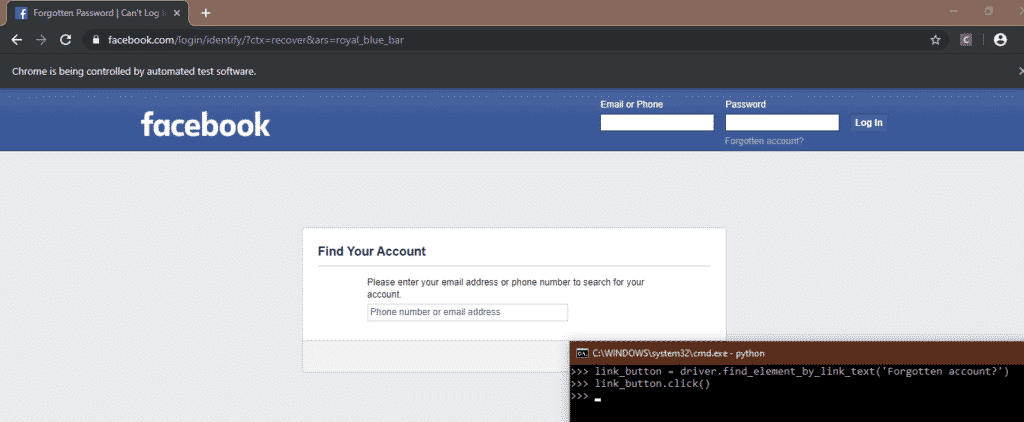
click() method in selenium can be used to click on different links and button elements that you found using the above methods. For example, you want to click on “Forgotten account?” on the Facebook page
>>> link_button.click()
Send Special Keys
Selenium also has a module that lets you send special keys (e.g, Enter, Escape, Page down, page up etc) while browsing the web. You need to import this module using the following command
For example, you’re reading an article on Wikipedia about the history of the United States, but you’re too lazy to press the DOWN Arrow key after a while. You can automate by sending this key to browser using Selenium
from selenium.webdriver.common.keys import Keys
import time
driver = webdriver.Chrome('C:\chromedriver')
//Open the article link using get method
driver.get("https://ift.tt/14LMXaN")
//Begin from the start of the page
elem = driver.find_element_by_tag_name('html')
While True:
time.sleep(5)
elem.send_keys(Keys.DOWN)
How to Automate Browser
In this section we will see how to automate our web browser with the help of some use cases.
Log into Social Media Websites Automatically
With web automation, you can easily make your logging in process automatic. If you check your social media websites at specific time (say 8 pm) regularly then it is good to automate this process. Following is the code to automate logging in process of two social media sites ‘facebook’ and ‘twitter’ using SELENIUM module in Python.
from selenium import webdriver
\\ importing special Keys from selenium
from selenium.webdriver.common.keys import Keys
\\ creating ‘driver’ object for ‘Google-Chrome’
driver = webdriver.Chrome('path to Chrome driver')
\\ maximizing the window
driver.maximize_window()
\\ opening facebook
driver.get('<a href="https://ift.tt/35zA8kP')
\\ locating ‘Email or Phone’ element using ‘id’ attribute
userName = driver.find_element_by_id('email')
\\ Entering username or the email for facebook
userName.send_keys('Enter User Name/Email')
\\ locating ‘Password’ element using ‘id’ attribute
passWord = driver.find_element_by_id('pass')
\\ entering password for facebook
passWord.send_keys("Enter Password")
\\ locating ‘login button’ element using the ‘id’ attribute and pressing ‘Enter’
driver.find_element_by_id('u_0_b').send_keys(Keys.ENTER)
\\ opening new tab for twitter
driver.execute_script("window.open('http://www.twitter.com', 'tab2');")
\\ switching to new tab
driver.switch_to_window('tab2')
\\locating ‘log in’ element and clicking on it
driver.find_element_by_xpath('//*[@id="doc"]/div/div[1]/div[1]/div[2]/div[1]').click()
\\ locating ‘Phone, email or username’ element
userName = driver.find_element_by_xpath('//*[@id="page-container"]/div/div[1]/form/
fieldset/div[1]/input')
\\ entering username for twitter
userName.send_keys('Enter User Name')
\\ locating ‘Password’ element
passWord = driver.find_element_by_xpath('//*[@id="page-container"]/div/div[1]/form/
fieldset/div[2]/input')
\\ entering password for twitter
passWord.send_keys('Enter Password')
\\ locating 'log in’ button and clicking on it
driver.find_element_by_xpath('//*[@id="page-container"]/div/div[1]/form/div[2]/button')
.click()
Above code automates the browser to log into social media websites. First of all we created an object of our favourite browser. In this use case, we have taken ‘Chrome’ as a browser. To create object we passed the path of our ‘chromedriver’ as an argument. Then we entered the url of facebook and logged into Facebook by selecting elements and passing username and password.
After this we opened a new tab and entered the url of twitter. After this we switched to the new tab as the control of the code was still on first tab although the second tab was open. Then we logged into twitter by selecting elements and passing username and password.
Online Shopping Automation
Another good example of browser automation could be the online shopping. For example, you want to buy a camera online but the prices are too high. You check everyday whether the price is in your range or not. This task can be automated using SELENIUM and you can avoid the checking of the price everyday. Following code will inform you through mail whether the price of your desired product is affordable or not. If your desired product is on sale, the program will notify you via an email.
from selenium import webdriver
\\ importing smtplib module for sending mail
import smtplib
\\ defining mail function to inform through email
def mail():
\\ establishing connection to the gmail server with domain name and port number.
This differs with each email provider
connection = smtplib.SMTP('smtp.gmail.com',587)
\\ say hello to the server
connection.ehlo()
\\ starting encrypted TLS connection
connection.starttls()
\\ log into gmail server with your main address and password
connection.login('sender mail address', 'password')
\\ sending mail to yourself informing you about the price of camera
connection.sendmail('sender mail address', 'receiver mail address',
'Subject: You can Buy the Camera')
\\ ending connection
connection.quit()
\\ mail function ends here
\\ launching google chrome by providing path of chromedriver as an argument
driver = webdriver.Chrome('path to chromedriver')
\\ minimizing the chrome window
driver.minimize_window()
\\ opening draz.pk site
driver.get('<a href="https://ift.tt/34pqSzw')
\\ locating element of search bar using id attribute to search for camera
searchBar = driver.find_element_by_id('q')
\\writing camera in search bar
searchBar.send_keys('camera')
\\locating search button element using xpath of element
search = driver.find_element_by_xpath('//*[@id="topActionHeader"]/div/div[2]/div/div[2]
/form/div/div[2]/button')
\\clicking on search button
search.click()
\\ locating element of your desired product using xpath attribute
product = driver.find_element_by_xpath('//*[@id="root"]/div/div[3]/div[1]/div/div[1]
/div[2]/div[1]/div/div/div[2]/div[2]/a')
\\ clicking on your desired product
product.click()
\\ locating element of price using xpath attribute
price = driver.find_element_by_xpath('//*[@id="module_product_price_1"]/div/div/span')
\\ extracting text from price element. This gives price of the product like ‘Rs. 24,500’
price = price.text
\\ converting price into string
Price = str(price)
\\ defining an empty array. This will be used in extracting digits form price like ‘24500’
form ‘Rs. 24,500’
num = []
\\ reading all the entries of price string one by one using for loop
for x in price:
\\ checking whether the entry is digit or not as we want only digits in price
if x.isdigit():
\\ adding only digits to num list
num.append(x)
\\ joining all the entries of num list. Now the price is a string containing only digits
price = ''.join(num)
\\ converting string of price into integer
price = int(price)
\\ checking whether the price is affordable or not
if price <= 25000:
\\ calling mail function to inform you about the price
mail()
\\ closing browser
driver.quit()
Above code opens daraz.pk site and searches for the camera and inform you through email if the price is affordable. First of all we imported SELENIUM and SMTPLIB modules. Then we defined ‘mail’ function which sends you mail informing you that the price is affordable, when called.
After this we opened chrome browser using chromedriver and searched for ‘daraz.pk’. Then we locate our desired product using elements and their attributes. How elements are found and located, has been described above. The price we got was a string so we converted this string into integer and then checked whether the price is affordable or not. If price is affordable then call the ‘mail’ function.
Creating Cron job
Above two automation scripts are required to run once a day at a specific time. We can manage this using cron job. Tasks, which are added to crontab can be run at a specific time repeatedly. To add above tasks in crontab, first of all run the following command in Linux Terminal.
Above command will open crontab file to edit. At the end of the file enter the following command.
We see entries before command from right to left.
- First asterisk, from right, means this command will run everyday of the week.
- Second asterisk means this command will run every month
- Third asterisk shows that this command will run every day of month
- Fourth entry is ‘8’, which means this script will run at 8th hour of the day
- Fifth entry which is ‘0’ means this command will run at 0th minute.
So this command will run at 8 O’clock everyday.
Conclusion
In this article, we discussed how you can use SELENIUM along with Python to automate your browser using different techniques. You can automate your daily routine work, fill out forms, download your things and a lot of stuff using it. We discussed only two examples here, but you can automated each and every thing a human can do manually with the browser.
from Linux Hint https://ift.tt/2OQWeIV


0 Comments